Creating an image slider in WordPress is the most-practiced way to display multiple images in a small place. Moreover, it grabs browsers’ attention with splendid sliding effects and design.
Are you looking for how to create an outstanding display of your particular bunch of images on your website? Do you like to make your website more appealing with a captivating slideshow? If your answer is yes, you are indeed in the right place.
Keep reading this blog. I’ll share every step of adding an image slider in WordPress. So, no more introductory words. Let’s jump into the main job.
However, the following outline of this blog helps you jump straight to exactly what you are looking for.
Table of contents
What is an image slider in WordPress
An image slider refers to a slideshow of images on a WordPress website. An image slider is an innovative and animated way to showcase multiple images in a single place. Apart from images, you can create a slider with videos, products, posts, and other content.
A slider is also known as a carousel. But, there is a little difference. The only difference between a slider and a carousel is the number of images or content displayed simultaneously. A slider shows only one image or content at a time, whereas a carousel shows multiple images or content at a time.
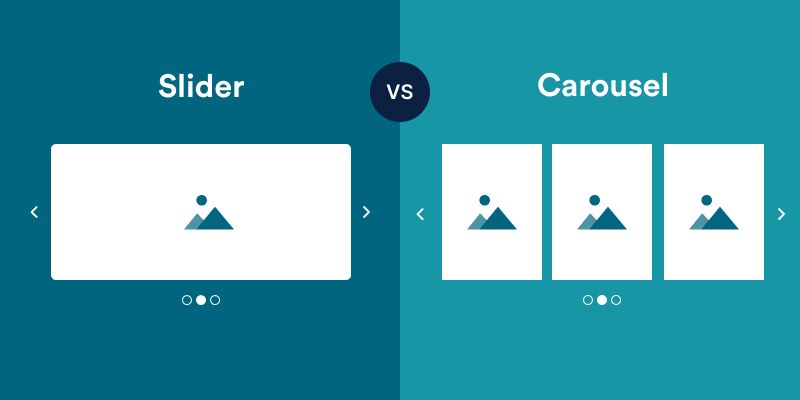
However, you can create both in WordPress following the same process by inputting different numbers of content should be displayed at a time.
To create a carousel in WordPress, you can read this blog How to Create a Carousel in WordPress for Free.
4 simple steps to create an image slider in WordPress
Follow these simple steps and create your image slider in WordPress in minutes without a single line of code.
Step 1: Install and activate the WP Carousel plugin
WP Carousel helps you create an image slider in WordPress seamlessly without writing a single line of code.
Including the world’s top prominent companies, organizations, and institutes like the University of Oxford and the University of Cambridge, More than 60,000 happy users love WP Carousel Pro to create sliders, carousels, and galleries on their WordPress websites.
You can enjoy the essential features of WP Carousel for free. However, you have to purchase WP Carousel Pro for advanced features. You can install and activate this powerful plugin in two ways.
Download WP Carousel and upload it
First, download WP Carousel. Next, go to your WordPress dashboard. Find Plugins at the menu bar. Click Plugins, then Add New. After that, click Upload Plugin on the upper left side next to the Dashboard. After that, click Choose File. It will take you to your download list. Next, find the file named wp-carousel and select it. Next, click Open, Install Now, and Activate to get WP Carousel ready to work.
Click steps:
Download WP Carousel → WordPress Dashboard→ Plugins→ Add New→ Upload Plugin→ Choose File → wp-carousel-free→ Open→ Install Now→ Activate.
Add WP Carousel from the WordPress dashboard
Alternatively, without downloading WP Carousel, you can add this plugin simply from your WordPress dashboard. However, before you go to install and activate WP Carousel, I would like to introduce WP Carousel’s cute logo to you. Please meet it.
However, the process is nearly the same as the first one. First, click Plugins, then Add New. Afterward, go to the search bar on the right side. Write WP Carousel in the search bar. Next, find WP Carousel in the search results and click it. Finally, click Install Now and Activate.

Click steps:
WordPress Dashboard → Plugins→ Add New → Search WP Carousel→ WP Carousel → Install → Activate.
See the documentation or watch this video tutorial to install and activate WP Carousel Pro.
If you need further help, please feel free to reach out to the support team and ask for support.
Step 2: Add images
If you have already installed and activated the plugin, it must have appeared on the menu bar of your WordPress dashboard. Now you can start creating a beautiful image slider in WordPress. First, click WP Carousel / WP Carousel Pro, then Add New. Next, add a title, and go ahead.
Now, click ADD IMAGES. It will take you to your WordPress media library. Next, select as many images as you want to add to your image slider in WordPress. Most importantly, add alternative texts, titles, captions, and so on to your images. It’s always a good practice for your site’s SEO. Next, click Create a new gallery, then click Insert gallery. Lastly, click Carousel before you dive into design your slider in WordPress.
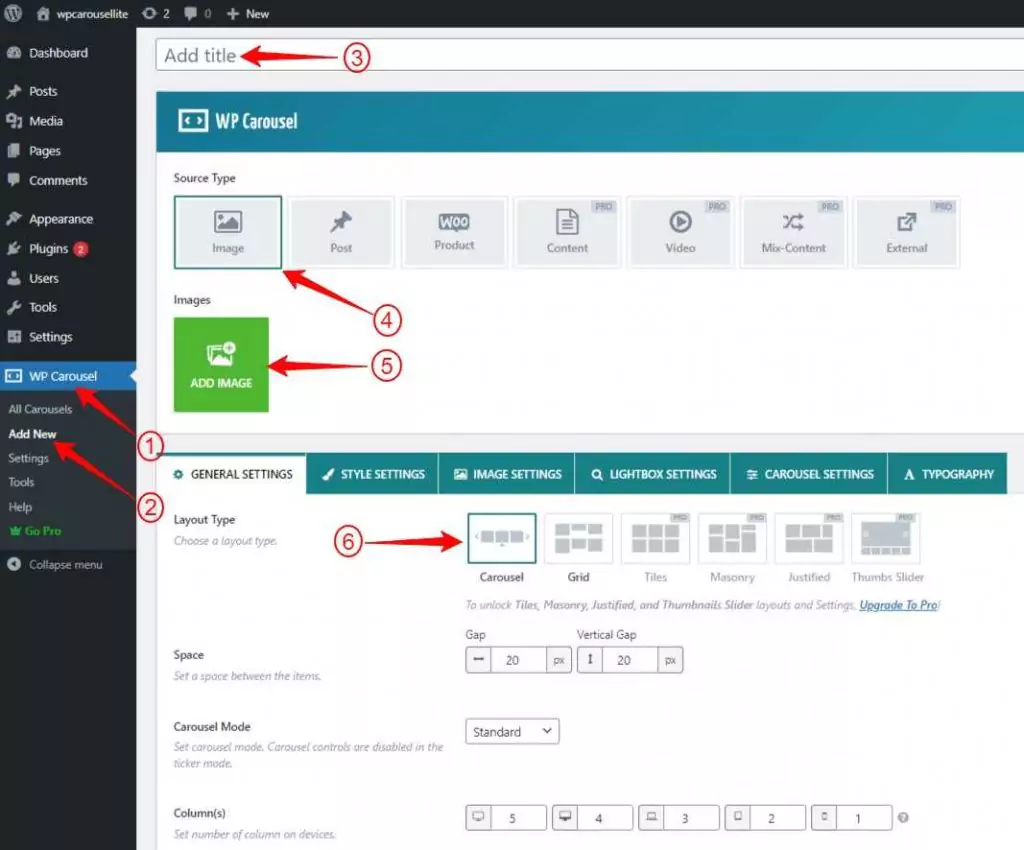
You can edit, reorder, and remove your images by clicking EDIT IMAGES just after the last image you have added for your slider in WordPress.
Step 3: Design your slider in WordPress
With tons of powerful features, WP Carousel offers you to design your slider in WordPress exactly how you want. However, only WP Carousel Pro helps you create your slider in WordPress with advanced features.
In addition, WP Carousel is a multipurpose WordPress slider and gallery plugin. As a result, you can create more like
- post slider and gallery
- product slider and gallery
- Content slider and gallery
- Video slider and gallery
- Mix-content slider and gallery
- External slider and gallery
- Image slider and gallery
And the galleries in several layouts:
- Grid
- Tiles
- Justified
- Masonry
- Thumbnail slider
All the design options have been distributed into six sections. Every section has its setting properties. Some of them include the followings:
- Standard, Ticker, and Center slider mode
- Column number
- Order by drag & drop
- Preloader
- Custom image size
- Lazy Load
- AutoPlay
- Pause on hover
- Slider Direction
- Scheduling your slider in WordPress
- Navigation
- Infinite loop
- Powerful lightbox
- Pagination
- Multiple image rows
- Touch Swipe
- Mouse Draggable
- Customize the typography of your image content
There are many more design options in WP Carousel Pro. Check them out individually and try out what is necessary for your slider in WordPress. Make sure you don’t leave any potential of WP Carousel untapped to make your image slider in WordPress outstanding.
You can read to learn about the slider best practices.
Step 4: Publish your slider in WordPress
First, see the preview of your slider in WordPress before you go to hit the Publish button. Then, you can go back to WP Carousel to edit your slider if you need. Looks awesome? Great! Now, click Publish or Update at the top right corner of the WP Carousel.
Finally, you can publish your slider in WordPress in three ways.
Use WP Carousel Gutenberg block
First, click Publish or Update after designing your slider. Next, go to the page or post you want to display your image slider. Next, click the plus icon to add a new block. It will appear with a search box. For the first time, Write WP Carousel and click it. Next, click Select a shortcode and pick the slider title you want to publish. See, it plays. Finally, hit the Publish or Update button on the top right corner of your page or post. Awesome! It has been published.

Click steps:
Publish/Update(slider) →(go to) the page/post→ Plus icon→ Search for WP Carousel→ WP Carousel block→ Select a shortcode→ Pick the slider title→ Publish/Update
Copy and paste the short code
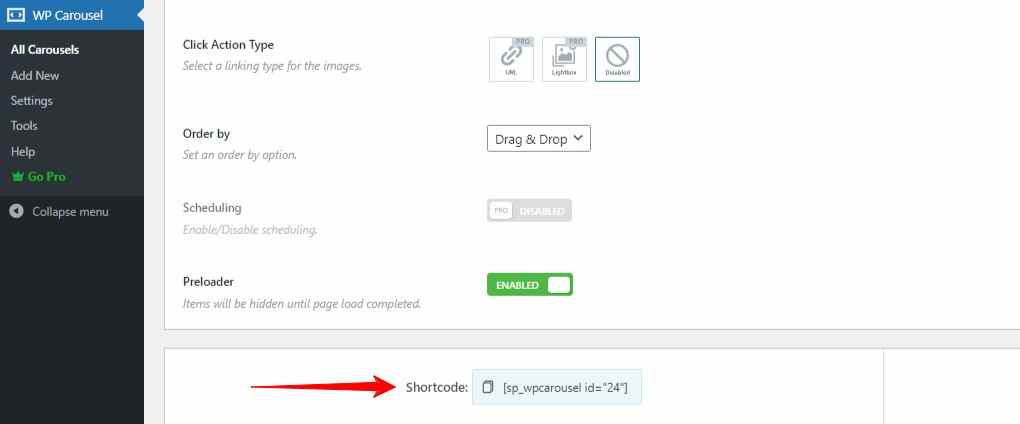
You can also copy the shortcode from the lower left side and go to the page or post where you want to place your slider. After that, you can paste the shortcode into Gutenberg’s Code, Shortcode, and Text blocks and hit the Publish or Update button at the top right corner.
Copy and paste the PHP function
In the same way, you can copy the PHP function from the lower right side of the WP Carousel. After that, you can paste it anywhere in your templates. It’s necessarily used in terms of a product page, header, footer and somewhere you are not allowed to use blocks and edit pages visually.

Lastly, A slider in WordPress has always been known as a proven way to improve the interface design of your website. Moreover, it saves your users time and effort. Furthermore, if designed wisely, a slider in WordPress can significantly enhance user engagement and revenue growth.
So, find some minutes to create your slider in WordPress without any code now.
Thanks for reading. Please feel free to leave your comments below. We will be happy to read and reply.


