Do you want to know what a slider is and how to create a gorgeous sliders in WordPress?
Adding sliders is a sophisticated way to present a bunch of key items outstandingly, grab visitors’ attention, and grow conversion.
If you want to make your website more appealing, interactive, and engaging with your key items presentation, please keep reading.
In this blog, I’ll share details about sliders and the easiest way to create mesmerizing sliders in WordPress in minutes with no code.
Let’s dive in.
Table of contents
What is a slider?
In web design, a slider is an animated interface element that displays multiple images, videos, products, posts, and so on one by one in a single place. If you turn on autoplay, the content slides automatically. It also allows users to navigate the content by dragging the mouse, clicking arrows and dots, or swiping (on touchscreens).

A slider is an attractive and interactive way to showcase your key content, grab visitors’ attention, and boost conversion.
A slider is also known as a carousel. However, there is a subtle difference between a slider and a carousel. Basically, a slider shows only one piece of content at a time, whereas a carousel shows multiple pieces at a time. Regardless of this little difference, sliders and carousels are often used interchangeably.
That said, you can create both carousels and sliders in WordPress following the same process by inputting different numbers of content should be displayed at a time.
However, if you want an individual guide to create a carousel in WordPress, you can read this blog on how to create a carousel in WordPress for free.
How to create a slider in WordPress?
Follow the 4 easy steps to add a slider in WordPress.
Step 1: Install WP Carousel plugin
WP Carousel helps you create aesthetic sliders with images, videos, posts, products, content, externals, and mix content in WordPress seamlessly without writing a single line of code.
More than 70,000 happy users, including the world’s most prominent companies, organizations, and institutes, like the University of Oxford and the University of Cambridge, rely on WP Carousel to create stunning sliders, carousels, and galleries on their WordPress websites.
Its robust features, easy customizations, compatibility, and fast support made it the user’s best choice.
Let’s install WP Carousel.
Don’t know how to install it? It’s simple. Learn how to install WP Carousel.
Step 2: Add images or other content
Congratulations! You have successfully installed and activated WP Carousel. Now, it is available on your WordPress dashboard admin sidebar, as seen in the image below. Follow the next steps to add images or other content.
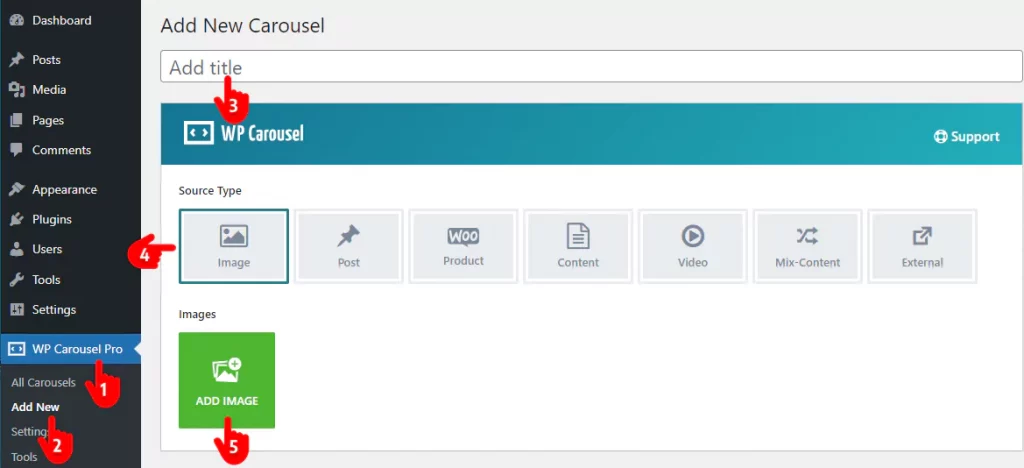
- First, click WP Carousel.
- Click Add New.
- Give your slider a title.
- WP Carousel offers seven options: image, post, product, content video, mix content, and external. Select what you want to create a slider with. For example, I’m choosing the Image to show you the process. However, the process is almost the same for all of them.
- Click ADD IMAGE. It will take you to your WordPress media library.
- Upload or select as many images as you want to display on your WordPress slider. Adding alt texts, titles, captions, etc to images is always a good practice for your site’s SEO.
- After that, click Create a new gallery at the bottom right.
- Then click Insert gallery.
Great! The images have been added to your slider in WordPress. You can edit and reorder them by clicking EDIT IMAGE next to the last image you have added.
Step 3: Customize the slider in WordPress
Follow the easy steps below to customize your sliders exactly how you want them with WP Carosuel’s robust customization options.
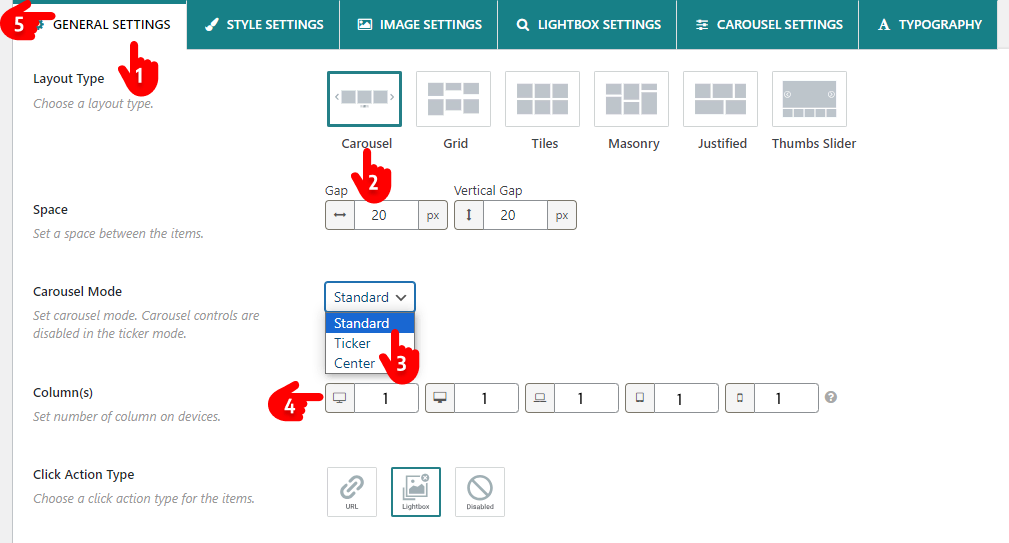
- Leave the GENERAL SETTINGS tab selected.
- Keep the Carousel layout selected. Did you notice other layouts? They allow you to create beautiful galleries in grid, tiles, masonry, and Justified. The last one, Thumbnail Slider, allows you to create sliders along with thumbnails flawlessly.
- You can choose a slider mode from Standard, Ticker, and Center.
- Put 1 as the column number to create a slider and more than 1 to create a carousel. By the way, a basic slider was initially created. You can see the preview by clicking the SHOW PREVIEW button at the bottom right. How does it look? As far as good. No Worries. WP Carousel offers many powerful customization options to help you utilize your creative power. It’s time to try them out to make your slider visually more appealing and connecting.
- Navigate through these six tabs to explore all the customization options and try them out as per your requirements and preferences.
Step 4: Publish the slider
If your slider sounds perfect, it’s time to make it live. Follow the simple steps below.
- First, click the Publish or Update button at the top right of the WP Carousel interface.
- Copy the shortcode at the bottom of the WP Carousel interface.
- Go to the page or post and paste the shortcode where you want to publish the slider.
- Finally, hit the Publish or Update button at the top right of the WordPress page or post.
Here is how a basic slider looks.

You can create far better sliders utilizing your creative power with WP Carousel.
The takeaway
Sliders are very effective at grabbing visitors’ attention and boosting conversion. If designed well, sliders can change your business experience.
You can create outstanding sliders in WordPress in 4 simple steps with no code.
Let’s create sliders on your WordPress website for higher conversion today.