Displaying your prominent clients’ logos on your website in a sophisticated way is an effective strategy to gain your visitors’ trust and convert them into your reiterative clients. Besides your clients’ logos, you can create stylish logo carousels with the logos of your partners, sponsors, affiliates, reviewers, and so on.
If you are interested in having a complete guide about adding a custom color logo carousel, you are in the right place. Keep reading this blog. In this blog, I’ll show you every step of how to create a custom color logo carousel on your WordPress website. So, let’s get into it.
Table of contents
4 simple steps to create a custom color logo carousel
All you need to do to add an aesthetic logo carousel to your WordPress website is to follow these four simple steps. Moreover, you can do it in minutes without a single line of code.
Step 1: Install and activate Logo Carousel Pro
Logo Carousel is a powerful and user-friendly WordPress plugin. Thousands of WordPress website developers rely on this plugin to create captivating logo carousels. First, you need to install and activate this plugin. It’s quite a simple task. However, if you face any obstacles in installing and activating it as a beginner, the following video tutorial will help you to overcome them easily.
Also, you can read how to create a WordPress logo slider or the documentation for more in detail.
Feel free to contact the support team if you need help.
Step 2: Add logos
Once you successfully install and activate the Logo Carousel Pro, it will be available on your WordPress dashboard. First, click Logo Carousel, then Add New. Next, give your logo carousel a title. Also, you can write a description if you like. After that, click Set Logo. It will take you to your WordPress media library. Here select a logo.
When you click a logo, you can see a right sidebar containing some text fields to let you optimize the logo image. In this phase, adding alter texts, titles, captions, and so on to logos is always a good practice for SEO and accessibility. So, always remember to do it properly.
After that, click Set Logo. The logo must have been added. Finally, hit the Publish button to publish it.
Click Steps
Logo Carousel→ Add New→ Add title→ Set Logo→ Select a logo→ Set Logo→ Publish
Similarly, you can add as many logos as you want.
Step 3: Design Logos with custom colors and many robust features
Besides custom color, Logo Slider Pro offers you many more styling features. That helps you make your logo showcases more sophisticated. Let’s start creating a stunning logo carousel with custom colors. First, click Logo Carousel, then Shortcode Generator at the Logo Slider menu. Next, click Add New. Give your logo carousel a name. After that, select Carousel from the layout presets.
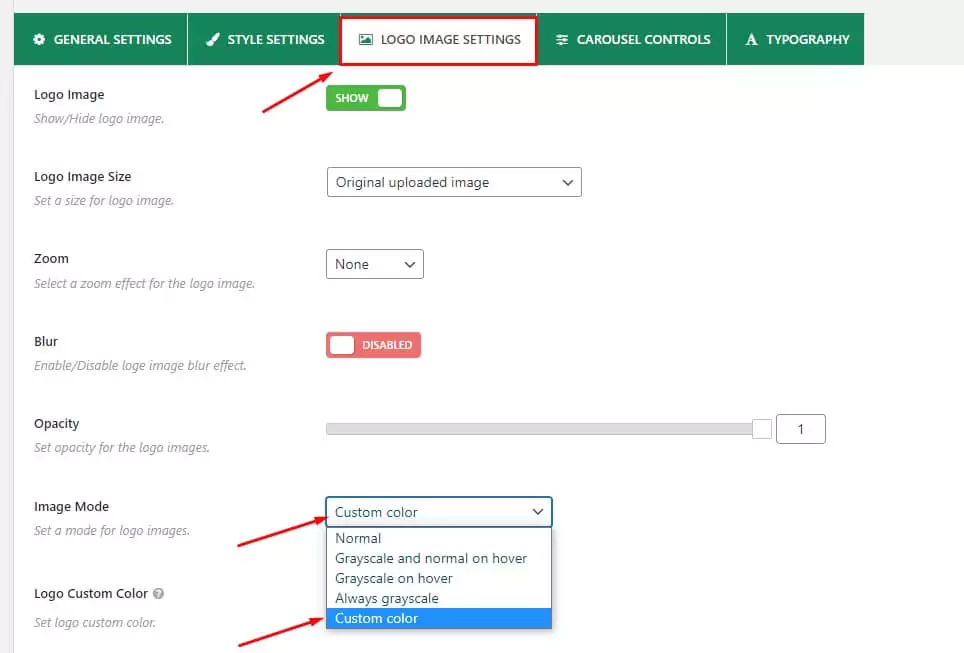
Go to the LOGO IMAGE SETTING tab next to the STYLE SETTING tab at the tab bar. Next, click the Image Mode dropdown, then click Custom color. Once you click it, it shows the Logo Custom Color option. Moreover, it lets you generate custom colors as well as paste hex codes. Choose colors to make your custom color logo carousels more attractive.
Click Steps
Logo Carousel→ Shortcode Generator→ Add New→ Add title→ …Design…→ LOGO IMAGE SETTING→ Image Mode dropdown arrow→ Custom color→ Select Color→ …Choose color…→SHOW PREVIEW (optional)→Publish/Update
As I mentioned above, the Logo Carousel offers you a wide range of robust features besides the custom color. So you can explore them one by one and try them out. Don’t leave any potential of the Logo Carousel untapped to ensure the most output.
After you design your custom color logo carousel, don’t forget to click the Publish button at the upper right corner to publish the shortcode.
Step 4: Publish your custom color logo carousel
If you have accomplished designing your custom color logo carousel, it’s time to publish it finally. However, Logo Carousel allows you to publish it in three ways.
Logo Carousel Pro Gutenberg block
First, go to the page or post you want to display your custom color logo carousel. Next, Click the Plus icon. After that, type Logo Carousel in the search bar, then click it. Next, click Select a carousel (shortcode) and pick the carousel title you want to display. Great! It plays and looks fantastic. Finally, hit the Publish or the Update button in the upper right corner.
Click steps:
Go to the page/post→ Plus icon→ Search for Logo Carousel→ Logo Carousel block→ Select a carousel (shortcode)→ Pick the carousel title→ Publish / Update
Copy-paste the shortcode
Alternatively, you can publish your logo carousel with the shortcode. First, copy it from the top of the Logo Carousel setting interface. Next, go to the post or page you want to present it and just paste it in any text or shortcode block. After that, click the Publish or the Update button at the top right corner.
Copy-paste the PHP code
Also, you can publish the logo carousel with PHP code. However, it’s necessarily used when you cannot publish it visually with a block. First, find it next to the shortcode and copy it. Then, go to your PHP template and paste it where you want to place it.
Take away
In conclusion, there are only four simple steps to create a custom color logo carousel on your WordPress website in minutes with no code. If appropriately designed, a logo carousel benefits you in many ways. Above all, it shows your expertise and experience. Consequently, you gain visitors’ trust, and they don’t hesitate to purchase your products or services. Finally, you experience the next level of your business.
So, create a custom color logo carousel now.
Thanks for reading. It will be our great pleasure to read and reply to your comments.
Leave a Reply