In this blog, I’ll show you how powerful social proofs are for your business and how to add them to your WordPress website in minutes with no code.
Your well-designed website might attract thousands of new visitors daily and offer them quality services and products, but the visitors leave without hitting the Get Started or Buy Now button. As a result, all your business and marketing strategies fail to reach your sales target.
Why?
New visitors are unwilling to become customers the first time they come across your business website. You must earn their trust first.
How?
It’s not only with aesthetic graphics and persuading copies.
Then how?
Simply with social proofs. A study shows 91% of buyers read at least one review before making a purchase.
What is social proof?
This term has been popularized by the most prominent persuasion scientist Robert Cialdini.
Social proof refers to a psychological phenomenon where people look to the actions and behaviors of others to determine the perfect behavior and make the right decision in a particular situation.
For instance, customer reviews and testimonials are the most powerful ones, as seen on ShapedPlugin’s landing page.
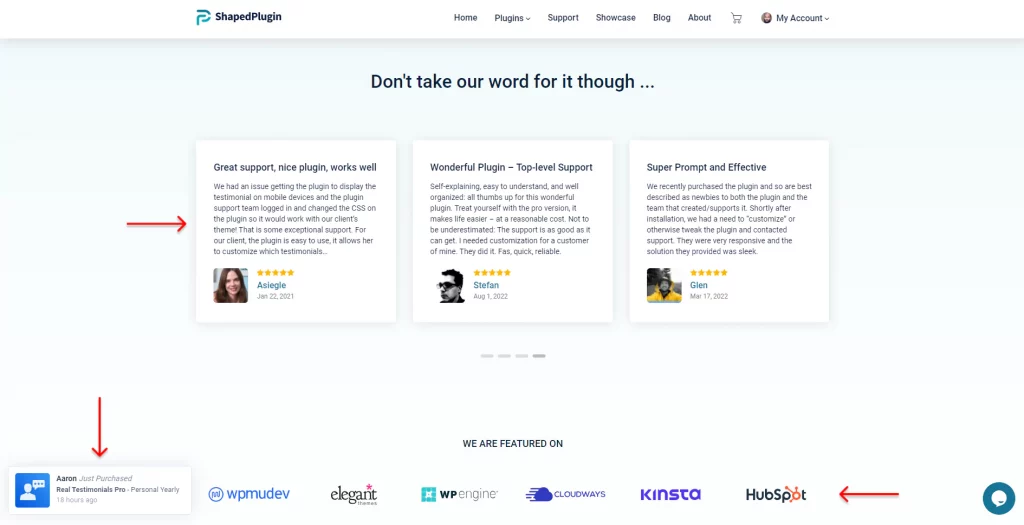
On the landing page above, we can see multiple types of social proof—customer reviews, featuring organizations, and live sales notifications in the bottom left corner.
Types of social proof
There are several types of social proof based on your business industry and context. The most used types include the following.
- Reviews and testimonials
- Certificates
- Featuring organizations
- Influencers’ and celebrities’ words
- Industry Leaders’ Recommendations
- The number of ratings, likes, followers, downloads, installations, and so on
Have you none of the above yet? Do you want to get some stronger proofs from more prominent ones? No Worries. Learn how to collect real testimonials for your business growth.
However, if you don’t have any of them to display right now, you can add a carousel with the logos of the companies and organizations that purchased your services or products.
Great! You have or will soon have the proofs to display, let’s learn the easiest way to display them on your website professionally for the highest output.
4 easy steps to display social proofs on your WordPress website
Four simple steps to add a beautiful social proof showcase on your WordPress website. Follow them properly and add social proof carousel in minutes with no code.
Step 1: Install and activate Real Testimonials
First, we have to install and activate the best social proof showcase WordPress plugin-Real Testimonials.
Why this plugin?
Not only for its outstanding features:
- Easy and Automated way to collect and showcase testimonials
- 5 unique preset layouts – Slider, Grid, Masonry, List, and Isotope
- 10+ super aesthetic customizable themes
- 100+ advanced styling and layout customization options to make testimonial showcases more appealing
- Video testimonials with a full-featured Lightbox.
- Unlimited testimonial submission forms.
- Mobile-ready and SEO-friendly, and much more
But also, most importantly, for its real social proofs:
- The number of happy, active users
- The number of all-time downloads
- The number of five-star ratings
- Customers’ reviews and testimonials
- Live sales notifications

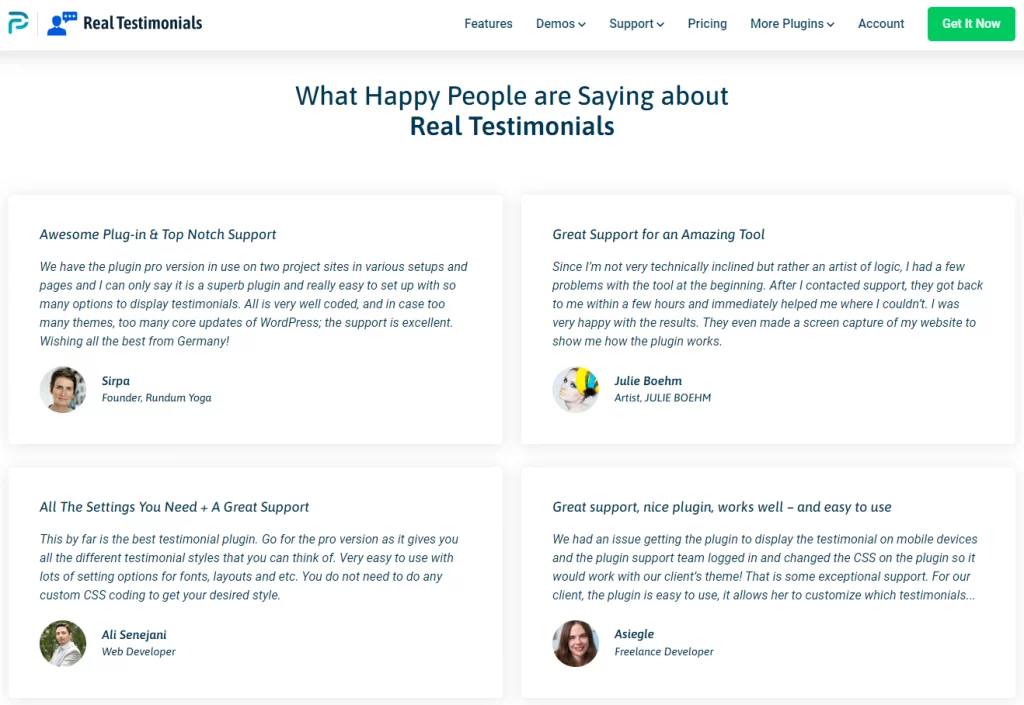
So, let’s install and activate Real Testimonials to create effective social proof showcases to boost sales.
First, click Real Testimonials to download it. After that, open your WordPress dashboard in a new tab.
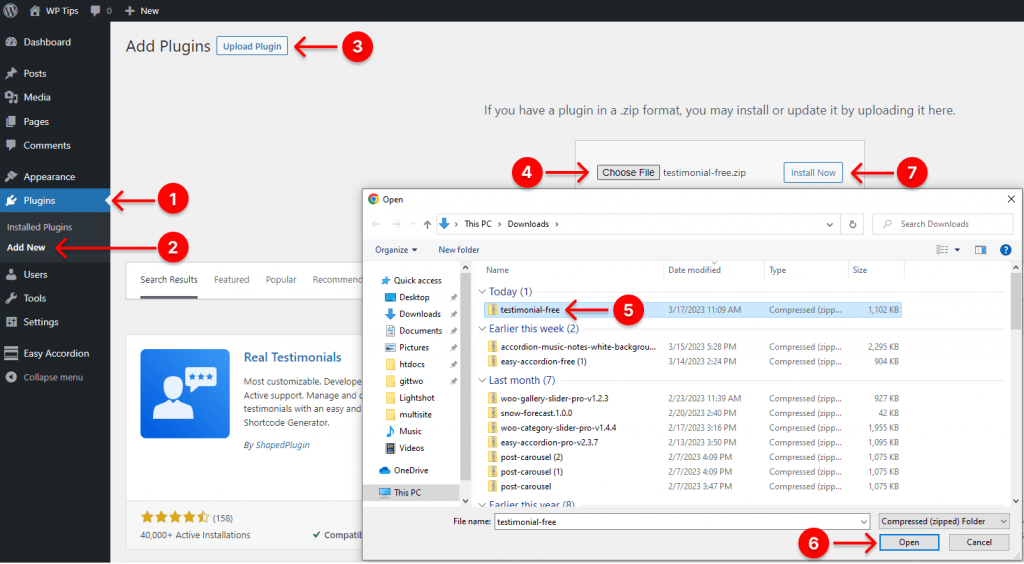
- First, click Plugins available in your WordPress admin sidebar.
- Next, click Add New.
- Then, click Upload Plugin next to the Add Plugins at the top of your WordPress dashboard.
- Click Choose File. It will take you to your download list on your computer.
- Select the zip file testimonials-free from your download list on your computer. Unfortunately, if you don’t find it in the list, please click here. Sorry for the inconvenience. Go back to the download list and refresh it. You will find it now.
- Click Open.
- Click Install Now. It will take you to the following interface.

8. Finally, click Activate Plugin button to get the plugin on your WordPress admin sidebar.
Step 2: Add social proofs
After you activate Real Testimonials, it should be on your WordPress admin sidebar, as seen in the following image.
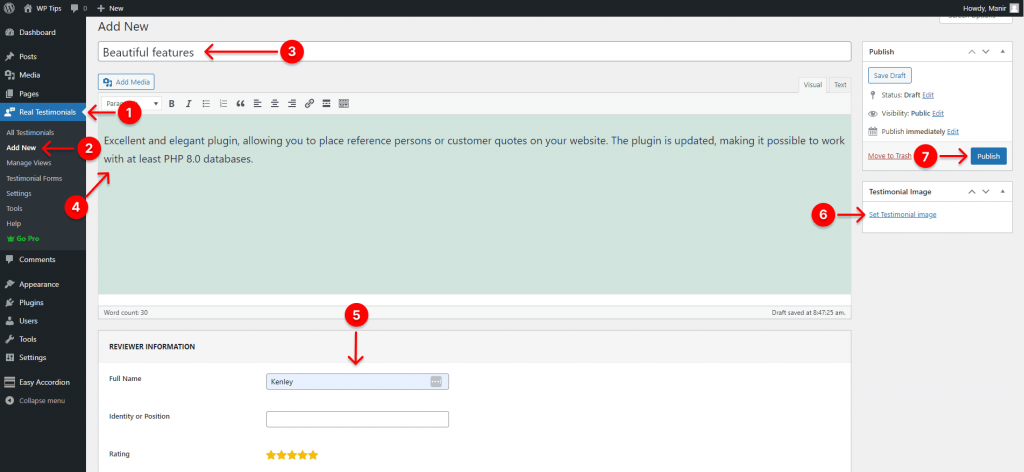
- First, click Real Testimonials.
- Then, click Add New.
- Paste the title of your client’s review in the text field. The review could be some positive words in the social media comment box, over the phone, or elsewhere.
- Paste the body of your client’s review in the text field.
- Fill out the required fields with relevant information.
- Set the reviewer’s photo.
- Finally, hit the Publish or Update button.
This way, you can add as many testimonials as you want. Now, let’s dive into designing an attention-grabbing carousel with these social proofs.
Step 3: Design your social proof carousel
Real Testimonials offers you a wide range of design features. With them, you can design your WordPress social proof carousel exactly how you want.
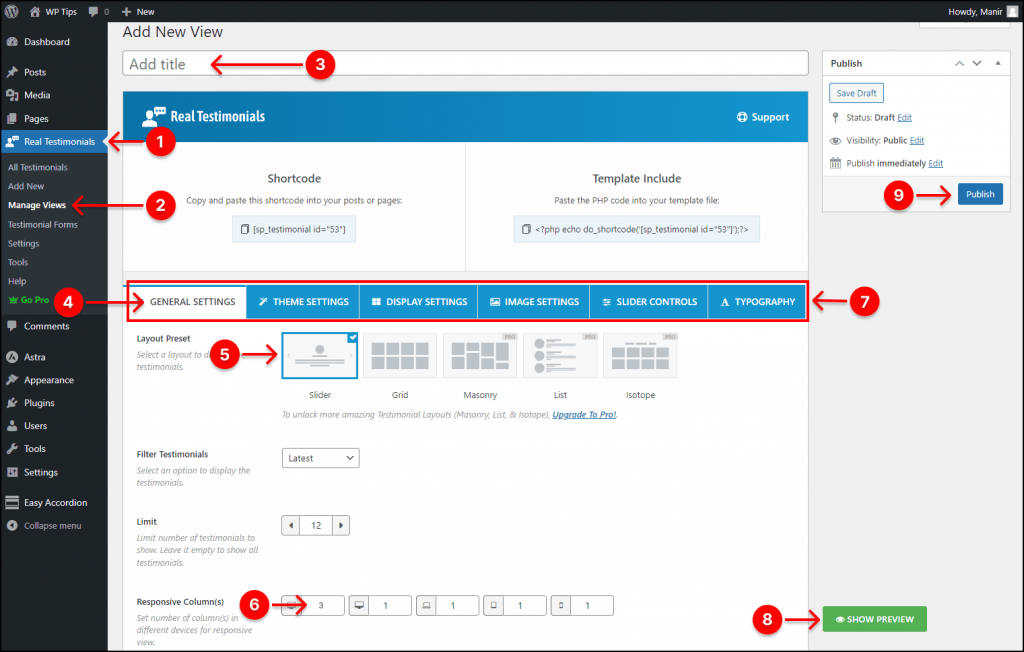
- First, click Real Testimonials.
- Next, click Manage Views.
- Give your testimonial carousel a title.
- Click GENERAL SETTING.
- Select the Slider layout.
- Insert 3 or the number of testimonials you want to show at once.
- Have an attentive look at all these six tabs and their features. Each has many features to let you design your WordPress testimonial carousel exactly how you want. Explore all the features individually, and don’t leave any of them that you need to make the carousel more attractive.
- Click the SHOW PREVIEW button to see how it looks. If everything sounds good, let’s go to publish.
- Finally, hit the Publish or Update button.
You can see the documentation or watch the following tutorial to learn more.
Step 4. Publish your social proof carousel
If everything looks perfect, it’s time to publish it. And it’s so simple. First, go to the page or post you want to show your social proof carousel. Also, you can add a new page or post by clicking Add New under Pages or Posts from your WordPress admin sidebar.
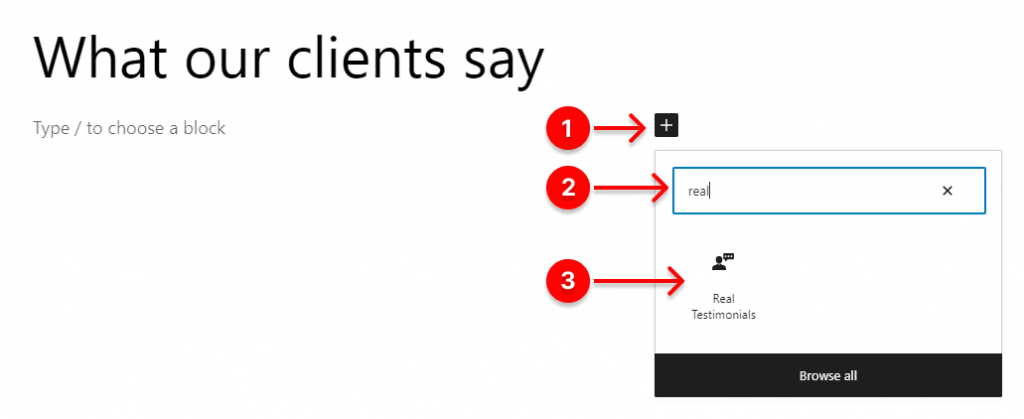
- First, click the plus icon.
- Next, type Real Testimonials in the search bar.
- Click Real Testimonials.
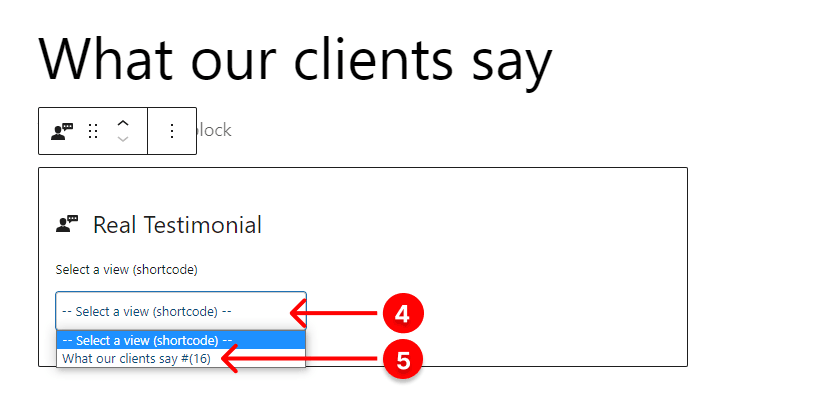
- Click the dropdown. It will display the social proof titles (shortcodes) you’ve created.
- Find the title or shortcode you want to publish and click it.
Superb! Your social proof carousel is almost live on your WordPress website.
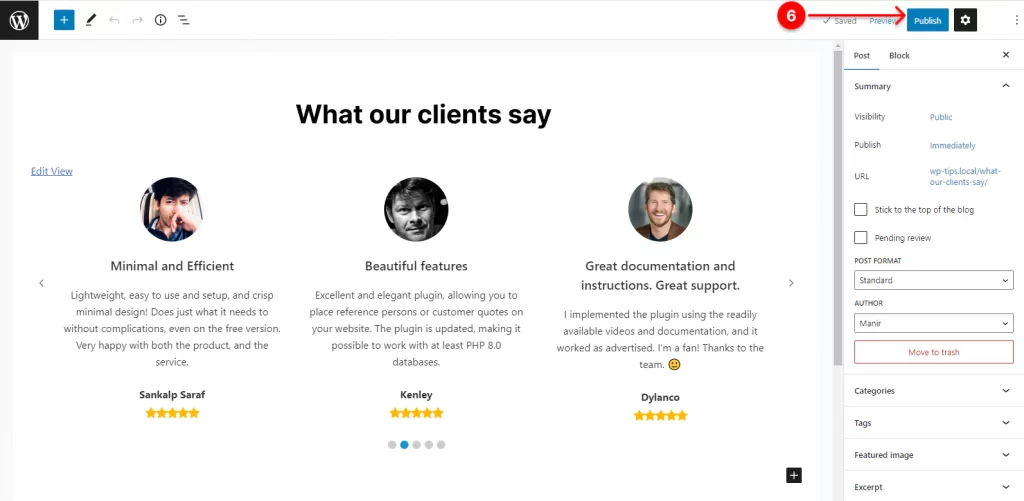
6. Finally, if everything looks perfect, hit the Publish or Update button at the top right corner.
Take Away
In essence, social proofs are even stronger than your captivating graphics and persuading copywriting. Because new visitors to your website trust them more than anything others. They are true and powerful marketers that sell your services and products through trust and authenticity.
So, let’s add some social proofs to your website in the next few minutes and take your conversion rate to the next level.
Thanks for reading.
Now it’s your turn. Share what kind of social proof is the most effective you think. Or, what’s your plan with social proofs? We really appreciate your comments and queries. Please leave them below. We love to read and reply.

Leave a Reply