Are you a WordPress website owner looking to skyrocket your sales and enhance your business’s credibility?
If so, there’s one powerful tool at your disposal that can make all the difference: customer feedback.
In this digital age, potential customers are increasingly turning to online reviews and testimonials before making a purchase decision. The positive experiences shared by your satisfied customers can be a game-changer for your sales and overall reputation.
In this article, I will show you how to collect and showcase customer feedback in WordPress website.
By the end, you’ll have a comprehensive understanding of how to collect and showcase customer feedback in WordPress.
So, let’s get started.
Why should you showcase customer feedback on your website?
Building trust and credibility
Customer feedback builds trust and credibility by showcasing real experiences and opinions of satisfied customers. Positive reviews act as social proof, assuring potential buyers of the reliability and quality of your products or services. When visitors see authentic feedback from others, they are more likely to trust your brand, leading to increased confidence in making purchase decisions.
Validating claims
The feedback from customers can validate claims by providing real-life evidence to support the promises made about your products or services. When customers share their positive experiences and endorse the benefits you advertise, it confirms the credibility of your claims. This validation reassures potential buyers that your offerings deliver what you promise, making them more inclined to trust your brand and feel confident about their purchase decisions.
Enhancing customer engagement
Having a channel for customer feedback is helpful as it promotes engagement by enabling two-way communication. When customers share their opinions and experiences, it fosters a sense of involvement and importance. Responding to feedback, whether positive or negative, demonstrates that you value their input and are committed to improving their experience.
This active engagement encourages customers to stay connected with your brand, provide more feedback, and develop a stronger emotional connection. As a result, they become more loyal and invested in your products or services, driving long-term customer relationships and advocacy.
Influencing purchasing decisions
Customer review significantly influences purchase decisions by providing social proof and valuable insights. Positive reviews and testimonials create a sense of trust and confidence in potential buyers, assuring them of the quality and satisfaction others have experienced with your products or services.
Additionally, feedback highlights specific features or benefits that resonate with customers, helping undecided buyers understand the value your offerings bring.
How to collect and showcase customer feedback in WordPress
Customer feedback has become a crucial part of every business. However, WordPress default functionalities don’t allow to collect and display testimonials.
So, how to collect and display customer testimonials on the WordPress website?
In this case, you must use a testimonial plugin. However, not all plugins allow you to collect and display testimonials; most plugins only allow you to add and display testimonials.
Keeping that in mind, in this tutorial, I will use the Real Testimonial Pro plugin. It is the best testimonial plugin that enables you to add, collect, and display customers’ feedback.
Now, let’s move on to collecting and displaying customer testimonials using the Real Testimonial Pro plugin.
Step one: Install and activate the Real Testimonial Pro plugin
First things first, install and activate the Real Testimonial Pro plugin. You can get the Real Testimonial Pro plugin from here.
Once you have installed and activated the plugin, it will appear on the WordPress Dashboard.
You have successfully installed and activated the Real Testimonial Pro plugin. Now, let’s start collecting and displaying customer feedback.
Step two: Building a testimonial form for collecting feedback
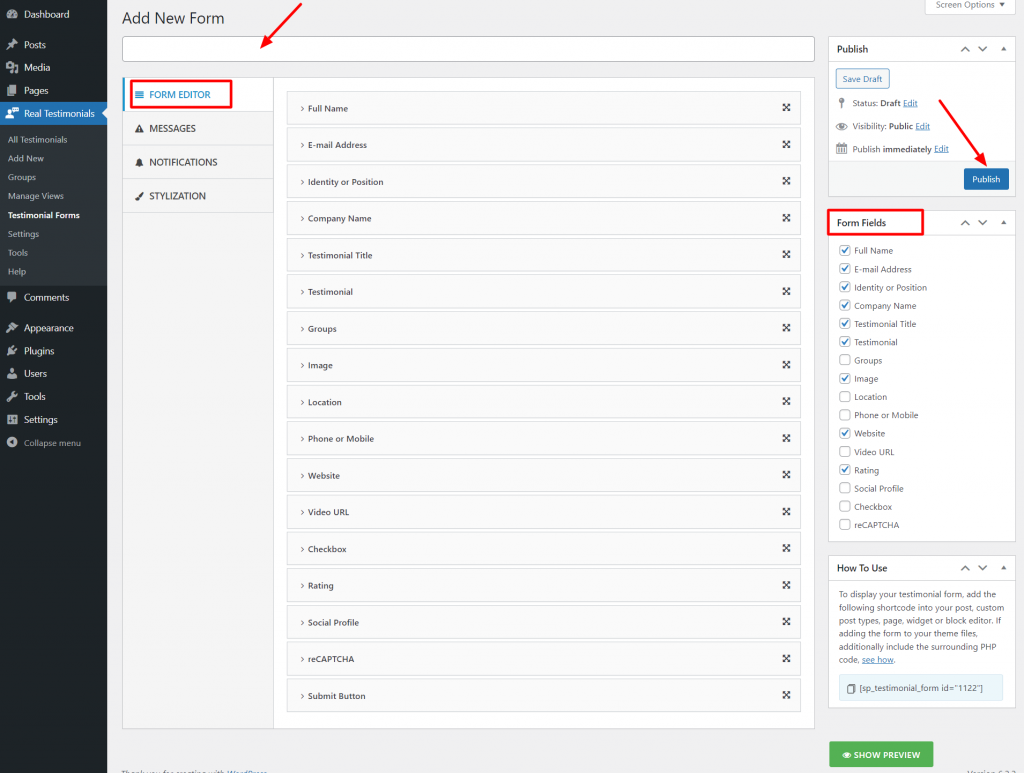
To build a customer feedback collection form, go to the WordPress dashboard. Next, click on Testimonial Forms, and then click on Add New.

After that, type the form title. Now, in the Form Editor section, you can add or remove form fields. To add a field to the form, check that field from the Form Fields. To remove a field, uncheck that field from the Form Fields. Also, you can customize the field’s label and placeholder text. Moreover, you can make the field required.
Step three: Configuring form message
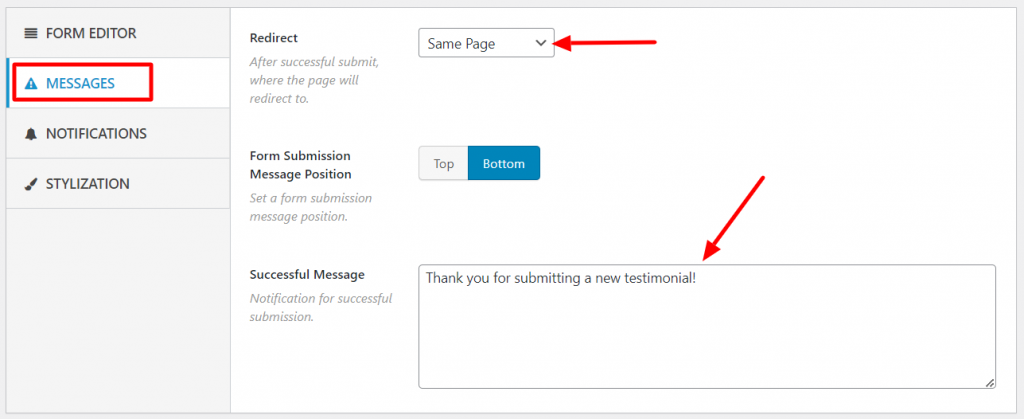
The Messages section allows you to customize the form message. You can set a redirect target after successful form submission. Also, you can set a notification message for successful form submission.
Step four: Configuring testimonial approval status and notification
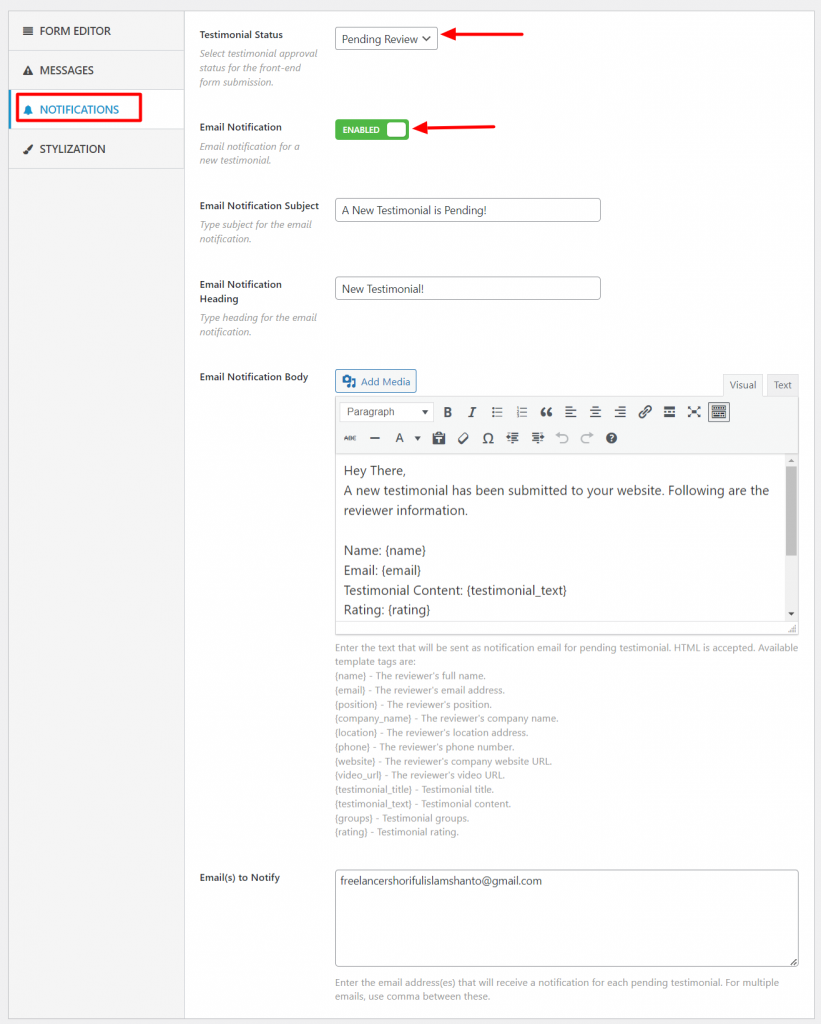
The Notifications section allows you to set the feedback approval status. Also, it allows you to enable/disable email notifications.
You can set the testimonial status to auto-publish, pending review, private, and draft. If you prefer not to review the feedback, you have the option to select auto-publish. By choosing this option, the feedback will be published automatically upon submission. However, if you choose pending or draft, you will need to manually publish them. Moreover, if you select private, you have to make feedback public for publishing. For this tutorial, I will select auto-publish.
If you want to get an email notification for every successful submission, enable the email notification. You can also set the notification mail subject, heading, body, and notify email.
Step five: Customizing testimonial form appearance
You can customize the feedback collection form from the Stylization option. It allows you to customize the label color. Also, you can change the Record button color and background color, as well as the hover and hover background color. Moreover, you can change the color and background color, and hover and hover background color of the submit button. Once the customization is complete, hit the publish button.

When customization is done don’t forget to hit the publish button.
Step six: Displaying testimonial collection form
To collect customer feedback, you must display the testimonial form. You can display the testimonial form anywhere using the shortcode. In this tutorial, I will display the testimonial form on a page. Here is how to do that:
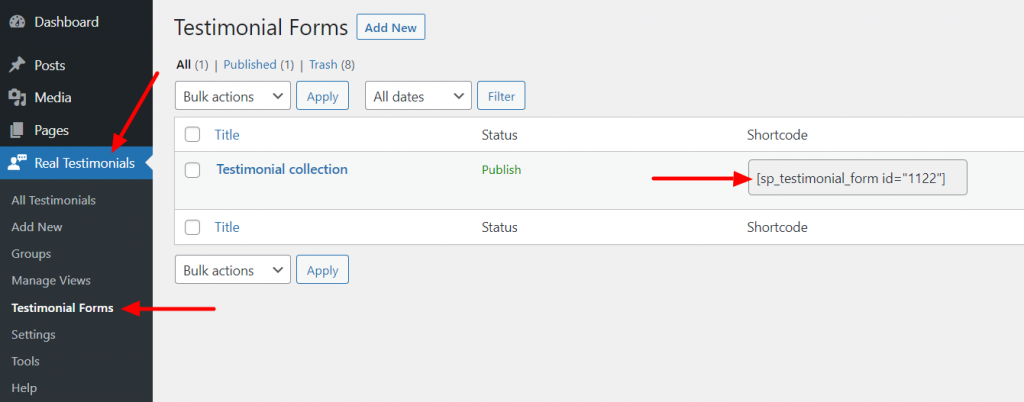
Go back to the WordPress dashboard and navigate to Real Testimonials. Next, click on Testimonial Forms and copy the form’s shortcode that you have created.
After that, open the page where you want to display the form. Now, click on the block inserter button and search for the Shortcode block. Click to add the shortcode block.
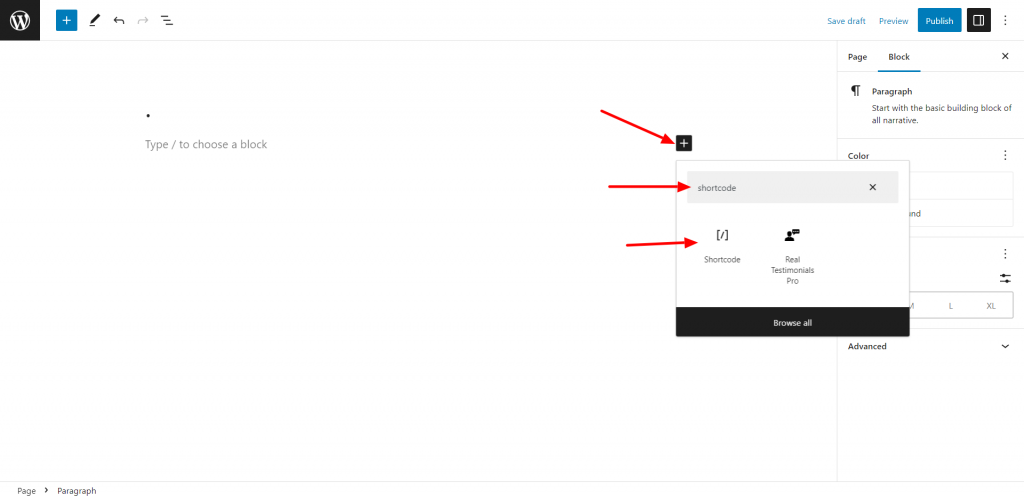
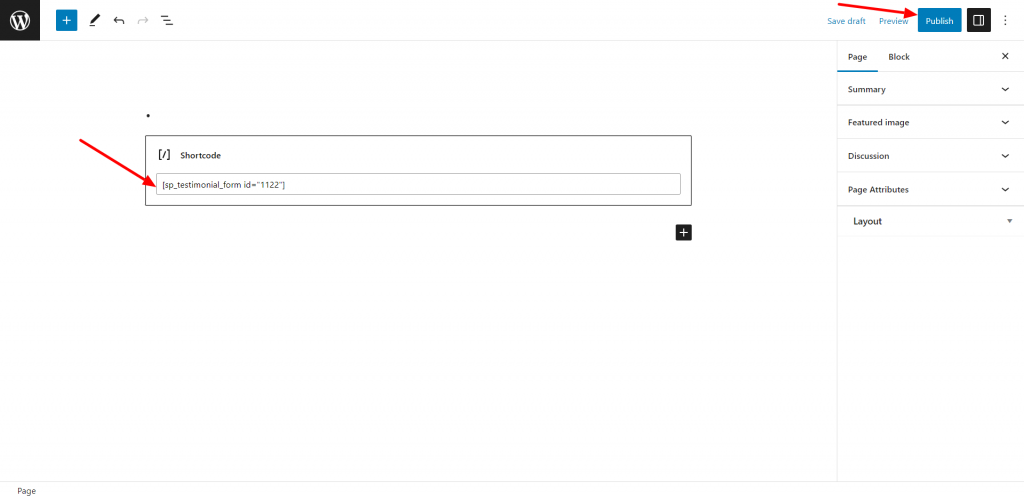
Paste the testimonial form shortcode inside it. Hit the publish button, and the form will be live on your website. Here is what it looks like:
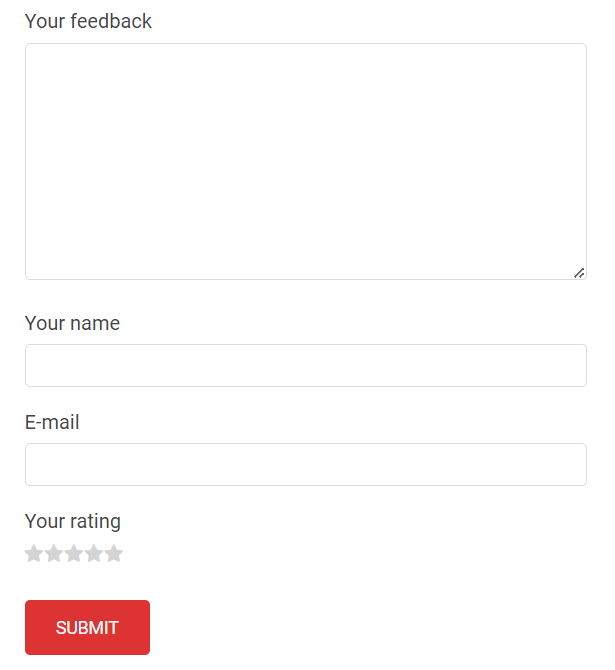
If anyone submits the form, the feedback will automatically be added to your website. Here is how the testimonial collection form looks like:
Step seven: Displaying collected testimonials
You have collected customer feedback, and now it’s time to display the collected feedback on your website.
To display the collected feedback, once again, go back to the WordPress dashboard. Next, navigate to Real Testimonials and click on Manage Views. After that, click on Add New.
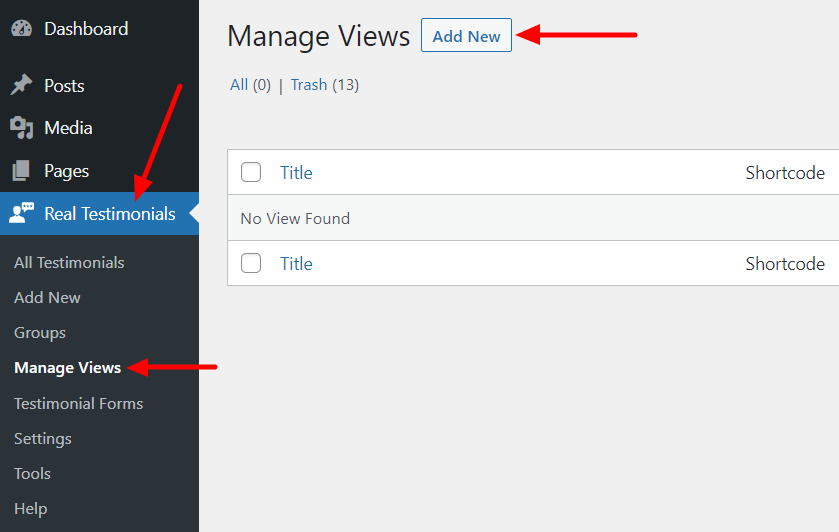
Now, add the view’s title. Choose the view’s layout from the General Setting’s layout preset. You can choose from slider, grid, masonry, list, and isotope.
From the Filter Testimonial, choose your preferred testimonials. In the testimonial collection form, I didn’t select any group, so I will select the latest. Once someone submits a testimonial, it will be displayed. Hit the publish button and copy the views shortcode.
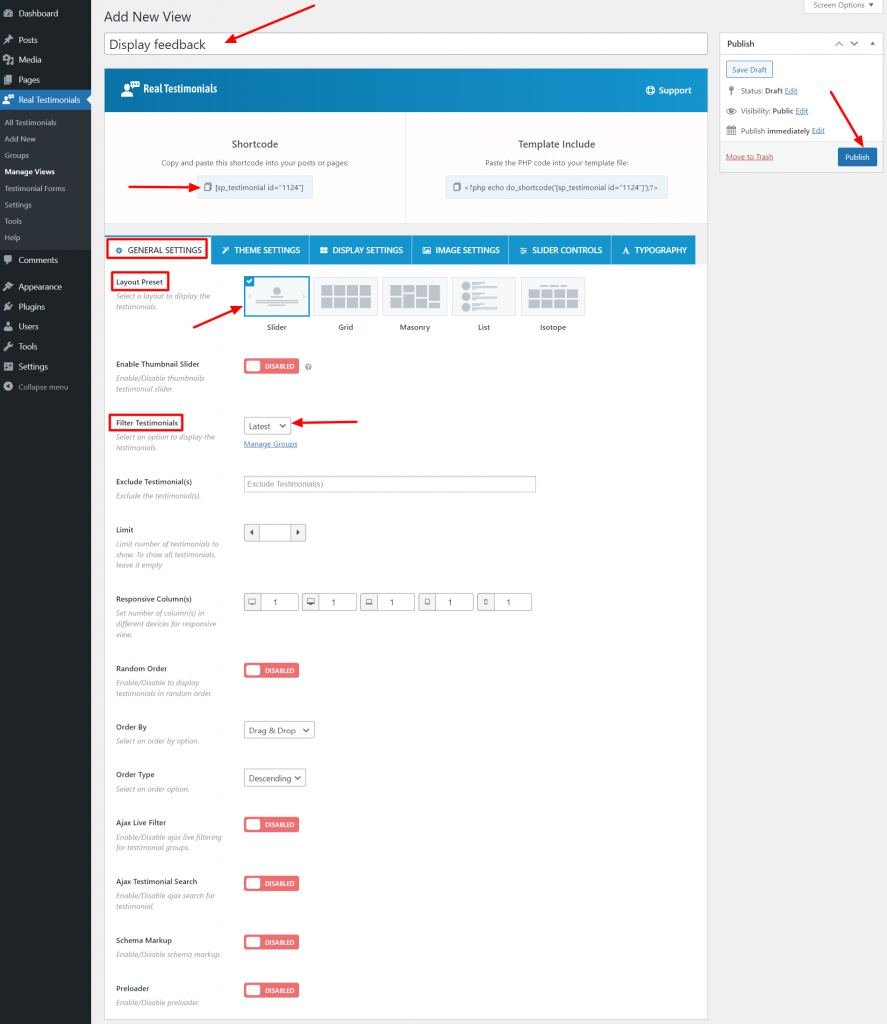
Paste the shortcode where you want to display the collected testimonials. I will display the testimonials on a page. Here is how to do that:
Open the page where you want to display the collected testimonials. Then, click on the block inserter and locate the shortcode block. Click on the shortcode block to insert it within the page content area.
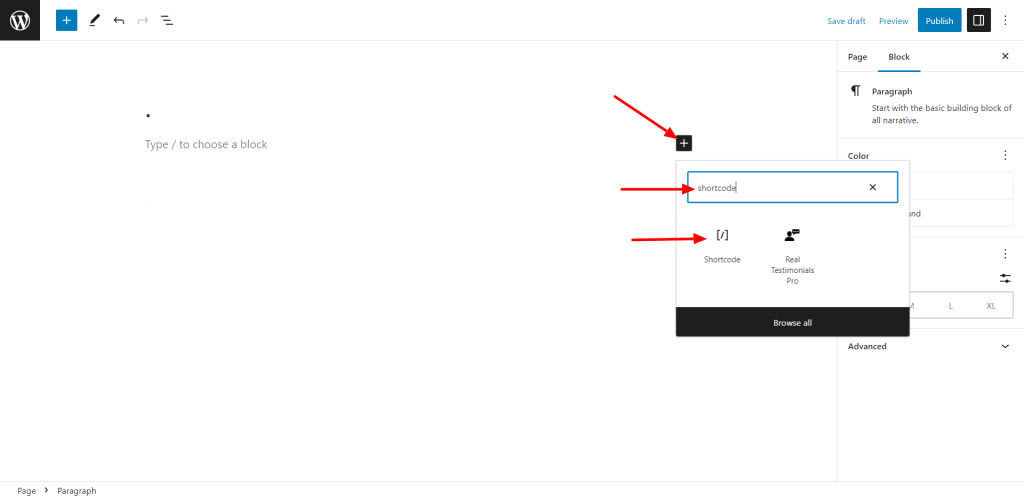
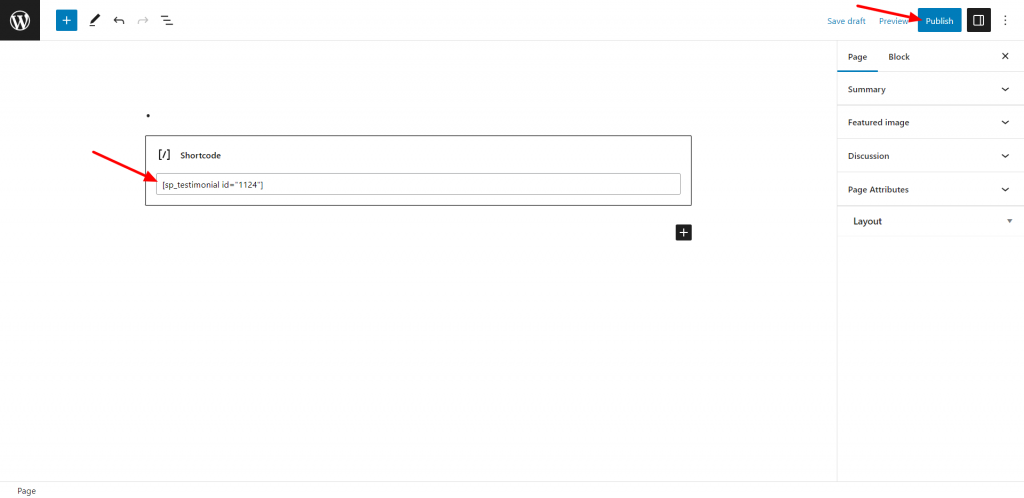
Now, paste the views shortcode and hit the publish button.
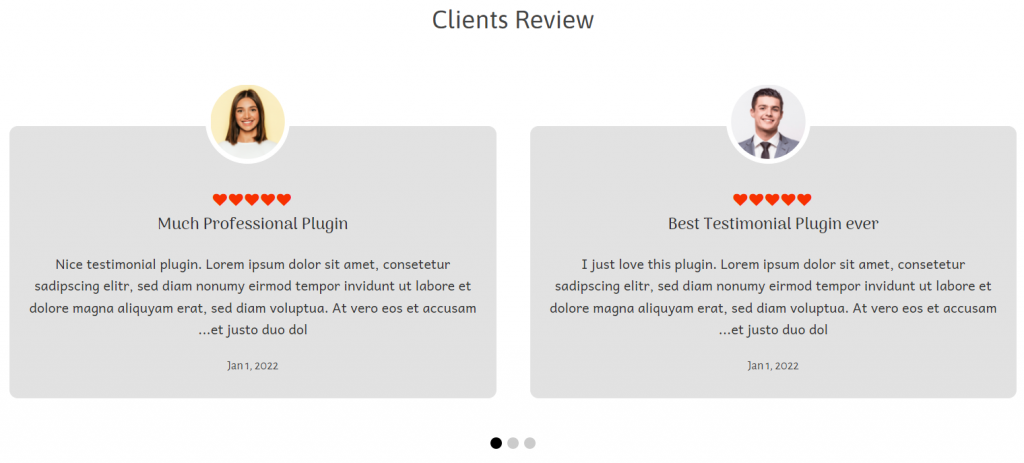
Here is what the testimonials look like on WordPress website:
Final Words
Leveraging customer feedback in WordPress to boost sales is a powerful strategy for businesses. By implementing user-friendly feedback forms and actively encouraging customer reviews, you can gather valuable insights that aid in improving products and services.
Displaying positive feedback on your website builds trust and credibility with potential customers, ultimately leading to increased conversions. Additionally, addressing negative feedback promptly and professionally demonstrates a commitment to customer satisfaction, further enhancing your brand reputation.
Remember, a transparent and customer-centric approach not only drives sales but also fosters long-lasting relationships, turning satisfied customers into brand advocates and propelling your business toward sustained success.


Pingback: 7+ Best WordPress Forms Builders in 2024 [Free & Paid] - ShapedPlugin