
Do you want to learn how to automatically add testimonials in WordPress website? If your answer is yes, this is the article for you.
There is a great plugin that can help you with that.
Here, I will show you how to automatically add testimonials in WordPress website. Moreover, I will show how to display automatically added testimonials.
Let’s get started!
How to automatically add testimonials in WordPress website
Undoubtedly, customer feedback is crucial for business. But it is not easy to add users’ reviews on the website.
Testimonials plugins are great for displaying testimonials. But most plugins lack features for adding users’ feedback automatically.
But the Real testimonials pro plugin allows adding testimonials automatically. Its testimonials form feature helps to add testimonials automatically.
In this tutorial, I will use the Real testimonials pro.
So, install and activate the Real testimonials pro.
Step 1: Build testimonials form
Building testimonials form with Real testimonials pro is easy. Here is how to do it;
First, go to the WordPress dashboard, then navigate Real testimonials. After that, click on Testimonial Forms. Now, click on Add New and type the form’s title.
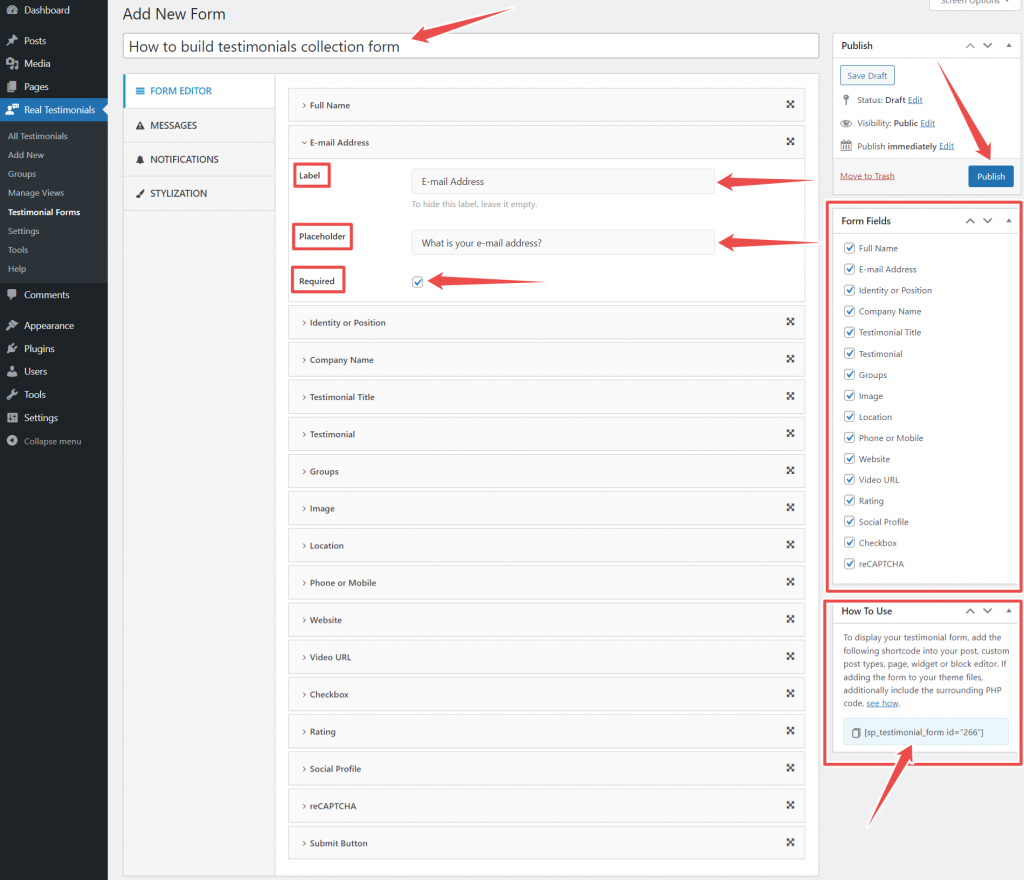
From the Form Editor, add fields according to your need. For adding a field, Just tick mark the field.
Real testimonials pro offers 16 fields which include full name, email address, identity or position, company name, testimonial title, testimonial, groups, image, location, phone or mobile, website, video URL, rating, social profile, checkbox, and ReCAPTCHA.
Use the Groups field for collecting reviews for a particular product/category. If you want to collect reviews for several products, this feature will help a lot.
If you want to collect video reviews, use the video URL field.
You can change the label and placeholder text as you want. If you want to hide the label text, keep it blank.
If you want to make any field mandatory, tick mark the Required.
You can place any field anywhere you wish to. Just drag and drop to change the field position.
This is how you can build a testimonials collection form.
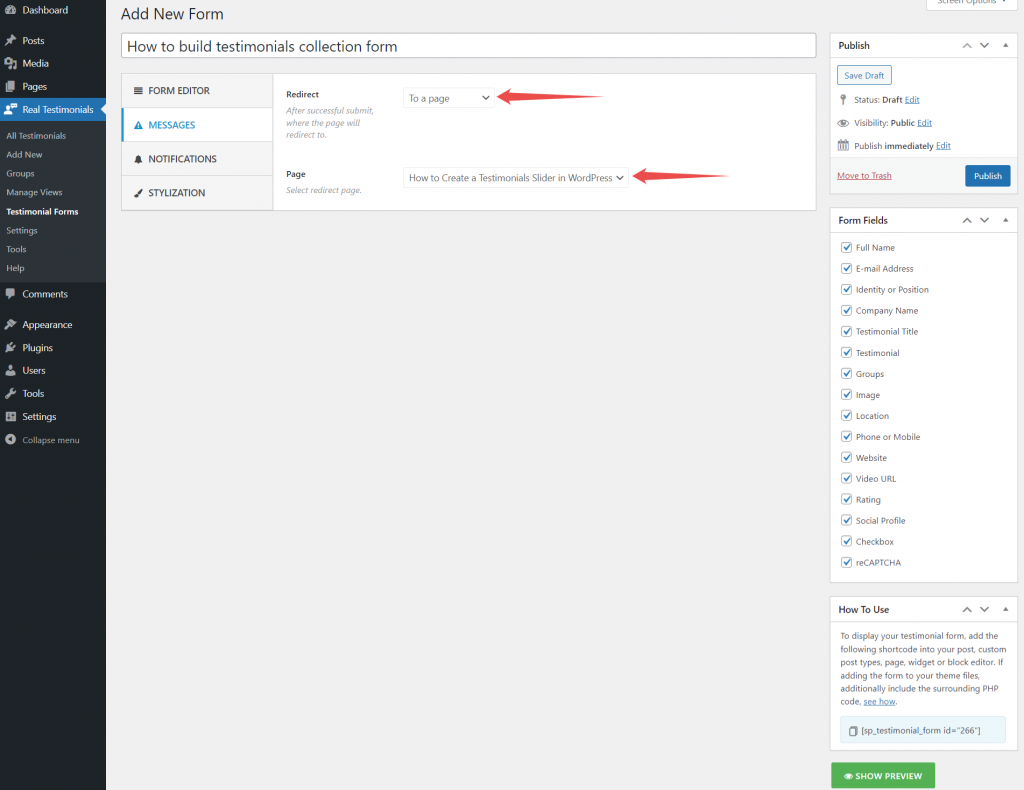
Step 2: Configure Messages
The Message option lets you choose the redirect page after submission.
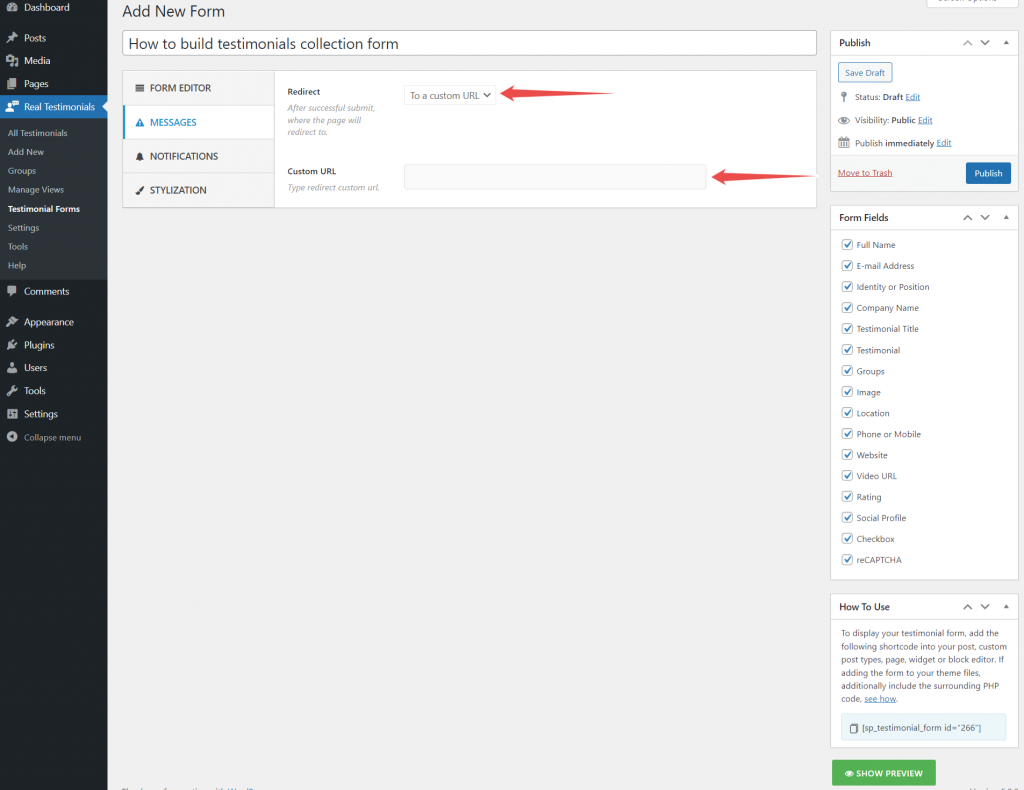
You have three options for the redirect: Same page, To a page, and To a custom URL.
If you select To a page as a redirect, you will have the option to choose from available pages.
You will have an option to set a custom URL if you choose To a custom URL as the redirect.
If you choose the Same page as a redirect, you will have the option to set a message.
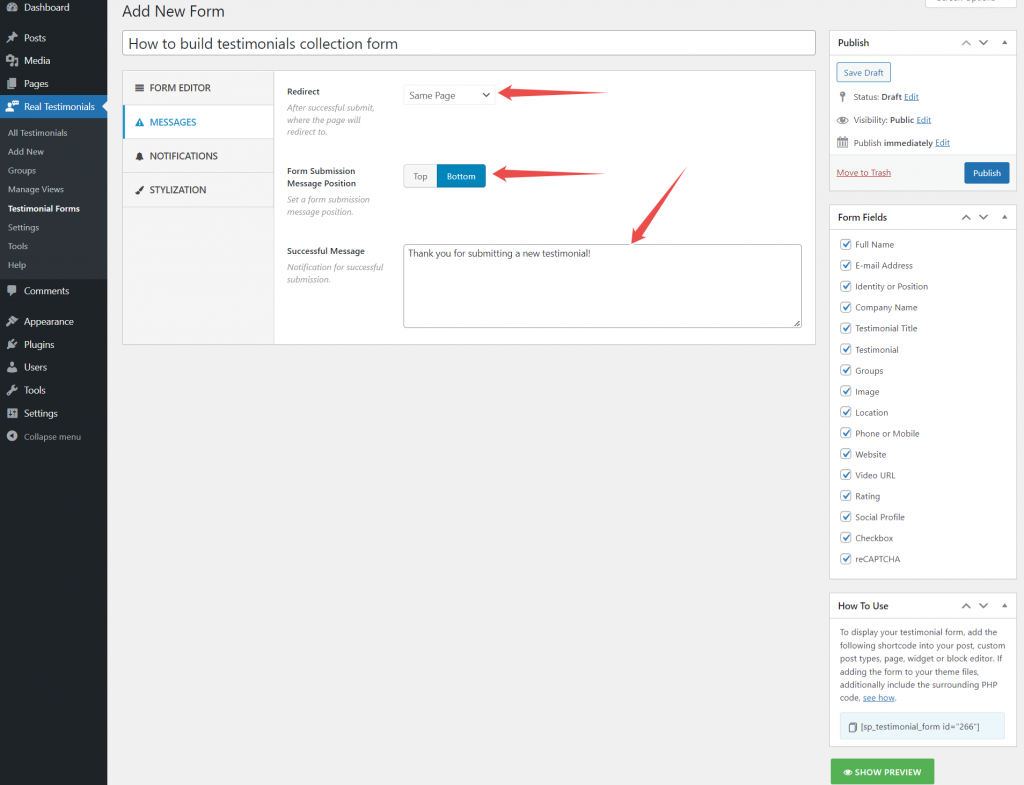
For this tutorial, I will choose the Same page as a redirect. Also, I will set an excellent submission message.
Step 3: Adding testimonials automatically
It is the most important part of this tutorial. Now, navigate to the Notifications option. Then, select Auto Publish as Testimonial Status.

Testimonials will publish automatically on your website after submission. This option doesn’t need manual action.
If you want to receive notification after every successful submission, enable Email notification.
If you enable Email notification, you will have options to set email notification subject, heading, text, and notify email.
For this tutorial, I will keep the Email notification option disabled.
*Note: if you don’t want to customize testimonials form appearance, then you can skip the Step 4.
Step 4: Customize testimonials form appearance
You can customize the testimonials collection form appearance according to your need. The Real testimonials pro allows you to customize the Label and Submit button color.
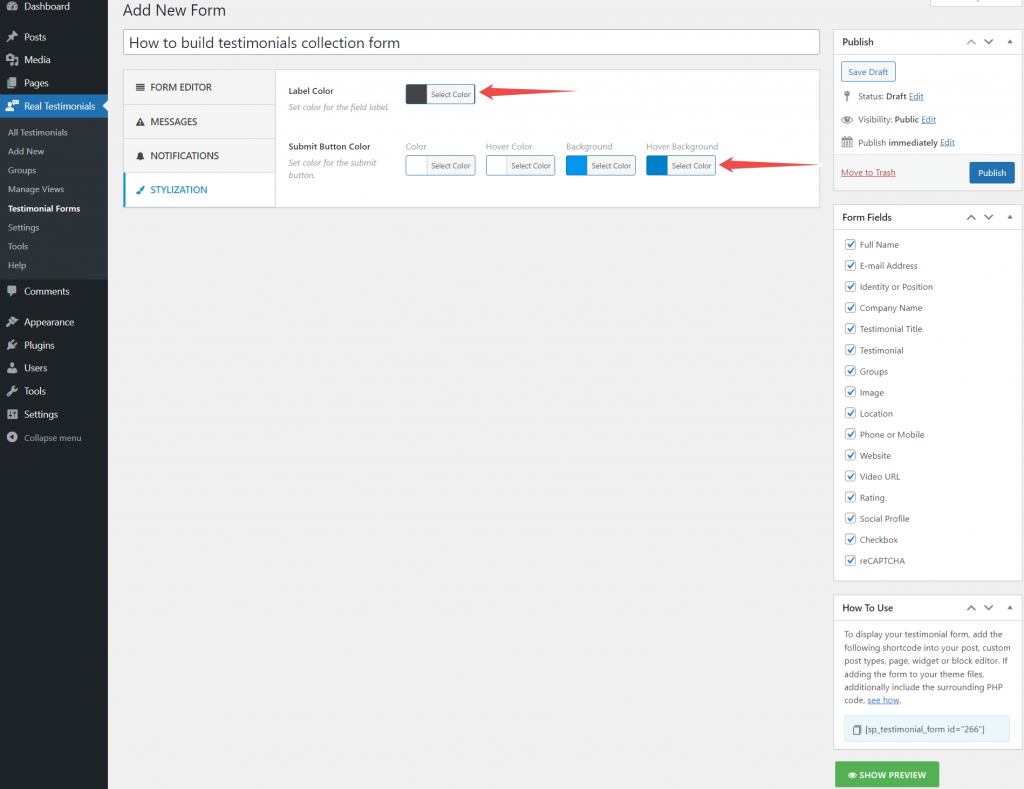
You can change submit button’s color and background color. Moreover, you can change the hover color and hover background color.
So, customize the testimonials form’s appearance to match your brand.
Now, hit the Publish button, and testimonials collection form creation is complete.
Step 5: Display testimonials collection form
It’s time to display the form to collect customer reviews automatically.
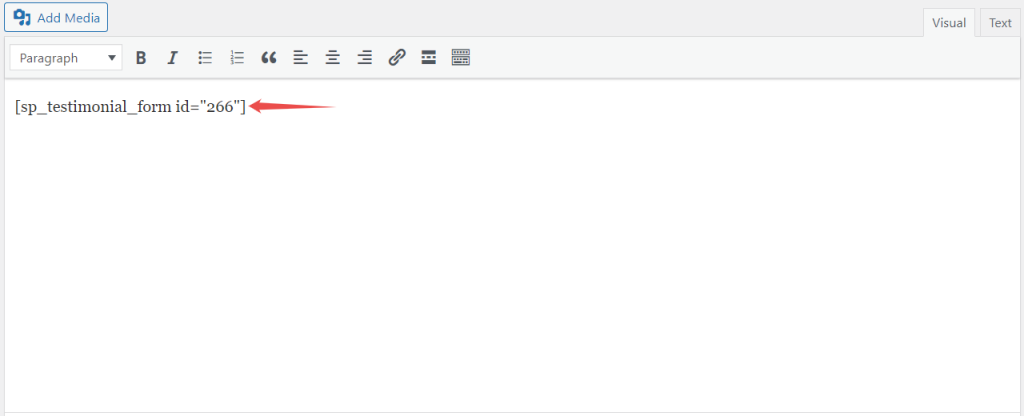
Copy the shortcode from the testimonials form’s How to use section. Then, paste it where you want to display the form. You can display the testimonials form in posts, pages, sidebar, custom pages, etc.
Step 6: Display automatically collected testimonials
I have created the testimonials form. Plus, placed it for collecting users’ reviews automatically.
Customer reviews will automatically add to your site if you follow the above steps correctly.
It is time to display automatically added customer reviews. Here is how to do that.
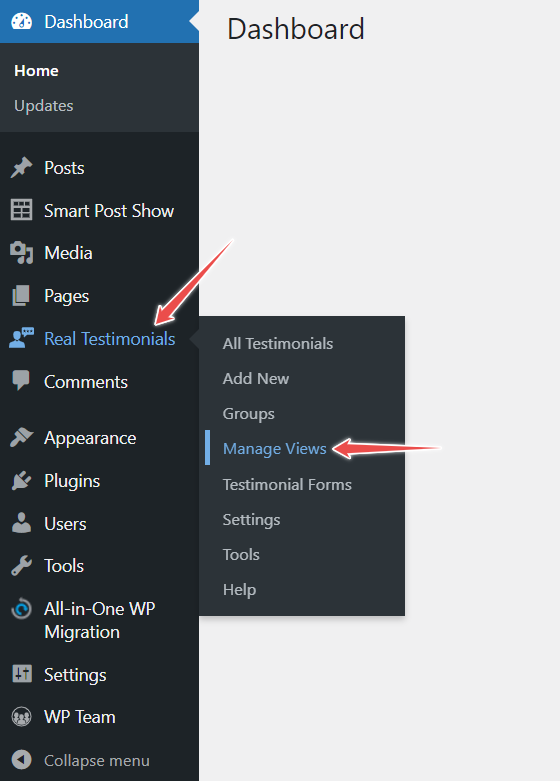
Again, get back to the WordPress Dashboard, navigate Real testimonials, then click on Manage Views. After that, click on Add New.
Now, Type the views’ title. Choose a layout preset as you like.
If you collect customer reviews for a group/category, select Groups from Filter testimonials. Then, add the group. If you didn’t collect customer reviews for a specific group, select Latest.

Now, hit the Publish button. Then copy and paste the shortcode where you want to display automatically added testimonials.
The whole mechanism is ready for collecting and displaying customer reviews. Now, you don’t need to do anything to collect and display users’ feedback.
Isn’t it cool?
Final words
That’s it! You have now learned how to automatically add testimonials in WordPress website. The best part is that the entire process is automated. You don’t have to worry about manually adding new testimonials.
Feel free to customize the form however you like and display it in your website’s best location.
Have fun collecting happy customer feedback and watch your business grow!
Leave a Reply