In this blog, I’ll show you how to add advanced WordPress filters smartly in minutes with no code.
Every standard website that contains (or will soon) a pretty number of posts (blogs, products, articles, images, videos, or anything) provides advanced filters.
These filters improve user experience by letting your website visitors quickly find what they are looking for.
Needless to say, the less time your visitors have to spend to find what they are looking for, the better.
Therefore, the filters are so crucial.
In addition to an easy shortcode generator, it has recently introduced many easier blocks. If you prefer gutenberg block editor, explore its handy blocks.
Let’s get in.
Table of contents
What are filters?
In essence, we are here talking about WordPress search filters.
Search filters refer to the functional options that help users to refine their search results by narrowing down the options based on specific criteria, such as niche, author, date, and so on for content, gender, size, color, brand, and so on for products.
These filters are often presented as a set of tabs, checkboxes, radio buttons, dropdown menus, or input fields that users can interact with to refine their search.
Most importantly, filters allow your website visitors to find their targeted results quickly.
Undoubtedly, allowing users to refine their search results quickly is important for both user satisfaction and business KPIs.
4 easy steps to add filters in WordPress
Follow the four simple steps to add advanced live Ajax filters to create a quicker search experience for your visitors.
Step 1: Install and activate Smart Post Show Pro
Smart Post Show Pro is a highly feature-rich and easy-to-use WordPress post management plugin. It left nothing that you need to organize and manage your posts and products to increase user engagement and conversion rate.
Plus, this powerful plugin offers you to add functionally super-pleasing WordPress search filters seamlessly.
Let’s install and activate it.
However, if you need assistance to install and activate it, please see the documentation or watch the following guide.
Feel free to contact the very swift and soft support team for further help.
Step 2: Create a showcase
Once you successfully install and activate Smart Post Show Pro, it must be at your WordPress admin sidebar, as seen in the following screenshot.
Next, add posts or products and create your showcase. Here, we are going to create a post showcase and advanced filters to it.
Note: If you want to add WordPress filters to your existing post or product showcase, revamp it with this plugin.
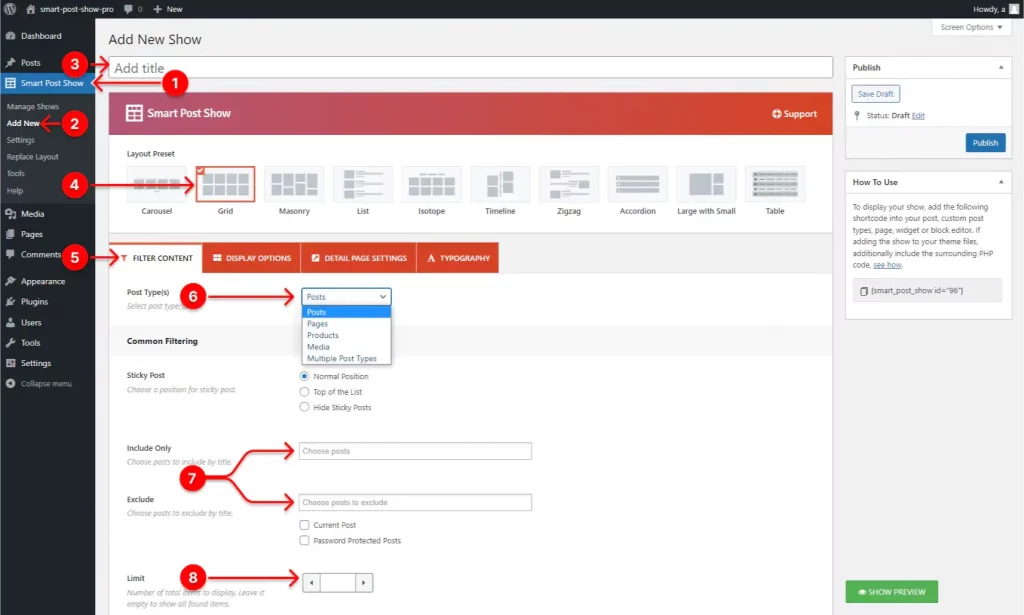
1. First, click Smart Post Show.
2. Next, Click Add New.
3. Click Add Title and give your showcase a name.
4. Select Grid, for instance. However, it allows you to display your content in different 10+ layouts-
- Carousel and slider
- grid
- masonry
- list
- isotope
- timeline
- zigzag
- accordion
- table
- large with smalls
5. Leave FILTER CONTENT selected.
Anyway, although I’m showing you the functionalities of the FILTER CONTENT tab according to the blog title, the other tabs next to it are super important to make your post and product showcase more appealing and engaging.
So, explore the fantastic options of the other tabs and try them out as per your requirements and your visitors’ preferences.
Most importantly, DISPLAY OPTIONS is a must to customize your post and product boxes’ backgrounds, borders, paddings, box shadows, and so on. No worries! They are very intuitive and easy to use. So try them to make your post and product pages aesthetically super pleasing to attract more visitors.
You might get one thing Smart Post Show is a highly feature-rich WordPress plugin.
Moreover, it is not only to add advanced WordPress filters for your posts and products but also to organize, manage, and showcase them aesthetically.
6. Select Posts, for example.
However, you can select what you need from posts, pages, products, media, and multiple post types.
7. Leave them empty and unchecked if you want to display all your posts.
However, you can display only some particular posts or hide some things. Want to show all posts of a specific category, tag, or more? Please scroll down and find advanced filtering.
Step 3: Configure WordPress filters for the showcase
Smart Post Show allows you to configure an advanced WordPress filter in a few clicks.
However, before we go to configure, we should recall that advanced filtering includes at least three compulsory elements.
- Taxonomy (Category, tag, more)
- Search bar
- Sort by
That said, the list can differ based on your industry and content types.
Let’s configure them

- Click Taxonomy, Sort By, and Keyword to check them.
1. Taxonomy (Category tag, more)
Users prefer clicking over typing.
The taxonomy (category) filter buttons, checkboxes, dropdowns, and so on allow users to find content quicker by clicking. That’s why the taxonomy (category) filter is so important.
So, let’s start configuring the taxonomy (category) filter.

1. Click the dropdown and select Category.
However, Besides category, you can select tag, format, and more.
2. Hide the taxonomy name if you show only one taxonomy.
That said, when you display multiple taxonomies, show their names.
3. Leave them (“Choose Terms” and “Operator”) how they are.
However, if you want to hide any or a few particular categories, click in Choose Terms field, select the category name(s), and pick NOT IN from the Operator dropdown. In terms of showing any or a few particular categories only and hiding all others, go the same way but select IN from the Operator dropdown. On the other hand, if you want to show the common posts and products of multiple categories, pick the categories and select AND from the operator dropdown.
4. Check Add to Ajax Live Filter.
5. Select the Button from the filter type dropdown.
However, you can select Dropdown if you have so many categories to show that are not allocated in a single row, and your visitors don’t like multiple filter rows.
In addition, Smart Post Show also offers you Radio and checkboxes. You can use them as per your requirements.
6. Keep it aligned in the center.
Customize the Filters
You might notice on the screenshot that Smart Post Show offers you many more options, including custom colors to customize your advanced WordPress filters and make them how it should be.
In addition, you can customize the filter labels and the in-between spaces of the filter buttons as per the pixel-perfect design demand.
Most importantly, hiding empty categories is always one of the best practices for a good user experience.
Furthermore, you can show post count [ WordPress (32) ].
Now, let’s dive into the sort by.
2. Sort by
It looks small but impacts largely. With a single click, your visitors can sort the posts and products by their preferences. In terms of products, the options could be “Price: low to high” and “Price: high to low.”
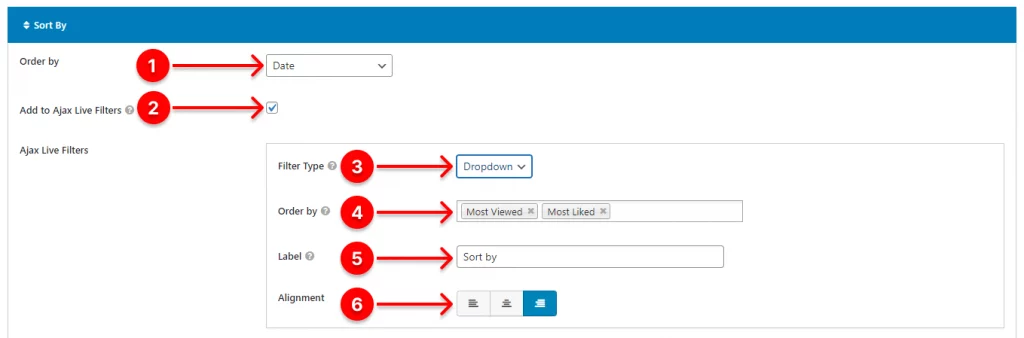
- Leave it in Date to keep the most recent as a default order by. However, it offers a long list. You can select what you need.
- Check Add to Ajax Live Filter.
- Select Dropdown.
- You can select Most Viewed and Most Liked from the long list.
- Write Sort by.
- Align it to the right.
Now, let’s configure the search bar.
3. Search bar
The search bar is one of the essential elements of advanced filters to allow your visitors to search by titles or more specific terms.
Let’s configure the search bar.
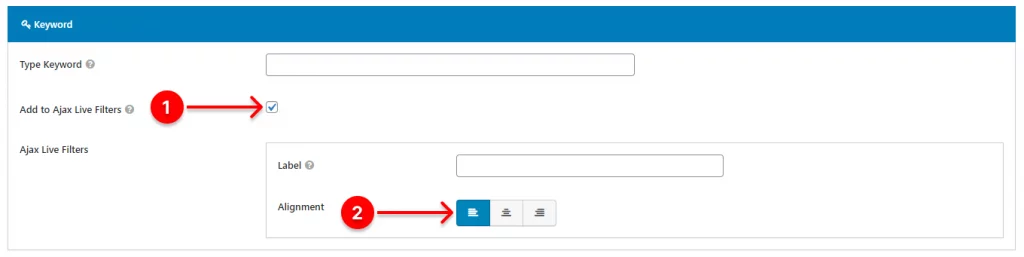
- Check Add to Ajax Live Filters.
- Align it to the left.
Great! We’ve configured them!
Let’s display them now
Step 4: Publish the showcase along with WordPress filters
As our showcase and WordPress filters are ready, it’s time to hit the publish button. First, find the Publish or Update button in the upper right corner.

- Hit the Publish or Update button.
- Copy the shortcode and paste it where you want to display your showcase and the advanced WordPress filters. To learn more, you can read the instruction above the shortcode.
After we published it, we got the following outcome.

How is it looking? Minimal and cool. Right?
However, as per your requirements and visitors’ preferences, you can craft yours aesthetically and functionally more pleasing with this feature-rich plugin.
Take Away
The advanced WordPress filters help your website visitors to refine your content and quickly find what they are looking for.
The quicker your visitors find what they are looking for, the better.
Therefore, the filters are very important for both user satisfaction and your Business.
Thanks for reading. Do you have any questions or something to share? Let’s talk below in the comment box.
Leave a Reply