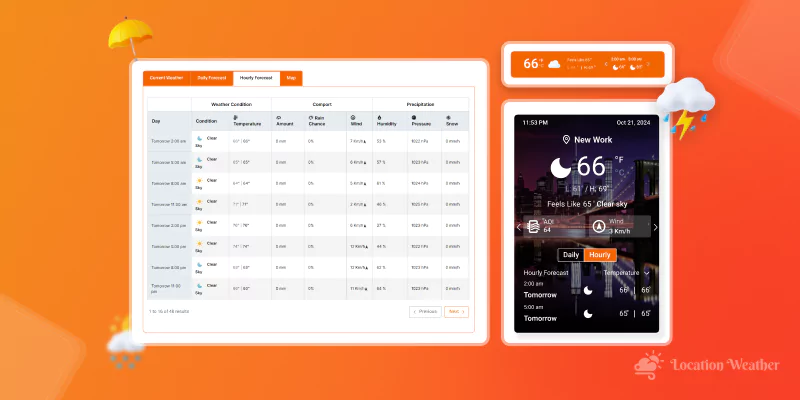
Adding a weather widget to your WordPress site is a great way to keep your visitors informed about the current weather conditions. In this article, I will show you how to add a beautiful weather widget in your WordPress site using a weather plugin.
I will also provide tips on how to customize the widget’s look.
Let’s get started!
Why should you show the weather forecast on your website?
Some businesses depend on weather forecasts. Weather conditions have a direct impact on their daily sales. Industries like travel, hotel, and hospitality rely on the weather forecast.
Weather forecast plays an important role when people buy services from these industries. That’s why if you have a website in these industries, you must display weather forecasts.
Weather forecasts on these websites can boost their sales and revenue significantly.
For the WordPress website, you can use a plugin to display weather forecasts. But remember that the plugin is easy to use, clutter-free, and doesn’t add weather links to weather service.
So, let’s see how to add a beautiful weather widget in your WordPress site.
How to add a beautiful weather widget in your WordPress site
As I said earlier, you need a plugin to display weather forecasts. For adding the weather widget to the WordPress site, you need a plugin that also offers weather widgets.
Here I will use the Location Weather plugin. It is an easy-to-use, fast, clutter-free, and beginner-friendly plugin.
Moreover, It is a free plugin. However, it has a paid version. The free version doesn’t offer too many features. But it does the basic weather display job. You must upgrade to the Pro version if you want more features.
So, install and activate the Weather Location plugin.
Step one: Create OpenWeatherMap API key
Location Weather plugin needs an API key from OpenWeatherMap to show weather forecasts. That’s why you need the API key first. Here is how you can create the API key.
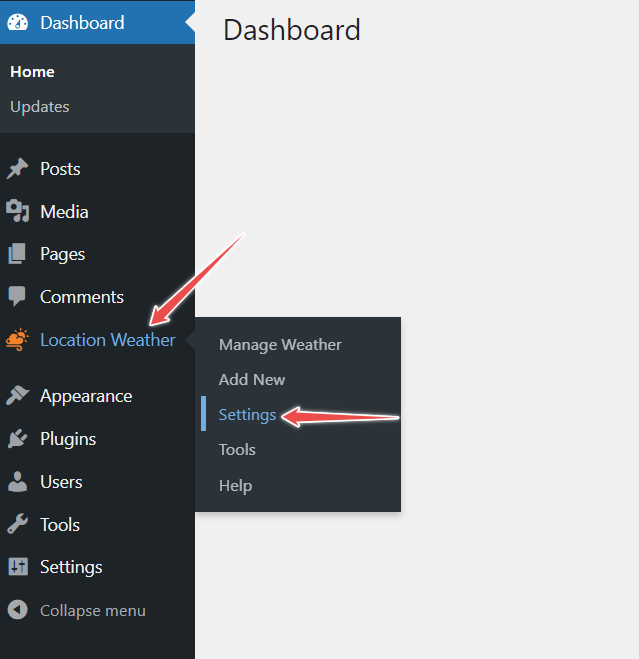
Go to the WordPress Dashboard and navigate Location Weather. Then, click on Settings. After that, click on the Get API Key.
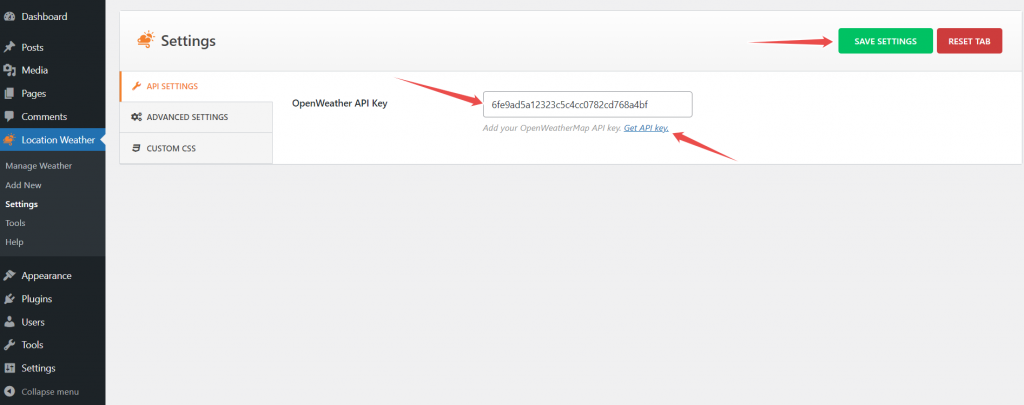
After clicking the link, it will take you to the OpenWeatherMap website. Now, create a profile and navigate the API keys tab.

Here you can see a default API key. You can create more API keys if you want. Copy the API key. Then, go back to the Location Weather Settings. Paste the API key in the API key box and click on Save Settings.
I have created and set up the API key. It is time to create weather reports.
Step two: Create weather reports
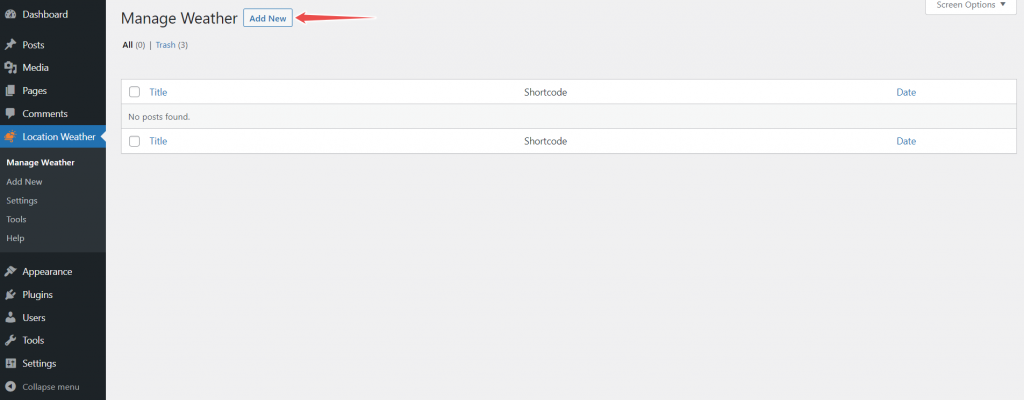
Again get back to the WordPress Dashboard and navigate Location Weather. After that, click on Manage Weather.
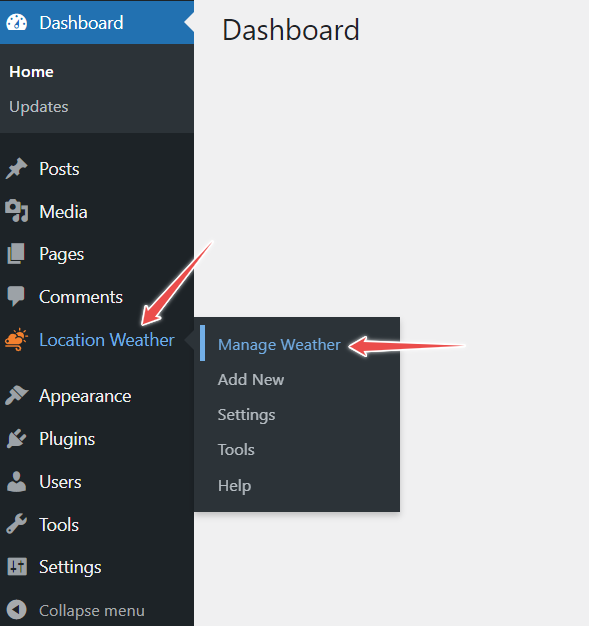
Now, click on Add New. Type the title for weather forecasts.
Scroll to the Weather Setting and type the city name. The Pro version allows adding location through ZIP, city ID, and coordinates. Now, click on Publish.
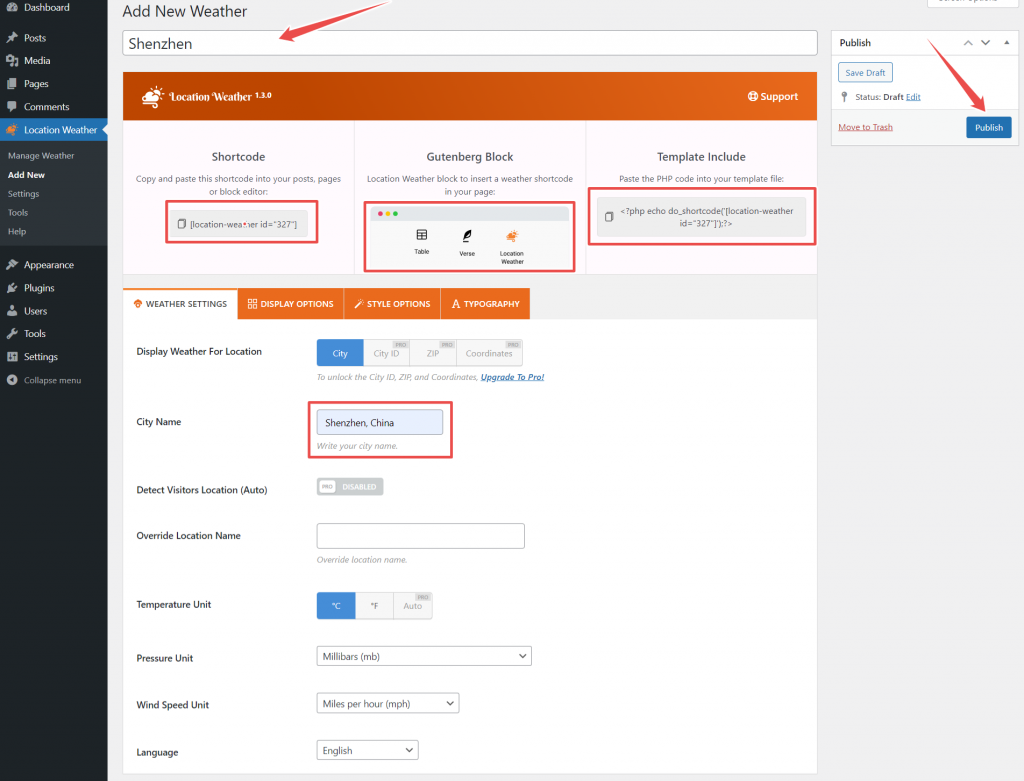
The weather forecast is ready. It is time to add the weather widget to the WordPress site.
Step three: Adding a weather widget to the WordPress site
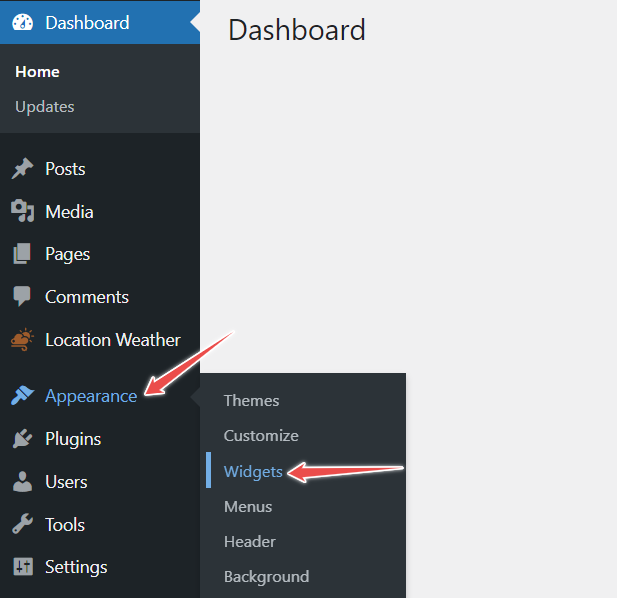
Again, go back to the WordPress dashboard and navigate to Appearance. Then, click on Widgets.
Now, choose where you want to add the weather widget. You can place it anywhere you want. Here, I will add the widget in the sidebar area.
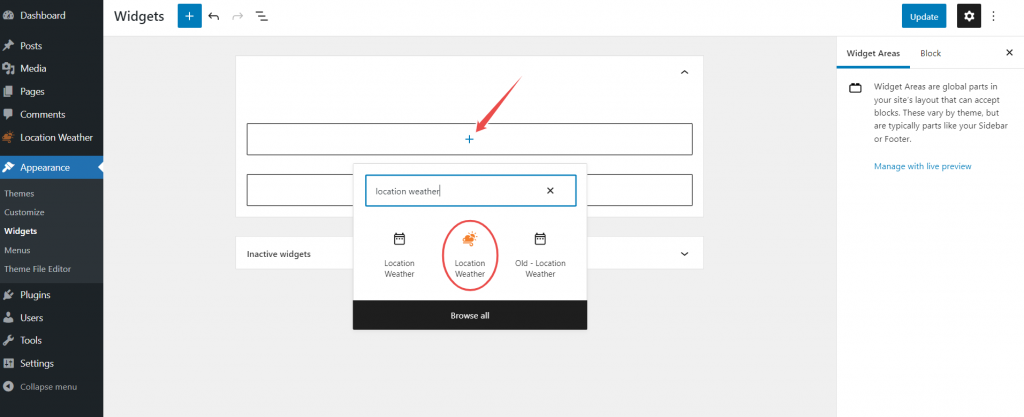
After clicking the widget area, click on Add Block. Then, search Location Weather and add it. After that, choose the city you have already added to show weather forecasts.
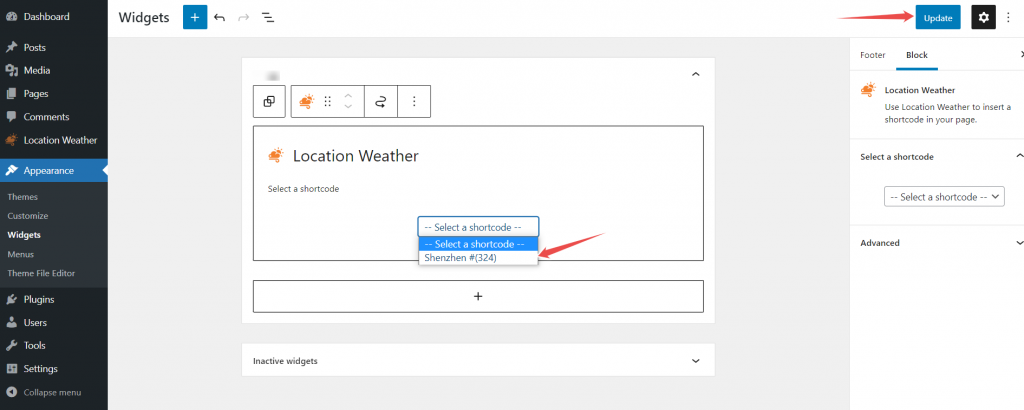
Finally, click on Update.
*Note: you can stop here. If you want to customize the weather forecast appearance, then continue.
Step four: Customize the appearance
Weather Location offers greater room for appearance customization. However, the free version has limited customization options.
From Weather Settings, you can override the location name using the Override Location Name option. Type the name in the box you want to display instead of the city name.
Moreover, you can change the pressure unit, wind speed unit, and language.
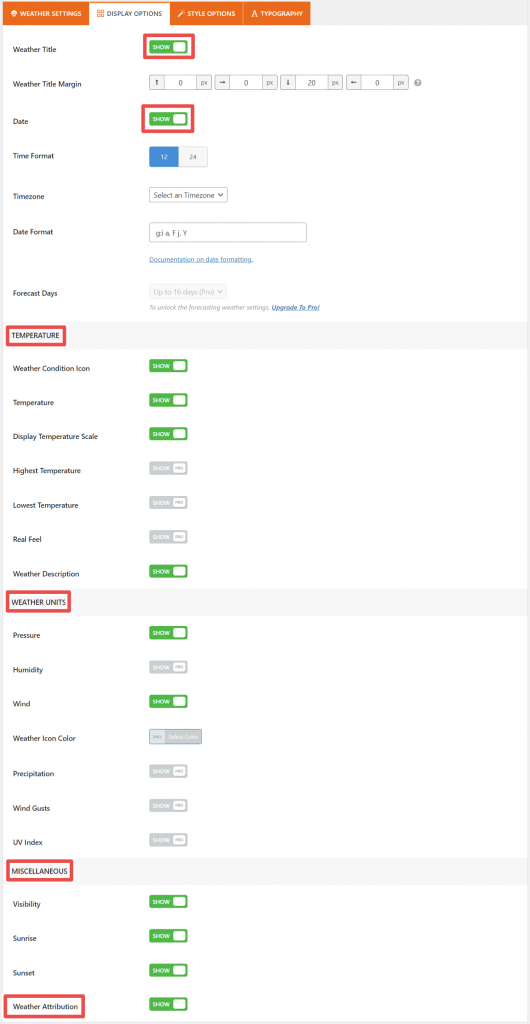
You can show/hide the weather title and date, set time format, zone, and date format from the Display Options.
Moreover, you can show/hide the weather condition icon, temperature, temperature scale, and weather description from the Weather option.
Also, using the Weather Units option, you can show/hide pressure and wind.
Furthermore, you can show/hide visibility, sunrise, sunset, and weather attribution from the Miscellaneous option. Here I will hide the wheater attribution as it will hide the weather service link.
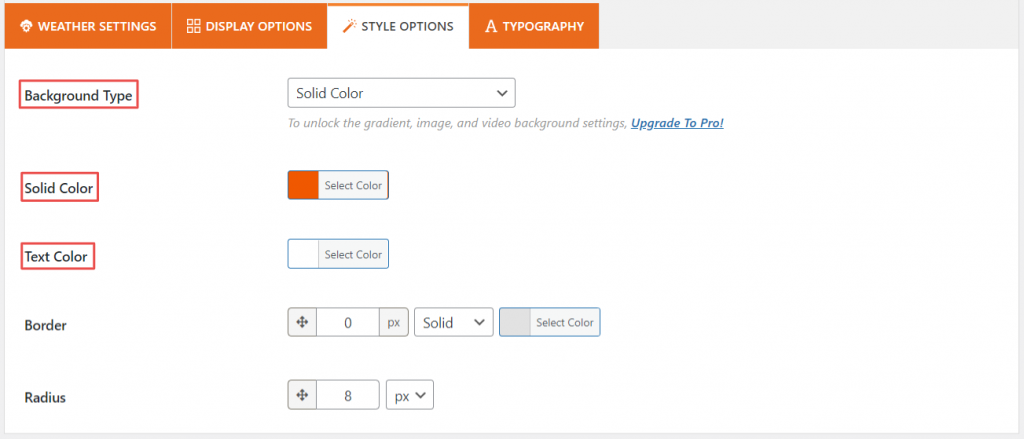
The Style option allows changing background type, solid color, text color, border, and radius.
The free version doesn’t allow to customize typography.
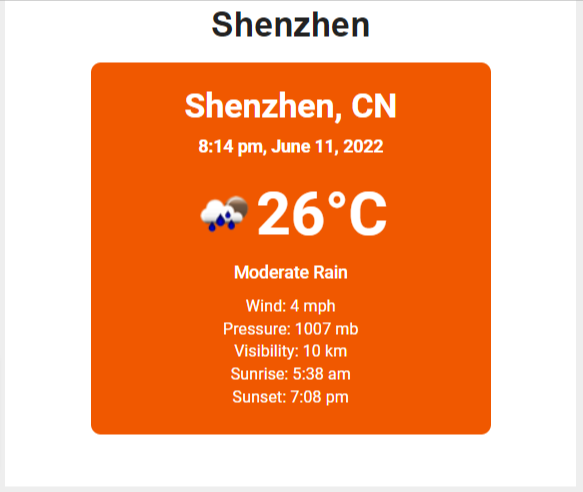
This is all for how to add a beautiful weather widget in your WordPress site. Here is how it looks.
Final words
Adding a weather widget to your WordPress site is a great way to give your users the latest forecast for their area.
It can also be a helpful tool if you run a business and need to keep track of weather conditions in different parts of the country.
I hope this tutorial has helped you add a beautiful weather widget to your WordPress site. If you have any questions, please feel free to ask.

