

Black Friday is one of the busiest shopping events of the year for WooCommerce store owners. More visitors and orders can bring more sales, but they can also cause problems. A slow page loses the shopper, a broken coupon loses your margin, and a sold-out product loses the sale.
These problems can lead to lost sales, abandoned carts, and unhappy customers. That is why it is important to prepare your WooCommerce store for Black Friday before the rush arrives.
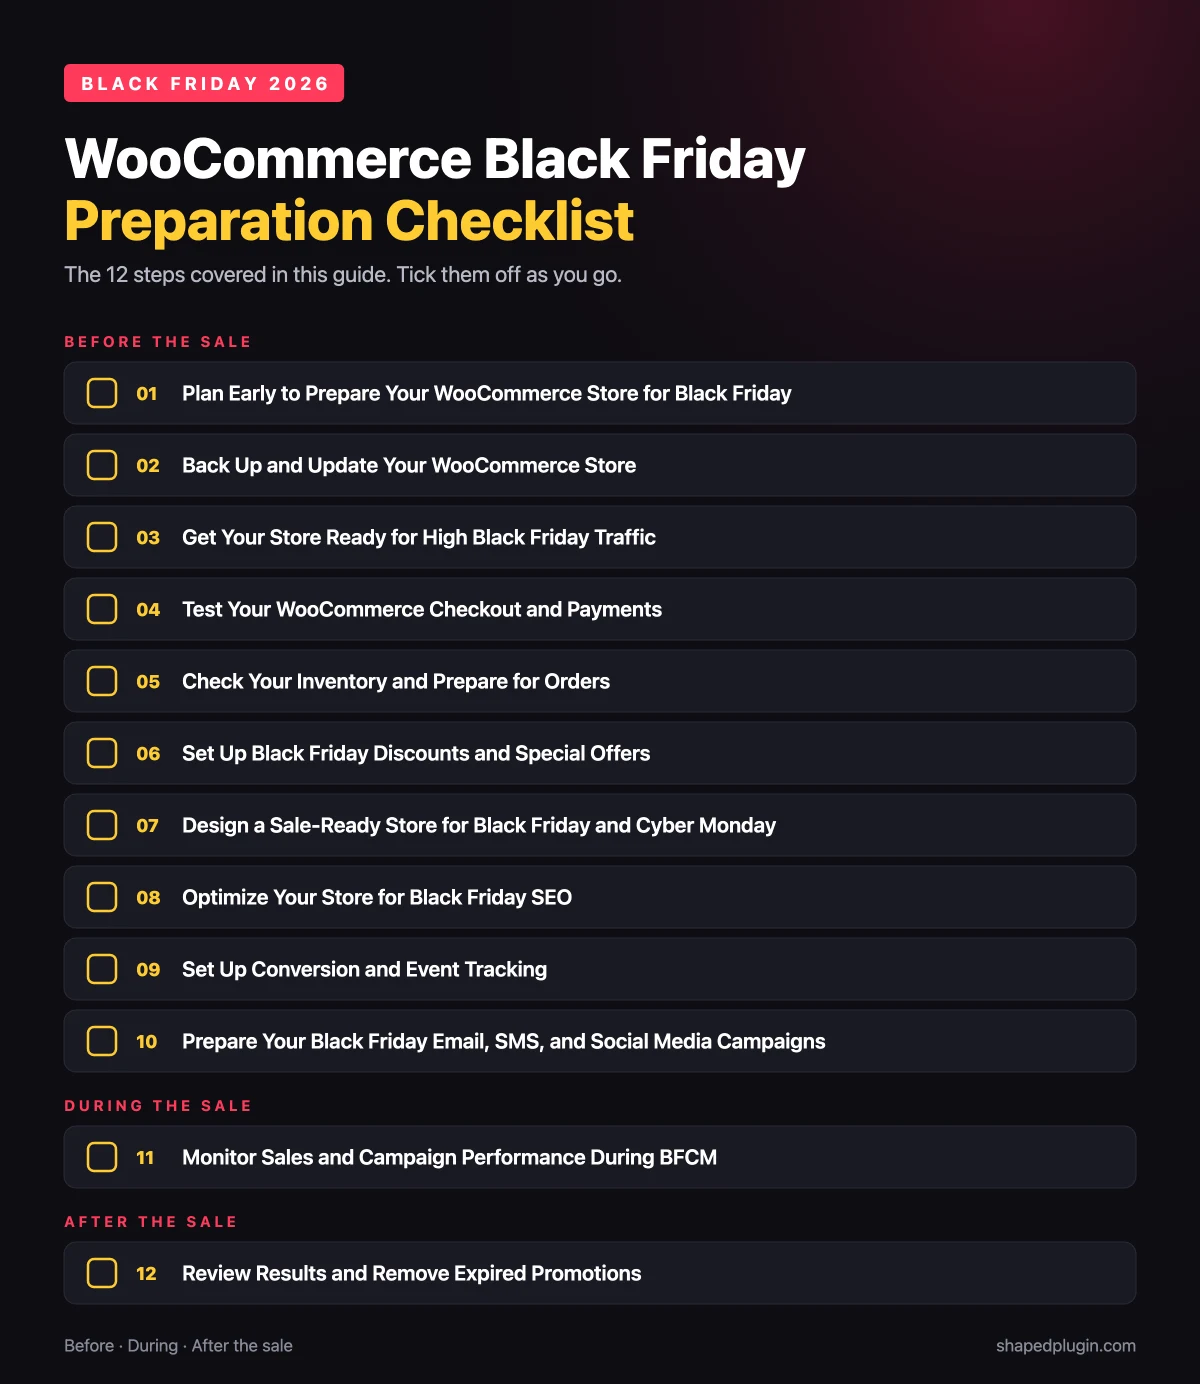
This guide covers a complete 12-step WooCommerce Black Friday checklist for 2026. You will learn how to prepare your store, set up discounts, improve website performance, plan marketing campaigns, and track sales.
WooCommerce Black Friday Preparation Checklist
To prepare your WooCommerce store for Black Friday, work through these 12 steps in order, based on the time you have left before the sale. The first steps protect your store with backups, updates, speed fixes, and checkout tests. The middle steps get your offers, landing page, SEO, tracking, and campaigns ready. The last two steps help you watch performance during BFCM and clean up once the sale ends.
1. Plan Early to Prepare Your WooCommerce Store for Black Friday
Early planning gives you enough time to get your store sale-ready. Use this time to set sales goals, plan discounts, check inventory, and prepare marketing campaigns before shoppers start buying.
Here is why early preparation matters:
- 73% of merchants in WooCommerce’s 2025 holiday survey said the holiday season accounts for more than 20% of their annual revenue.
- 71% of shoppers plan to start buying before Black Friday, while 46% plan to shop before November, according to Attentive’s 2026 survey of 600 U.S. shoppers who intend to shop BFCM sales.
- U.S. shoppers spent $11.8 billion online on Black Friday 2025, a 9.1% increase from 2024, according to Adobe Analytics.
These numbers show why you should start preparing before Black Friday arrives. An early plan gives you more time to reach shoppers, test your store, and make the most of the sales opportunity.
Create a Black Friday Preparation Timeline
Black Friday is getting closer, so it is important to plan your tasks based on the time you have left. Count the days and choose the plan that fits your BFCM preparation.
| Time Available | What You Should Prioritize |
| 3 Weeks | Review past sales, plan discounts, check inventory, test website speed, create landing pages, and prepare marketing campaigns. |
| 1 Week | Finalize discounts, update product pages, check stock, test checkout, and schedule promotional emails. |
| 48 Hours | Check payments, coupon codes, backups, stock, shipping rates, and campaign links. Avoid major website changes. |
If you have only a few days left, focus on fixing problems that could stop customers from buying.
Review Last Year’s Holiday Sales Data
Review last year’s holiday sales to see which products and marketing channels brought the most sales. You can find this information in WooCommerce Analytics and Google Analytics 4 (GA4).
- Go to WooCommerce → Analytics in your WordPress dashboard.
- Open Analytics → Coupons and note which codes worked.
- Open GA4 → Reports → Acquisition → Traffic acquisition to see which channels brought visitors and purchases.
Set Revenue, Traffic, and Conversion Goals
Set targets based on last year’s results.
Calculate Your Expected Revenue
Estimate expected revenue with this formula:
Visits × Conversion Rate × Average Order Value = Revenue. Conversion rate is the share of visitors who buy. The numbers below are examples. Replace them with your own.
Example: Last Year vs. Black Friday Goal
| Metric | Last Year | Black Friday Goal |
|---|---|---|
| Website visitors | 5,000 | 6,000 |
| Conversion rate | 2% | 2.5% |
| Total orders | 100 | 150 |
| Average order value (AOV) | $100 | $100 |
| Revenue | $10,000 | $15,000 |
For example, 6,000 visitors × 2.5% × $100 = $15,000 in expected revenue.
This gives you a revenue target based on traffic and expected purchases.
Track these goals during the sale so you know when to adjust your campaigns.
2. Back Up and Update Your WooCommerce Store
Back up both your database and website files. Your database stores orders, products, customer records, and settings.
You can use your hosting provider’s backup service or a WordPress backup plugin.
Useful guide: WooCommerce backup documentation.
Update WordPress, WooCommerce, Themes, and Plugins
Check available updates before launching your campaign, and finish them at least a week before the sale.
- Open Dashboard → Updates in WordPress.
- Test important updates on a staging site first.
- Apply the tested updates to your live store.
- Check product pages, checkout, payments, and order emails after each update.
Avoid major updates during the sale itself, but do not skip security updates. Test them and apply them safely.
3. Get Your Store Ready for High Black Friday Traffic
Check your store’s hosting and loading speed before you send more visitors to your website. Your product pages and checkout should work even when many shoppers arrive at the same time.
Add Caching and a CDN
Caching saves a ready copy of each page. A CDN (content delivery network) stores copies of your files on servers around the world. Use your host’s page cache or a caching plugin, and add a CDN if your shoppers are spread across regions. Then exclude the cart, checkout, and My Account pages from the cache.
- Caching plugins: WP Rocket or Jetpack Boost.
- CDN: Cloudflare.
- Check the cache exclusions even if your plugin sets them for you.
Compress Images and Remove Unused Plugins
Compress your product images and delete the plugins you do not use.
- Compress and lazy-load images with Smush. Lazy-load means an image loads when the shopper scrolls to it.
- Convert images to WebP.
- Turn off the tracking codes and widgets you do not need during the sale.
Run Google PageSpeed Insights to check loading speed and identify performance problems.
Test your store on mobile devices. Mobile drove 52.8% of U.S. online holiday spending from November 1 to December 1, 2025, according to Adobe Analytics.
4. Test Your WooCommerce Checkout and Payments
A smooth checkout turns more visitors into customers. Baymard Institute puts the average cart abandonment rate at about 70%, and 17% of U.S. shoppers have left an order because the checkout was too long or complicated. During Black Friday, each lost checkout costs you more.
Simplify Checkout and Allow Guest Checkout
During peak sales, shoppers do not want to spend extra time at checkout. Let shoppers pay without an account.
Go to WooCommerce → Settings → Accounts & Privacy and allow orders without an account. Remove fields you do not need, such as Company. On the default block-based Checkout, you can hide optional fields for free: edit the Checkout page and turn them off in the Checkout block settings. For classic checkout or custom fields, use the Checkout Field Editor.
Check Payment Gateways and Express Checkout Options
Offer one card option, one wallet, and one backup method. Express checkout lets a shopper pay with one tap.
Open WooCommerce → Settings → Payments to review your available payment methods.
Check that:
- Your payment gateways are active.
- Each payment method supports your selling region and currency.
- Card payments work correctly.
- Apple Pay or Google Pay works if your provider supports it.
- Payment errors display clear messages.
- Customers return to the correct page after payment.
5. Check Your Inventory and Prepare for Orders
You need enough inventory to handle orders without promising products you cannot deliver, so confirm stock for every sale product and set alerts before the sale starts.
Useful guide: WooCommerce inventory settings.
Check Stock Levels and Best-Selling Products
Go to WooCommerce → Analytics → Stock to review the stock status of your products and variations.
Check these details:
- Available product quantities.
- Popular products with limited stock.
- Product variations such as size and color. When one size or color sells out, shoppers should see that before they click. Smart Swatches for WooCommerce replaces variation dropdowns with color, image, and label swatches, so available options are easy to spot.
- Products that suppliers cannot restock quickly.
- Items you plan to feature in advertisements.
Compare your available stock with expected demand.
For example, avoid promoting a product to thousands of shoppers if you have only a few units left and no plan for restocking.
Set Low-Stock Alerts and Manage Out-of-Stock Products
WooCommerce can track stock quantities and notify you when products run low.
To check these settings:
Go to WooCommerce → Settings → Products → Inventory. Enable stock management if you want WooCommerce to track quantities.
- Enable low-stock and out-of-stock notifications.
- Set the low-stock and out-of-stock thresholds (for example, 5 and 0).
- Check the email address that receives the notifications.
- Save your changes.
Then review the stock settings of individual products and variations. If you allow backorders, show the expected delivery date clearly.
Useful guide: WooCommerce low stock alerts.
6. Set Up Black Friday Discounts and Special Offers
Pick a few products for deep discounts and protect your margin on the rest. Do not discount the whole store.
Choose Your Offer Types and Featured Products
- Give deep discounts to overstock, seasonal items, and high-margin products.
- Raise order value with Product Bundles, free shipping above a set spend, and product recommendations. Show related items and upsells on product and cart pages so shoppers add one more item before checkout. ShapedRecommend can suggest relevant products automatically.
- Sell gift cards with WooCommerce Gift Cards.
- Keep the offer simple. Complex deals confuse shoppers.
Create Coupons and Schedule Sale Prices
- Set an expiry date and time.
- Schedule sale prices in Product data → General → Schedule. Read the product guide.
- Check your site time zone under WordPress Settings → General. Scheduled sale prices and coupon expiry follow it, so a wrong time zone can start or end your sale at the wrong hour.
- Use Smart Coupons for buy-one-get-one and store credit offers.
- Check your region’s rules on crossed-out “was” prices.
Plan Discounts for Partners, Affiliates, and Influencers
Give each partner a unique coupon code and a unique link.
- Set the discount and the commission before launch.
- Set a usage limit on each code.
- Add UTM tags to each link.
- Track codes with Coupon Campaigns.
- Give loyal customers an early-access code.
7. Design a Sale-Ready Store for Black Friday and Cyber Monday
Build one landing page for the sale and show the deal on every key page.
Create a Dedicated Black Friday Landing Page
Create one page with a short URL, such as /black-friday-deals, and keep it live all year.
- Add a hero image and a headline with a number, such as “30% off bestsellers.”
- Show featured products and bundles in a WooCommerce product slider near the top of the page, so shoppers see your best deals without scrolling. Reno Slider by ShapedPlugin displays products in sliders, carousels, grids, or tables without code. List your top categories below it.
- Add the sale end date, shipping deadlines, and return window to this page and to each product page. A separate Shipping and Returns tab keeps these details easy to find. Smart Tabs by ShapedPlugin lets you add custom WooCommerce product tabs like this.
- Add buttons that link to product pages, plus a quick view button so shoppers can check sizes, prices, and photos without leaving the sale page. Reno Quick View by ShapedPlugin adds this to WooCommerce product listings.
- Add customer reviews and payment icons near your top deals. Genuine reviews help shoppers trust a discount they have only seconds to judge. Real Testimonials by ShapedPlugin can show them in a slider or grid.
- Update the page each year. Do not build a new one.
Add Sale Banners, Countdown Timers, and Pop-Ups
Add a site-wide banner, a countdown timer, and one pop-up with a clear button.
Site-Wide Banner and Countdown Timer
- Add a site-wide notice at the top of every page.
- Set the timer to the exact sale end time. Hide it or show “Sale ended” when it hits zero.
- Match the coupon expiry to the timer.
Exit-Intent Pop-Up
Trigger the pop-up on exit intent. Omnisend data shows pop-ups average a 2.1% conversion rate, so keep the offer short and the button clear. For product pop-ups, compare these WooCommerce product popup plugins.
Sale Badges and Menu Link
- Add Black Friday sale badges to product thumbnails with WooCommerce product badges.
- Add a “Black Friday Deals” item to the menu.
Search engines need time to find your sale page. The next section shows how to help it get found early.
8. Optimize Your Store for Black Friday SEO
Update the titles, meta descriptions, and internal links on your sale pages, and publish the landing page early so Google can index it.
Update Product Titles, Meta Descriptions, and Internal Links
Add seasonal keywords to your top product and category pages, then link them to the sale page.
- Update the titles and meta descriptions for your top 10 products.
- Use phrases such as “Black Friday deals” and “holiday gift ideas.”
- Replace supplier descriptions with your own text.
- Link to the sale page from blog posts and category pages. Use clear anchor text.
- Fix broken links.
- WooCommerce already adds basic Product schema, the code that tells Google your price and stock. Check it with Google’s Rich Results Test. SEO plugins such as Yoast WooCommerce SEO can add richer data.
- Submit your sale offers early in Google Merchant Center so Google can approve them.
Check Your Black Friday Landing Page SEO
Check the title, URL, headings, speed, and internal links on the landing page.
- Use the primary keyword in the title, H1, and URL.
- Write a unique meta description.
- Write question headings with a short answer below each. On the sale page, group common questions (shipping cut-off, returns, coupon stacking) in a collapsible FAQ so the page stays short. Easy Accordion by ShapedPlugin lets you add an FAQ accordion without code.
- Show deals in an HTML table.
- Add the page to your sitemap and link it from the homepage and menu.
- Keep product details the same across your store.
Without tracking, you will not know which campaign made the sale. The next section shows you how to set it up.
9. Set Up Conversion and Event Tracking
Check that every sale, click, and campaign shows in your tools before November 20. Use Google Tag Assistant to test your tags.
Check GA4 and Conversion Tracking
Place a test order and confirm that GA4 records the purchase.
- Open GA4 Realtime and watch the purchase event appear.
- Confirm that revenue and order ID show in the event.
- Check that Google Ads receives the purchase conversion.
- Check Google Tag Manager, Meta Pixel, and Ad Tracking. Confirm that each tag fires on the right page.
- Use Tag Assistant to preview your Google Tag Manager container.
- Use Meta Pixel Helper to check Meta events.
- Confirm these events: ViewContent, AddToCart, InitiateCheckout, and Purchase.
- Connect your ad accounts with Google for WooCommerce and Meta for WooCommerce.
- Add UTM Links to Every Campaign
- Tag every link you share with UTM codes. A UTM code is a short tag in a link that shows where a click came from.
- Build links with the Campaign URL Builder.
- Use one naming rule, such as utm_campaign=bf26.
- Tag emails, SMS, social posts, influencer links, and ads.
- Set Up Button and Event Tracking
- Track the clicks that lead to a sale.
- Track banner clicks.
- Track add-to-cart clicks.
- Track pop-up sign-ups.
- Track coupon copy buttons.
- Create these events in Google Tag Manager and test them in preview mode.
Once tracking is in place, you can plan the campaigns it will measure.
10. Prepare Your Black Friday Email, SMS, and Social Media Campaigns
Your store is ready for the traffic. Now plan the messages that bring shoppers to it. Build and schedule your campaigns before the sale starts so you can focus on orders during BFCM.
Plan Your Campaign Calendar
Map out what you will send and when. Here is a simple schedule you can adjust to the time you have left:
- 2–3 weeks before: Publish gift guides and announce upcoming deals.
- 1 week before: Share sale previews and invite shoppers to join your email list.
- 2–3 days before: Send early-access offers to subscribers and loyal customers.
- Black Friday: Launch the sale and promote your featured products.
- Cyber Monday: Promote remaining deals or a separate Cyber Monday offer.
Schedule Email and SMS Campaigns
Email Campaigns to Schedule
Write and schedule these messages in your email marketing tool before the sale:
- Early-access invitations.
- Sale launch announcements.
- Abandoned cart reminders with a link back to the cart.
- Last-chance reminders before the sale ends.
SMS Campaigns
Send SMS only to customers who opted in. Keep each message to one offer and one clear button.
Use the AIDA Framework for Each Message
Pro tip: Use the AIDA framework to structure each message. Grab Attention with the offer, build Interest with product benefits, create Desire with reviews and savings, and end with one clear call to Action.
Prepare Social Media Posts and Ads
- Schedule posts that show your best deals with product photos or short videos.
- Point every ad to the matching landing page or product page.
- Use the same prices and end dates across your store, emails, and ads.
- Pause ads for products that sell out.
11. Monitor Sales and Campaign Performance During BFCM
Check your store several times a day during the sale. Small problems, like a failed payment method or an expired coupon, cost more sales the longer they run.
What to Track During the Sale
Keep an eye on these numbers:
- Revenue and orders in WooCommerce → Analytics.
- Conversion rate and traffic sources in GA4.
- Payment failures and checkout errors.
- Stock levels of your best sellers.
- Ad spend and return on ad spend.
- Page speed and uptime.
How to Fix Common Sale-Day Problems
Find the cause before you change the whole campaign. Change one thing at a time so you can see what made the difference.
High Traffic but Few Sales
Check the landing page, product details, shipping costs, and checkout. Unexpected costs at checkout are a common reason shoppers leave.
Many Abandoned Carts
Test each payment method and your coupon codes, and make sure your abandoned cart emails are sending.
Products Selling Out
Pause ads for sold-out products and promote a similar item that is still in stock.
Slow Pages or Site Errors
Contact your host before you make major changes to the live store, and pause ads until the site is stable.
12. Review Results and Remove Expired Promotions
When the sale ends, clean up your store so shoppers do not see expired offers, then review what worked.
End Discounts and Clean Up Your Store
- Confirm that scheduled sale prices have ended.
- Disable expired coupons.
- Remove sale banners, pop-ups, and countdown timers.
- Pause Black Friday ads.
- Update abandoned cart emails that mention expired offers.
- Keep the landing page live, and turn it into an email sign-up page for next year.
Review Your Black Friday Results
Compare your revenue, traffic, and conversion rate with the goals you set in step 1. Then check your orders, average order value, and profit after discounts and ad costs. Note your best-selling products, top traffic channels, and coupon usage. These notes make next year’s plan faster and more accurate.
Final Thoughts
Preparing for Black Friday is about planning early, not fixing problems at the last minute. Every step you take now, from improving website speed to testing checkout and setting up discounts, will help your store handle the Black Friday rush.
WooCommerce gives you the tools to manage products, schedule discounts, track inventory, and review sales. Follow this checklist to get your store ready, reach more shoppers, and turn Black Friday visitors into customers.
Need more ways to lift sales? See our list of WooCommerce plugins to increase sales, and grab the tools you need at a discount in our WordPress Black Friday deals roundup. Start with one change from this checklist today, and your store will be sale-ready before the rush.
WooCommerce Black Friday FAQs
1. When should I start preparing for Black Friday?
Start about three weeks before Black Friday, or earlier if you can. That gives you time to test speed and checkout, plan discounts, and schedule campaigns. If you have only a few days, focus on payments, coupons, and stock first.
2. Should I discount my whole store?
No. Give deep discounts on a few products, such as overstock, seasonal, or high-margin items, and protect your margin on the rest. Bundles and free shipping thresholds raise order value without cutting every price.
3. How do I schedule a sale in WooCommerce?
Open the product, go to Product data → General, enter a sale price, and click Schedule to set the start and end dates. The sale follows your site time zone under Settings → General, so check it first.
4. Do I need a separate Black Friday landing page?
Yes. One page with a short URL, such as /black-friday-deals, keeps all your offers in one place. If you keep it live every year, it can build search visibility before each sale.

Leave a Reply