In today’s competitive e-commerce marketplace, customers’ attention is the key currency. And, highlighting your services to the targeted customers is crucial to attract visitors and increase sales. One of the best ways to showcase your visual content is to create a vertical image slider in WordPress.
A vertical image slider is a creative way to add dynamic visual appeal to your WordPress website. Using a vertical slider, you can showcase multiple types of content, such as featured posts, product images, client logos, or any visual content in a stylish, space-saving format.
In this blog, I’ll explain how to create a vertical slider in WordPress using the WP Carousel plugin in 3 simple steps.
Let’s get started! Enjoy up to 60% on this Best 2025 WordPress BFCM deals.
What is a Vertical Image Slider?
Sliders are a great way to showcase multiple pieces of blog content in a compact space. It includes images, videos, featured products, client logos, or blog highlights in a unique scrolling format — from top to bottom instead of side to side.
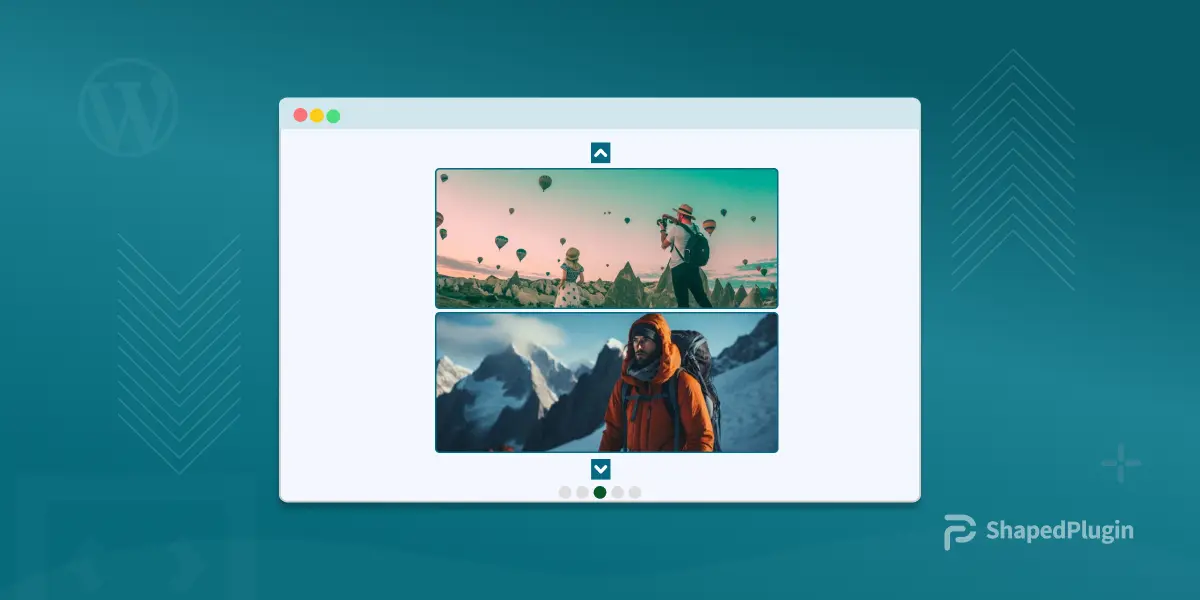
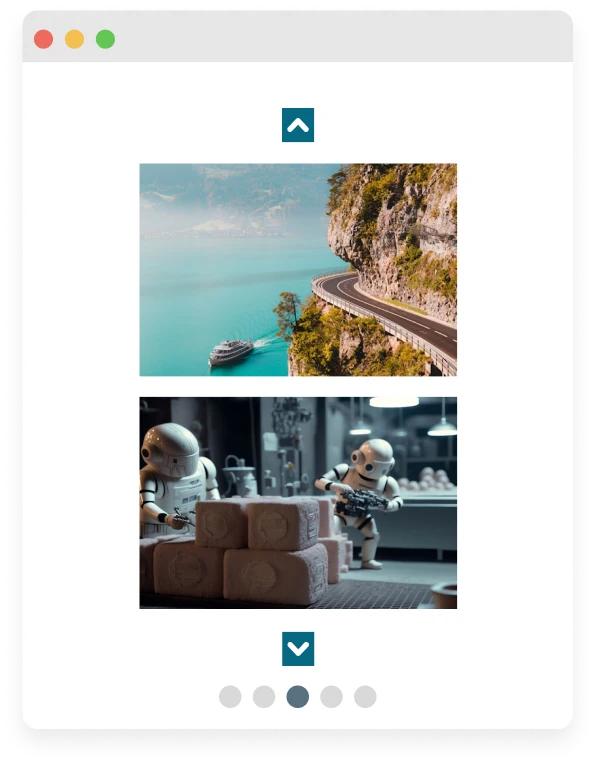
There are two most common types of sliders: Vertical and Horizontal Sliders. They give your website a modern and professional look, while also providing a unique user experience. Let’s take a live example of how the vertical slider looks.
Why Sliders are Important?
Vertical sliders are particularly useful when you want to make your content stand out in a fresh, elegant way. For example, a vertical image slider can display images smoothly from top to bottom, adding a visually appealing element to your blog, portfolio, or online store. Perfect for narrow spaces, sidebars, portfolios, or creative layouts.
How to Create a Vertical Image Slider in WordPress using the WP Carousel
Both vertical and horizontal sliders are great for presenting multiple pieces of content within a small area. However, a vertical slider offers a unique scrolling effect that grabs the user’s attention, ideal for modern layouts, sidebars, and mobile-friendly designs.
While sliders are widely used, WordPress does not have a built-in slider feature. To create a vertical slider, you need a dedicated slider plugin like WP Carousel. This #1 WordPress Slider plugin allows you to create and set up vertical or horizontal sliders with extensive customization options without any coding.
Let’s dive into the steps! It’s so simple.
Step 1: Install & Activate WP Carousel
Among the Best Slider Plugins, WP Carousel is the most powerful and multipurpose Slider plugin in WordPress. It provides the easiest way to create sliders from almost every type of blog content, including mesmerizing image sliders, galleries with images, videos, audio, posts, products, content, mixed content, and external content.
Moreover, you can display your content in beautiful layouts: Carousel & Slider, Thumbnail Slider, Grid, Tiles, Masonry, and Justified. Significantly, as you already know, using WP Carousel allows you to create any slider you want. Now, I will create an image slider. So, let’s learn how to create an image slider with WP Carousel.
To create a vertical image slider, let’s install WP Carousel and activate it on your WordPress site. It only takes a minute! Once activated, you’ll find a new menu called WP Carousel in your dashboard. However, if you’re new (Future Master) to this plugin, check out this step-by-step installation guide here.
Step 2: Create a New Vertical Image Slider
- Navigate to WP Carousel→ Add New Carousel.
- Enter the Carousel Name: Image Slider in the title box.
- Under Source Type, select Image. Click Add Image to upload images from your devices or select existing ones from your Media Library.
- After selecting your images, click Create a New Gallery → Insert Gallery.
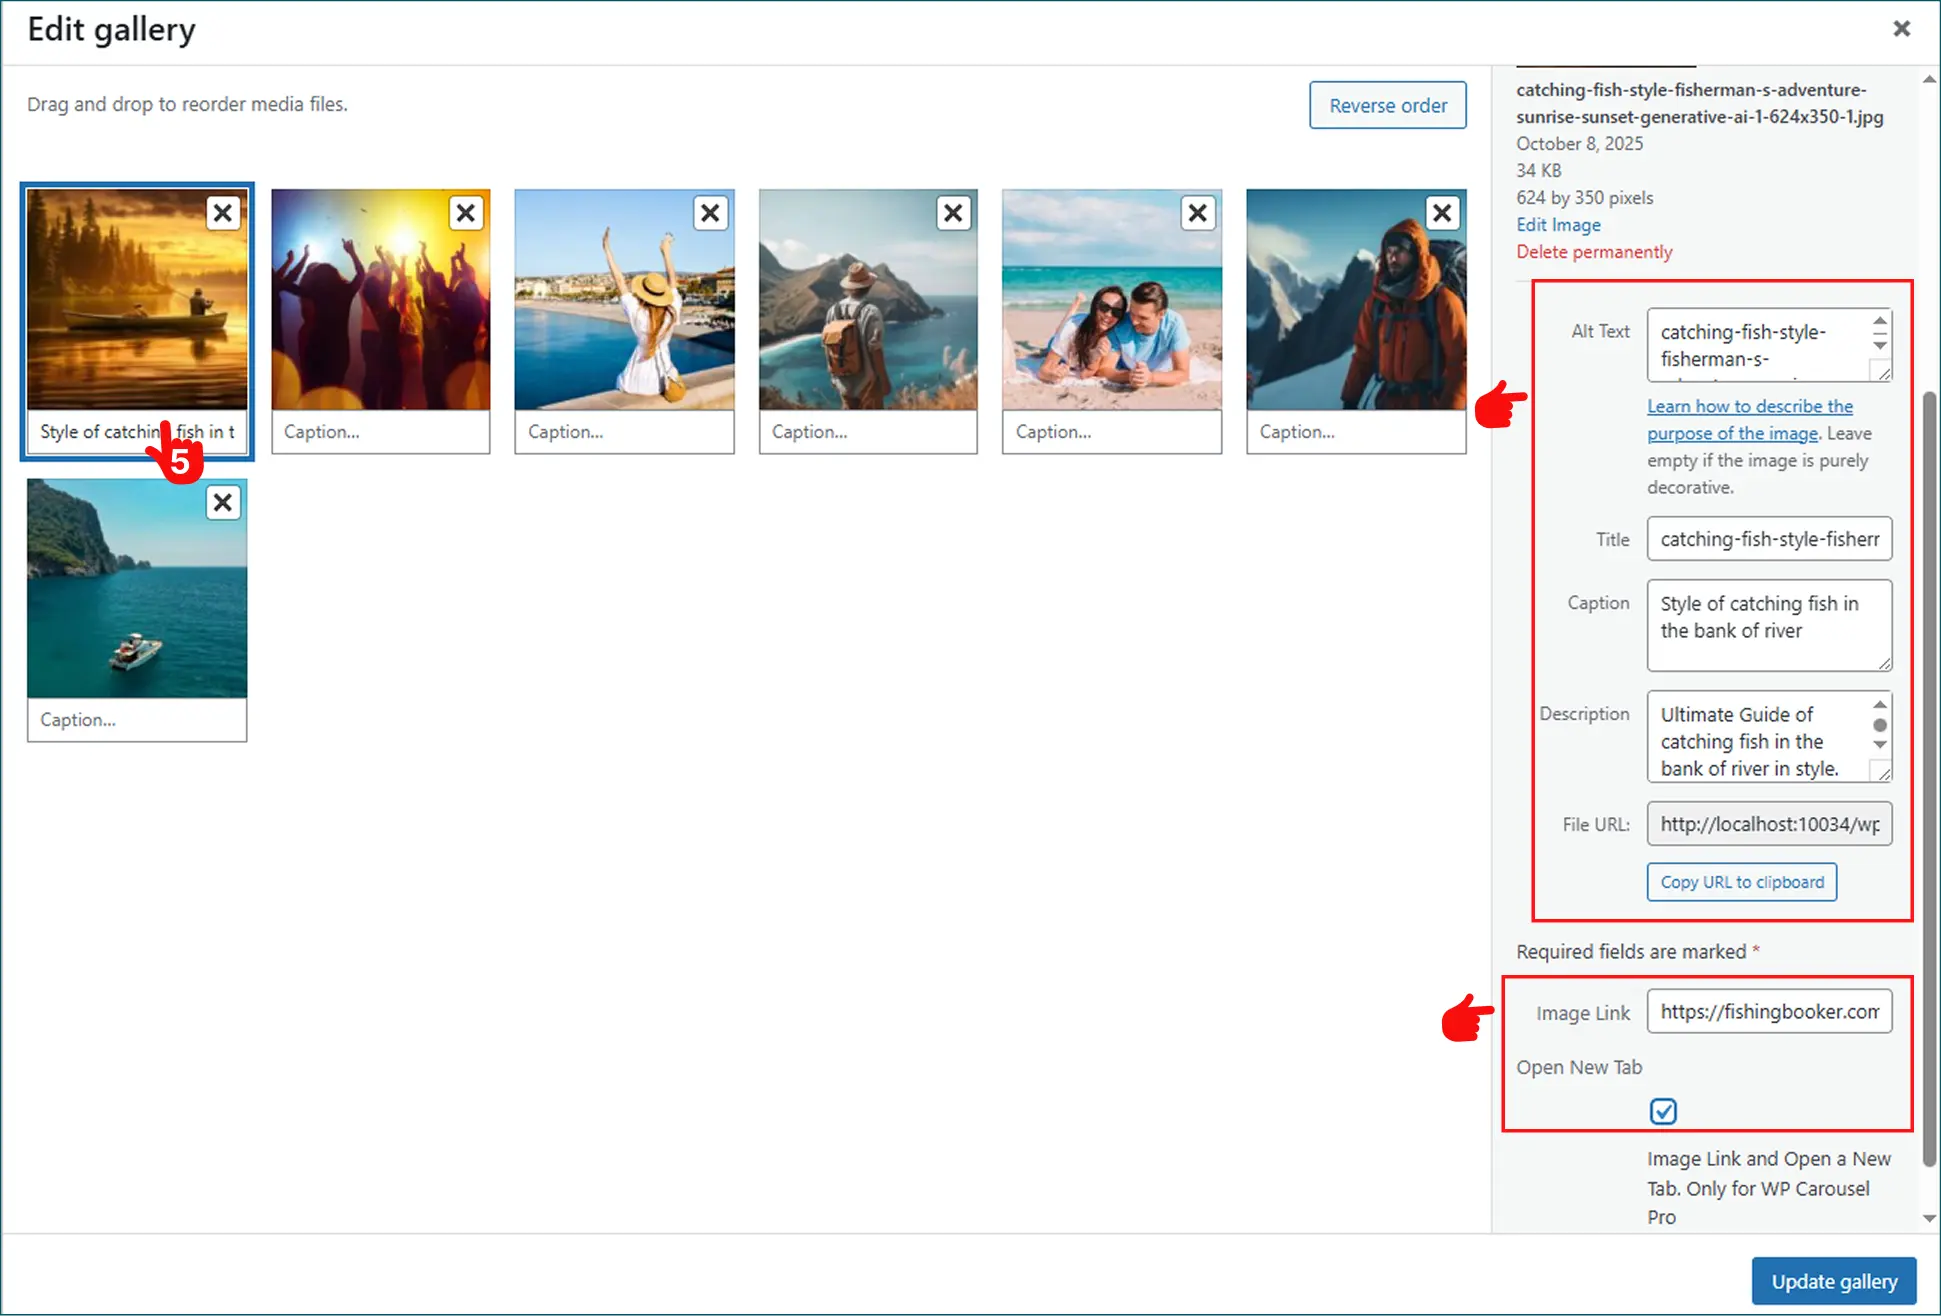
- Moreover, you can add Image Alt Text, Captions, Descriptions, and Links for each Image if you wish (Optional), as shown in the Image below.
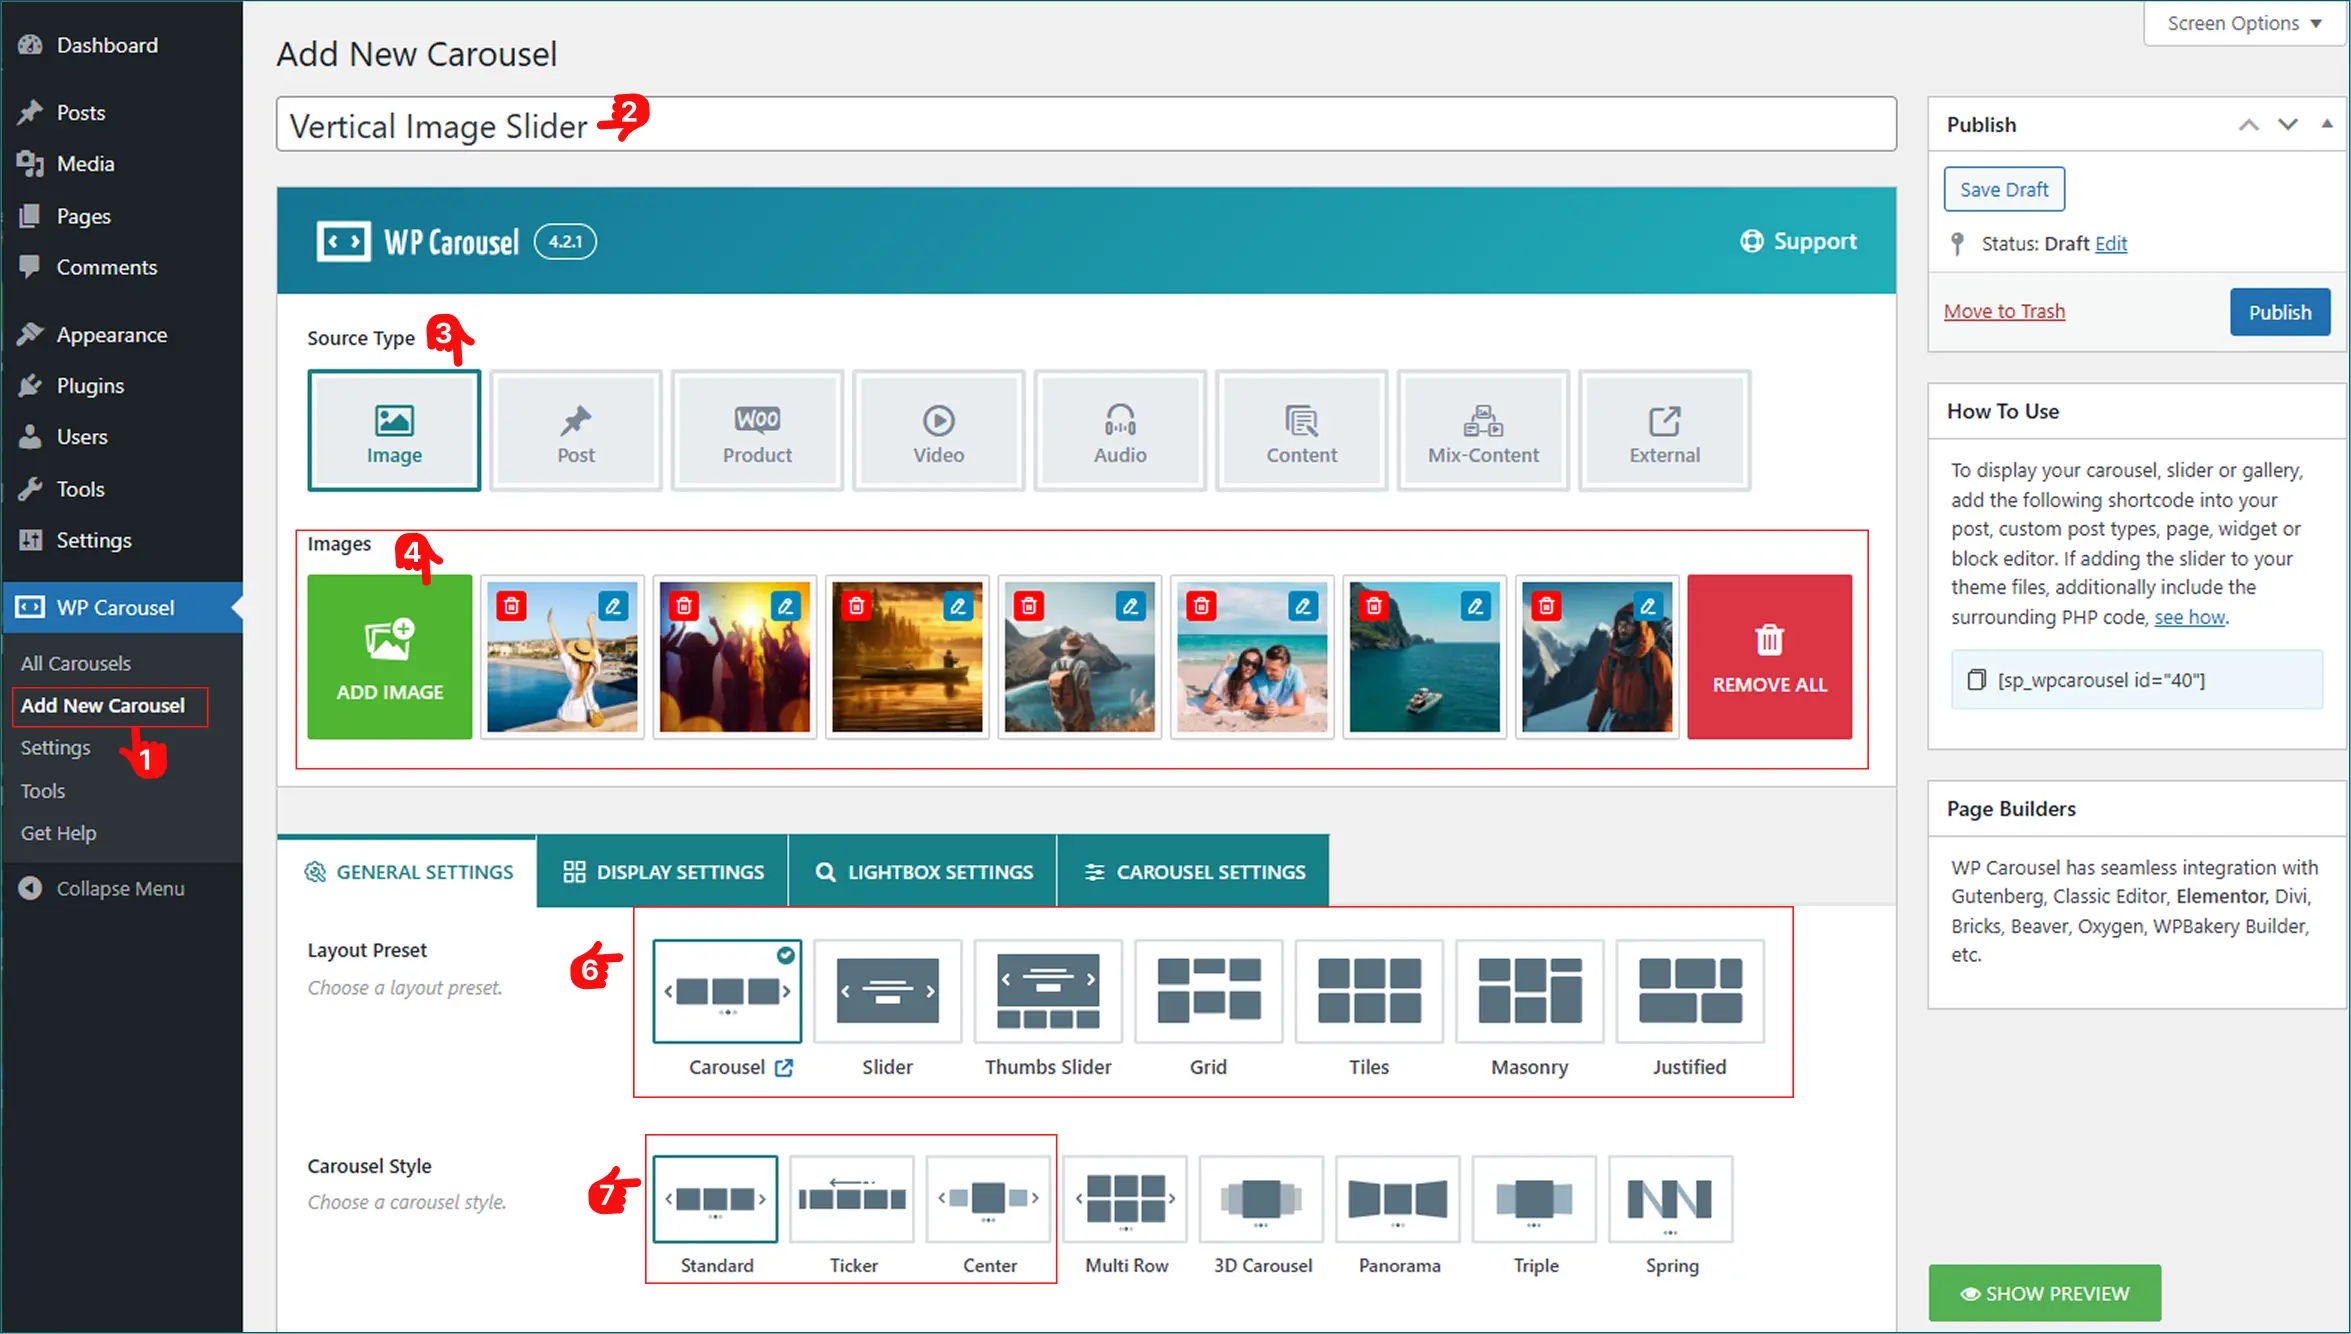
6. Now, back to the Carousel General Settings Tab; Choose the Layout Preset as Carousel.
7. Pick any Carousel Style from Standard, Ticker, or Center as your preference.
Note: By default, the slider orientation is set to horizontal. In the next step, you’ll learn how to find and switch to the vertical slider.
Step 3: Change the Slider Orientation to Vertical
In the previous step, we created an image slider whose orientation is Horizontal. Now, it’s time to shift the slider orientation from Horizontal to Vertical.
- Open the Carousel General Settings Tab. Scroll down and find the Carousel Orientation option.
- You’ll find both Horizontal & Vertical as a switch menu. Choose Vertical Slider orientation.
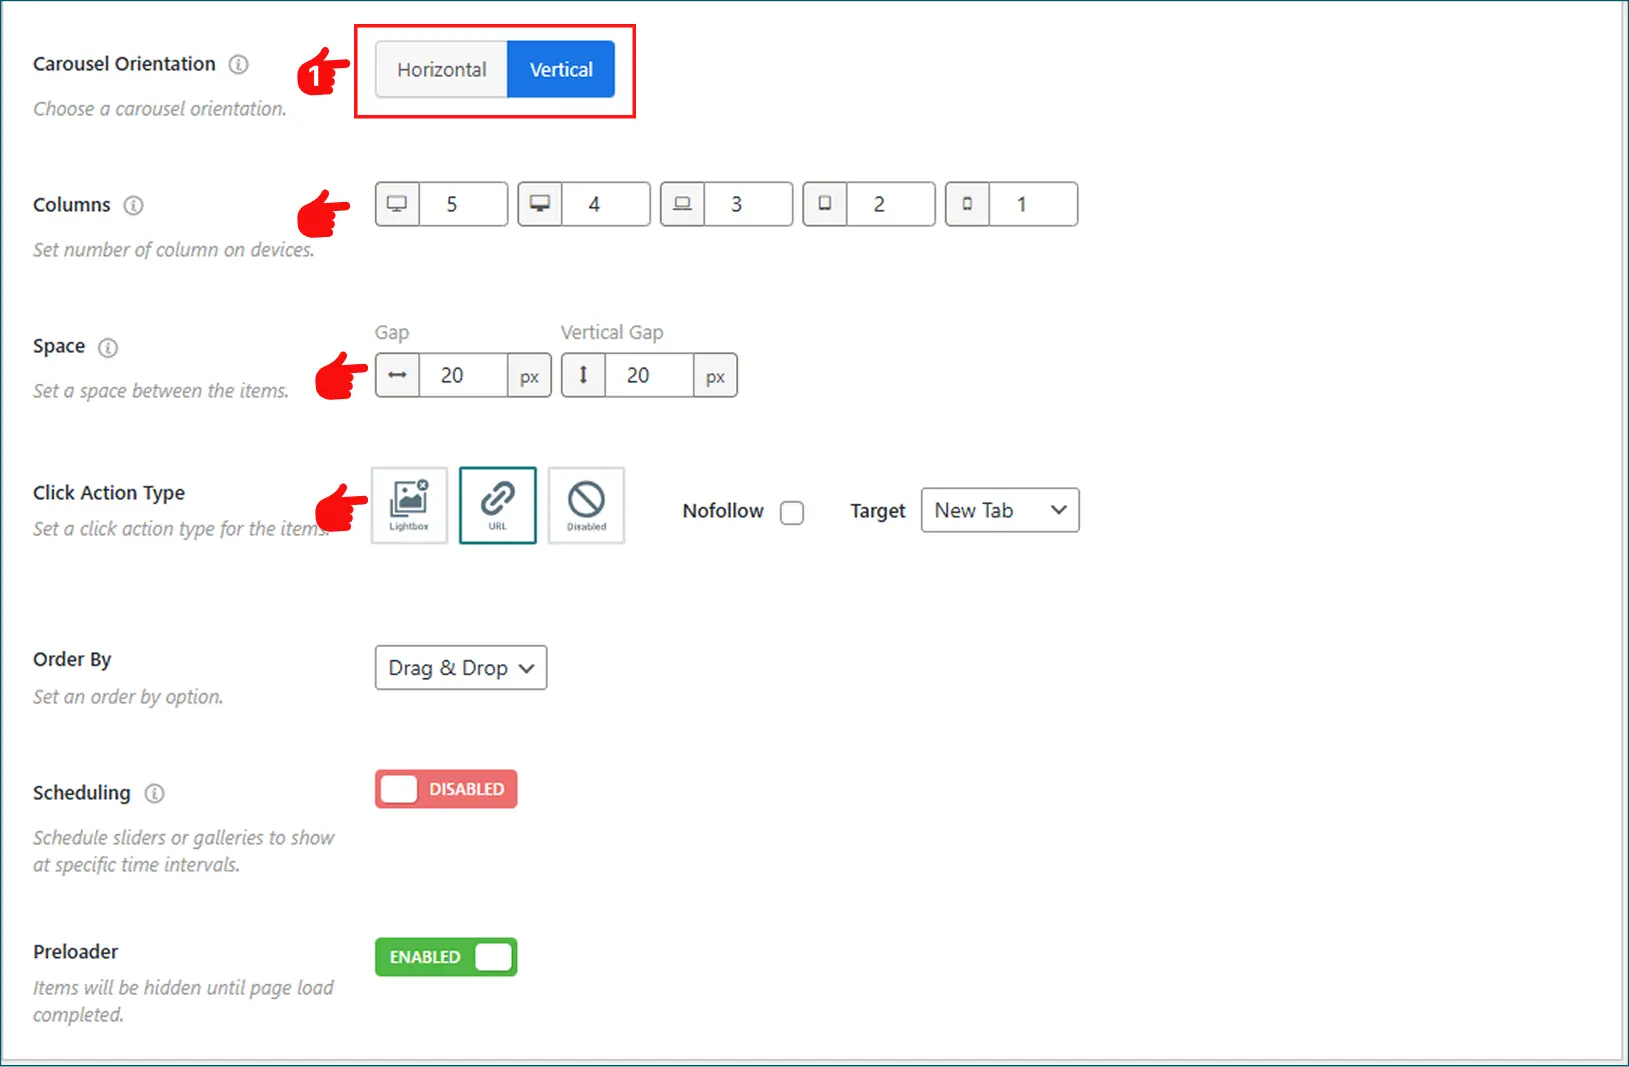
Importantly, you can set the number of columns, space, order images, and even add an image carousel with links and a lightbox, giving you ultimate control over your content showcase.
Congratulations! That’s it — You have successfully created a vertical image slider, and your image slider now scrolls vertically!
Now, click Publish, and a shortcode will appear. Copy that shortcode and paste it wherever you’d like the slider to show up — inside a post, page, or even a widget area.

Note: You can avoid step four if you don’t want to customize the vertical slider.
Step 4: Customize Your Vertical Slider (Optional but Recommended)
WP Carousel Pro includes powerful customization options that let you style your vertical slider to match your website’s design. So, let’s customize the vertical slider appearance.
- After creating and setting the Carousel General Settings, it’s now time to decide how your image slider will be displayed.
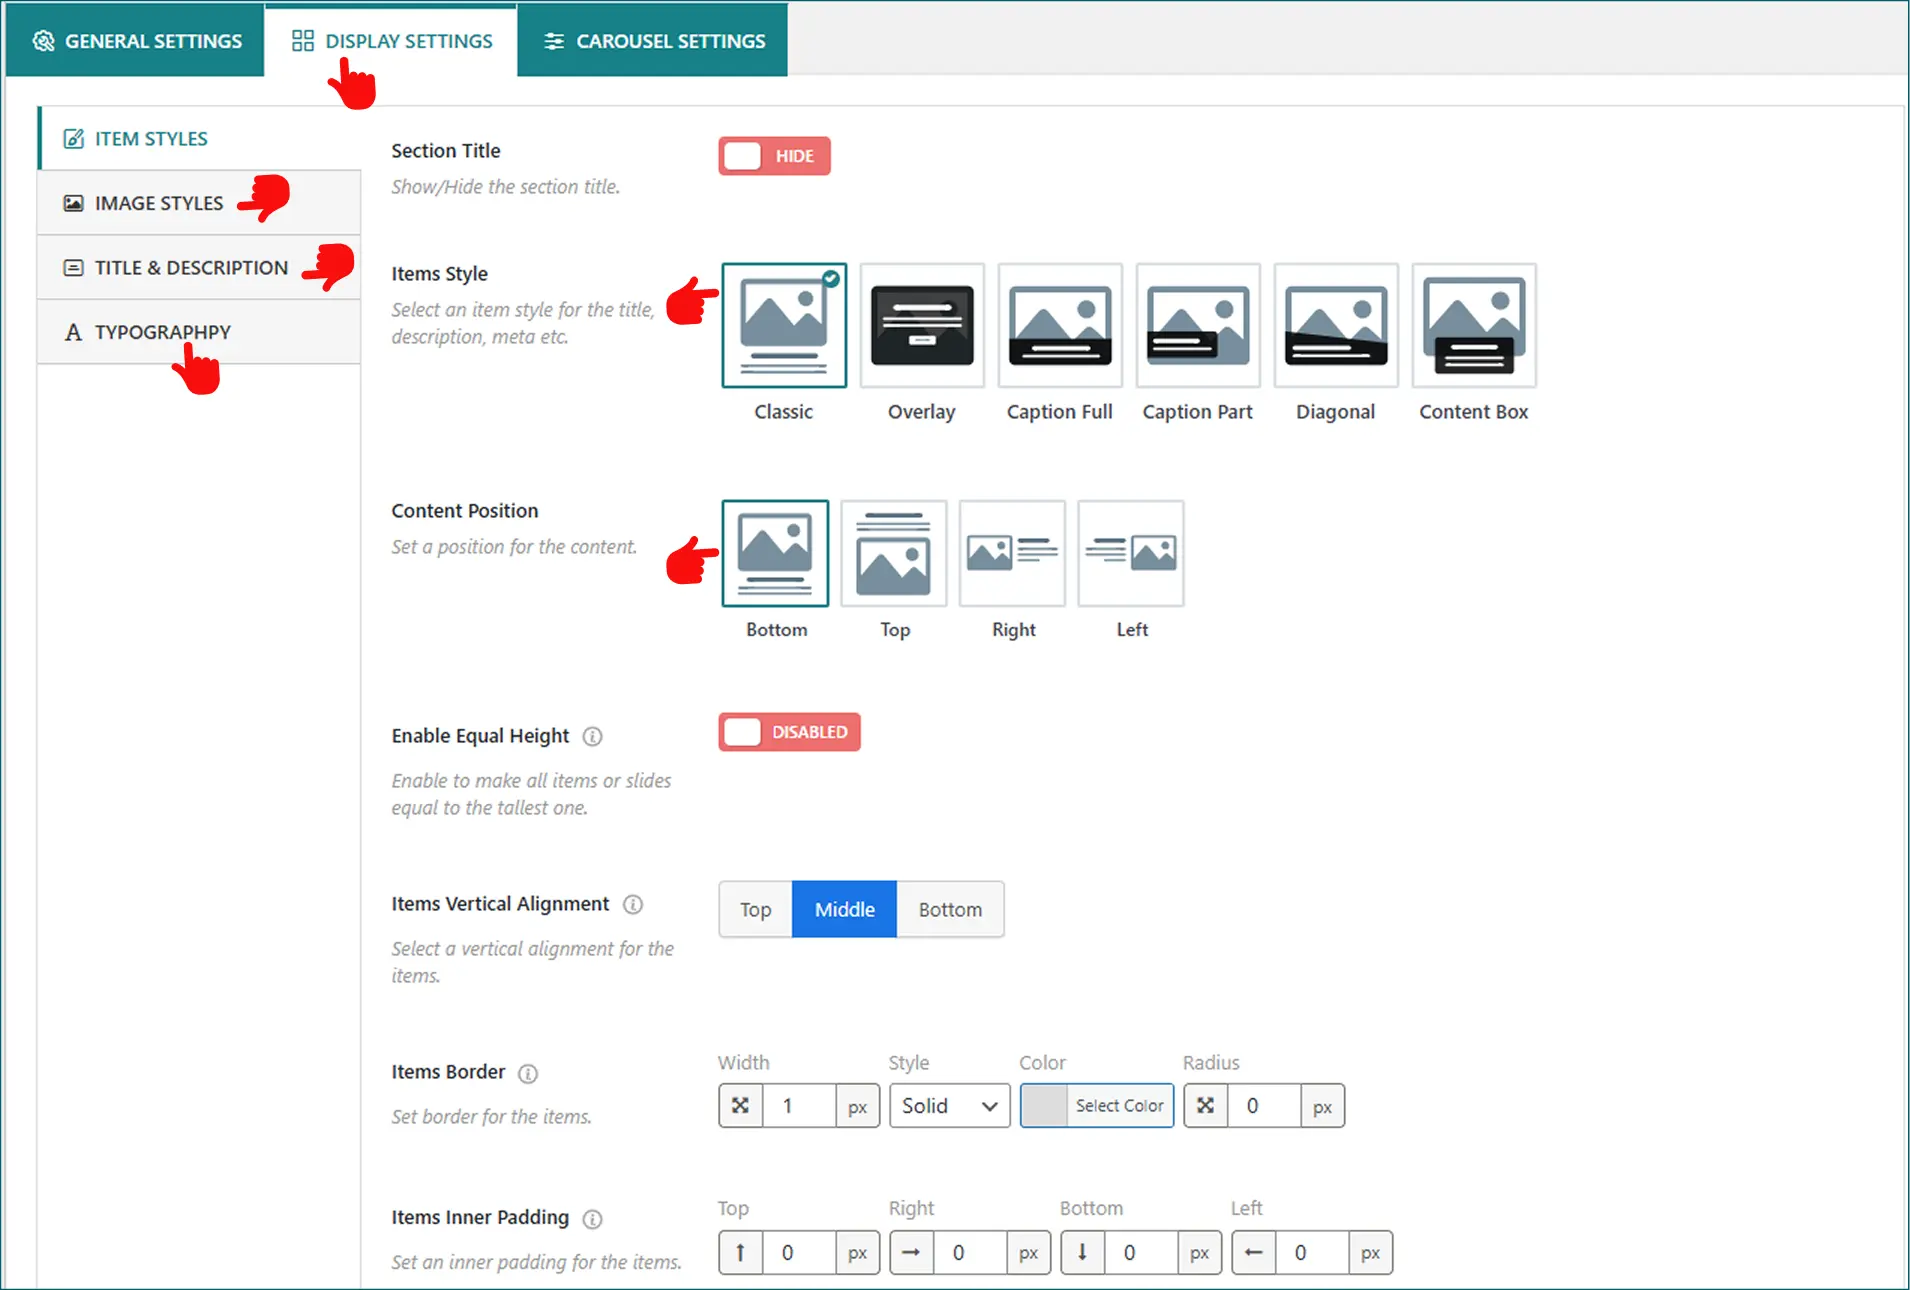
- Move to the Display Settings: Configure Item Styles, Image Styles, Show or hide Image Titles & Descriptions, and set Typography from flexible customization options.
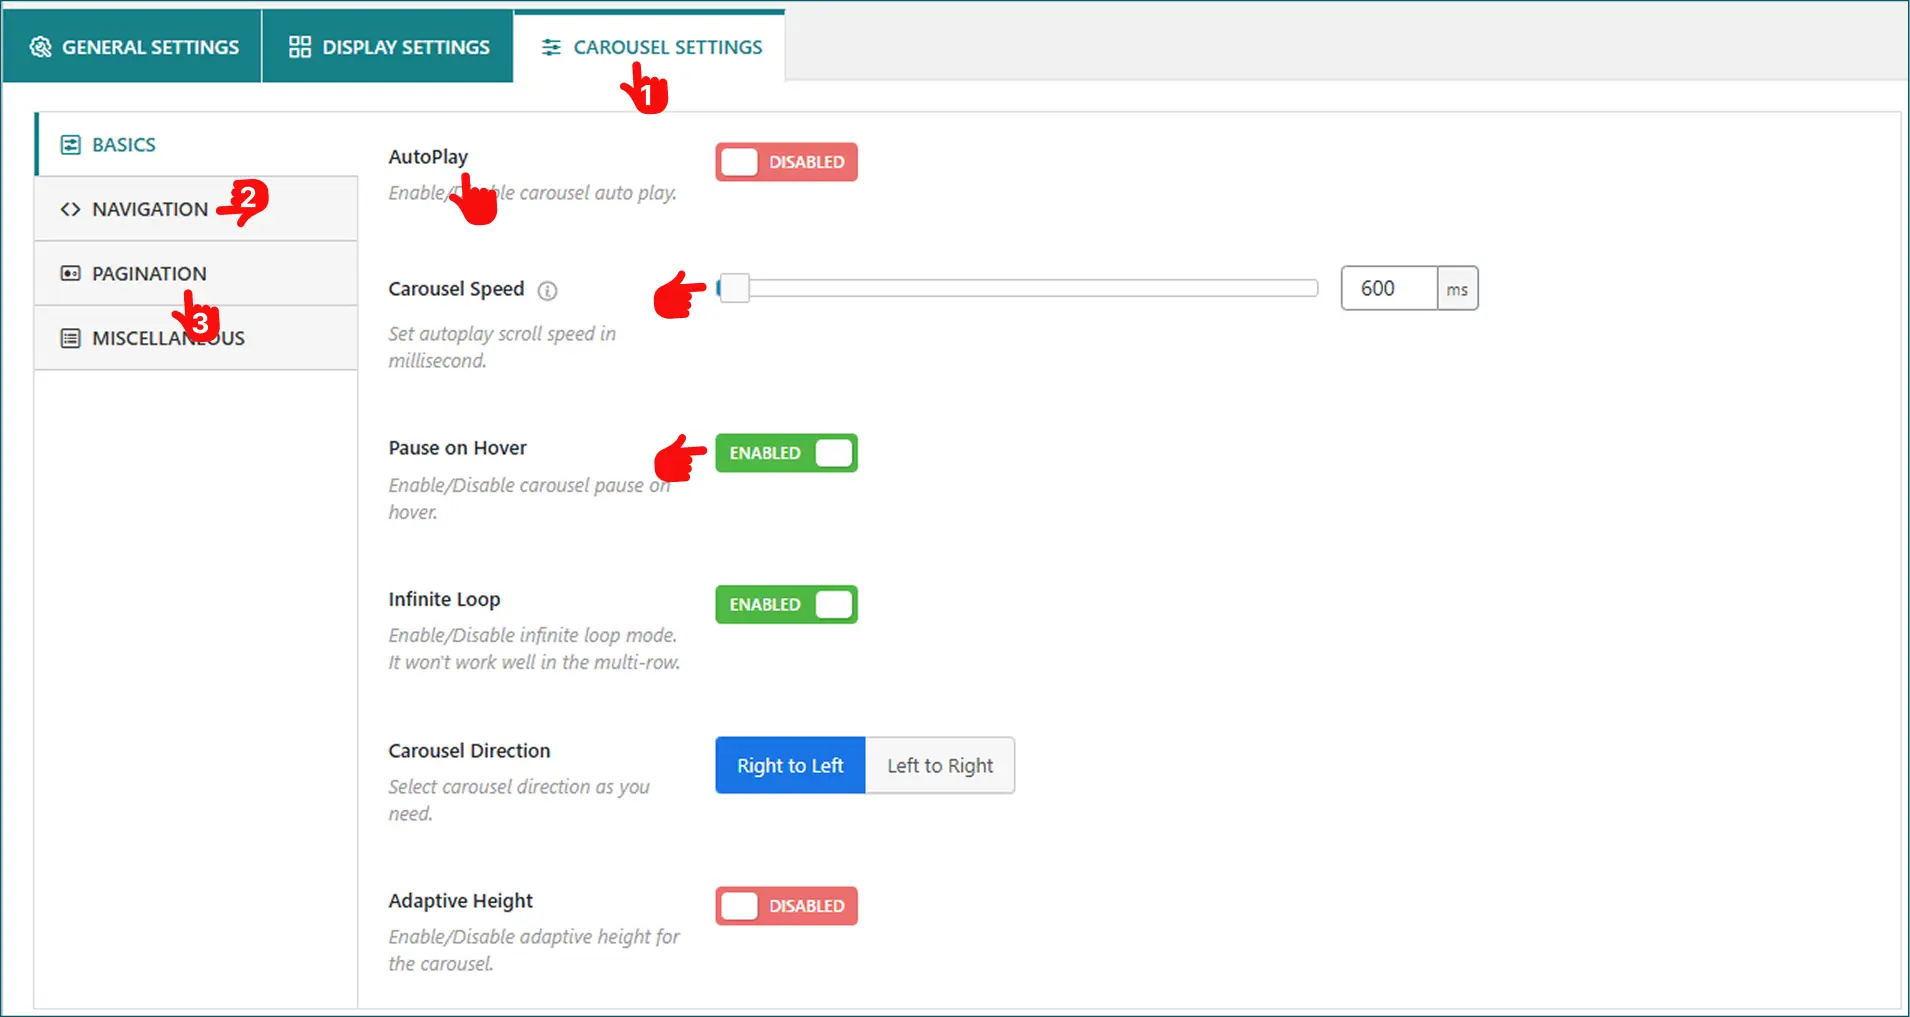
2. After you have designed the image slider, you can also configure Carousel Settings.
- Navigate to settings like Carousel Speed, Pause on Hover, Carousel Direction, and more.
- Moreover, it provides you with ultimate flexibility to choose from various navigation and pagination styles, each with comprehensive customization options.
You’re almost done! This is how you can customize the vertical slider and showcase your content effortlessly.
Final Words
To Sum Up, WP Carousel offers you ultimate flexibility to transform your static visuals into dynamic vertical sliders that capture customers’ attention, highlight your services, and improve user experience — all with just a few clicks.
So, don’t be late. Download WP Carousel today and let your visuals come to life in interactive sliders that keep visitors engaged and elevate your WordPress business to the next level.
I hope you’ve successfully created an image slider and displayed your content smoothly and beautifully. Do you have any more questions about building or using a vertical slider in WordPress? Let me know in the comments below. I’ll always be happy to help you.
Leave a Reply