WordPress photo gallery is the best option for photography, art, travel, and any website. No matter what niche is of your website, you should always incorporate photos and images because nobody likes reading page after page of plain text. Apart from this, photos improve SEO and increase user engagement.
Wondering how you can showcase multiple photos and images in an organized and stylish way? If yes, you are indeed in the right place. In this blog, I’ll show you how to create a WordPress photo gallery in four steps. So, please keep reading and learn the easiest way to make your photo gallery in WordPress in a few minutes with a powerful photo gallery plugin.
However, there is a built-in gallery block in WordPress Gutenberg. You can create a basic photo gallery in WordPress using this block. On the other hand, if you like to create a professional WordPress photo gallery, you may need something more powerful. That’s all about this blog. Let’s dive into the main job.
Before that, you can look at the following table of contents. It will help you jump straight to what you are looking for without scrolling down again and again.
Table of contents
4 Simple steps to create a professional WordPress photo gallery
Follow these four easy steps to create a professional WordPress photo gallery in minutes with no code.
Step 1: Install and activate WP Carousel
First, you need to install and activate WP Carousel, a powerful WordPress photo gallery & carousel plugin. Including many of the world’s top corporations, more than 60,000 WordPress enthusiasts prefer this plugin to create sliders and galleries on WordPress websites. Its beginner-friendly user experience and robust features have made it the most preferable.
Moreover, it’s a multipurpose WordPress gallery and slider Plugin. As a result, besides a WordPress photo gallery, you can create many more. I’ll tell you about them in step 3.
However, you can install and activate WP Carousel in two ways:
Download WP Carousel and upload it
First, Download WP Carousel now. Next, go to your WordPress dashboard. Find Plugins on the left menu bar of the dashboard. Click Plugins, then Add New. After that, click Choose File. Your download list will come up. Now, find the zip file named wp-carousel-free. The file might be at the top of your downloads as you have downloaded it just now. Select the zip file, then click Open. Next, click Install, then Activate to have WP Carousel to start creating an aesthetic photo gallery in WordPress.

Click steps:
Download WP Carousel → WordPress Dashboard→ Plugins→ Add New→ Upload Plugin→ Choose File → wp-carousel-free→ Open→ Install Now→ Activate.
Add WP Carousel from the WordPress dashboard
Alternatively, you can add WP Carousel from your dashboard as well. First, however, look at WP Carousel’s logo so that you can easily recognize it in the search results.

First, go to your WordPress dashboard and find Plugins on the left menu bar. Click Plugins and Add New. Afterward, go to the search bar on the upper right side. Write WP Carousel in the search bar and find it in the search results. Hopefully, it will say Hi, from the top two lines. Next, click WP Carousel. Finally, click Install, then Activate to get started creating your WordPress gallery photo gallery.
Click steps:
WordPress Dashboard→ Plugins→ Add New→ Search WP Carousel→ WP Carousel →Install and Activate.
Please read this documentation or watch this video tutorial to install and activate WP Carousel Pro seamlessly.
If you need further assistance, please feel free to reach out to the support team. We will be happy to assist you.
Step 2: Add Photos
Usually, once you have installed and activated WP Carousel, it must be available on the left menu bar of your WordPress dashboard. Then, you and WP Carousel are ready to create an eye-catching WordPress photo gallery.
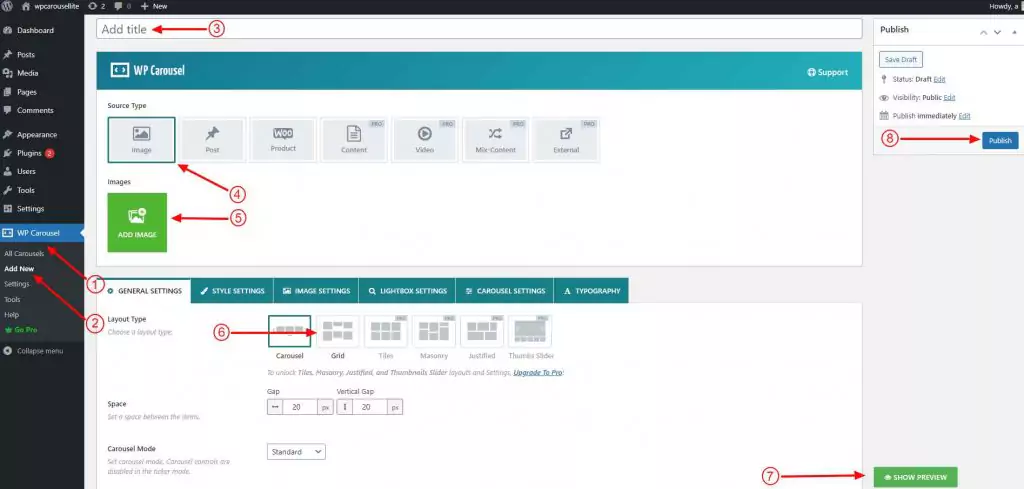
First, click WP Carousel at your WordPress menu bar. Next, click Add New, and give it a title. After that, select Images. Next, click ADD IMAGES. It will take you to your WordPress media library. Next, select what photos you want to add to your WordPress photo gallery. You can have as many photos as you wish. Most importantly, remember to includet to add alternative texts, titles, captions, and so on, incorporating focus keywords to your photos individually to help your SEO. Aside from this, adding them to your photos improves the accessibility of your website and landing pages.
After that, click Create a new gallery, then click Insert gallery. Lastly, click Grid before you dive into designing your WordPress photo gallery.
You can see the preview by clicking the SHOW PREVIEW button at the bottom right side. Now, dive into designing your photo gallery in WordPress just how it should be.
If you click the Publish button at the upper right side, an initial photo gallery will be ready to be published.

Click steps:
WP Carousel→ Add New→ Add title, give it a title →Image (source type)→ ADD IMAGE, select images→ Create a new gallery→ Insert gallery→ Grid/Tiles/Masonry/Justified→ SHOW PREVIEW(optional)→Publish (after you complete designing)
As you have added photos, dive into designing your photo gallery in WordPress with the powerful features of WP Carousel.
Step 3: Design your WordPress photo gallery
With a wide range of robust features, WP Carousel gives you complete freedom to craft your photo gallery in WordPress exactly how you and your visitors love it. Moreover, as it is a multipurpose WordPress photo gallery and carousel plugin, you can create many more like:
- Post gallery, slider, and carousel
- Product gallery, slider, and carousel
- Content gallery, slider, and carousel
- Video gallery, slider, and carousel
- Mix-content gallery, slider, and carousel
- External gallery, slider, and carousel
- Image gallery, slider, and carousel
And the galleries in several layouts:
- Grid
- Tiles
- Justified
- Masonry
WP Carousel offers all the basic features you need to create a WordPress photo gallery. However, to make your WordPress photo gallery outstanding and more appealing, you may require the advanced features of WP Carousel Pro. Here are some of the freemium features of this popular WordPress photo gallery plugin.
Space between the items
WP Carousel cares about your WordPress photo gallery’s small and big aspects. In that sequence, it allows you to set space between the items as per your need. You can set it sufficiently to avoid clutters on your photo gallery in WordPress and make it visually clean and appealing. Sometimes your gallery may look more stylish with no space. Put some thought and see what fits better with your gallery.
Column number
WP Carousel allows you to set the column number of your WordPress photo gallery based on the different screen sizes of different devices. Consequently, it helps to display your photos on screens of various sizes with more proficiency.
Order by drag & drop
You can drag and drop the photos to reorder them in WP Carousel. When you need to reorder the photos, you can do it using the WP Carousel drag-and-drop option. Keeping your key photos on the first row is always a good practice in photo galleries.
Enable Scheduling
When you want to display a particular WordPress photo gallery for a certain period with a special offer or on a special occasion, Scheduling might be very useful for you. With this thoughtful option, you can schedule your photo gallery tailored with specific photos earlier and forget it. It will work on time.
When you enable Preloader for your photo gallery in WordPress, you ask the browser to fetch the photos of the gallery sooner. As a result, the browser displays your photos sooner than other content.
Enable Preloader
Enabling the Preloader for the media content the browser typically discovers later is very important. It helps the browser to understand what content should be displayed first.
Color your photos
WP Carousel allows you to color the photos throughout your WordPress gallery. You can add your brand color to the background to grow your brand identity. Apart from that, making your photos visually more appealing with various colors can be one of the best options.
Show/Hide
WP Carousel Pro gives you many Show/Hide options that you can use according to the content consistency, user needs, and preferences. Some of them include the following:
- Section title
- Image caption
- Image Description
- Image title attribute and so on
Content Position
WP Carousel Pro allows you to place the content of your photos how you prefer. It offers you several content positions:
- Overlay
- Bottom
- Top
- Right
- Left
Zoom in/out on hover
with WP Carousel Pro, you can make the photos of your gallery more interactive and connective. It allows you to set zoom-in or zoom-out effects when visitors hover over the photos. As a result, the photos of your WordPress gallery respond to your visitors with higher interactivity. It significantly contributes to connecting your visitors more closely and enhances your site’s conversion rate.
Watermark
By adding watermarks to your photos, you can prevent misuse of them. WP Carousel Pro allows you to add watermarks to your photos seamlessly. Moreover, you will get several customization options to craft your watermarks how you like.
Image Protection
Your photos may be valuable assets, and you prefer to keep your visitors from downloading them. With the WP Carousel Pro‘s Image Protection option, you can protect your photos with a single click, enabling Image Protection. Nobody can download your photos with the right click once you enable it.
Powerful Lightbox
Lightbox is one of the most powerful features of the WP Carousel Pro. It displays your photos by occupying most of the screen and dimming out the rest of the web page. It helps your users to see your photos in a larger view.
WP Carousel Pro‘s lightbox offers you many setting options to make your lightbox presentation more enjoyable for your users.
Apart from all the features above, there are many more on WP Carousel Pro. Please explore them individually and try them out to design your WordPress photo gallery functionally and aesthetically super pleasing.
You can read the documentation to learn more about designing a photo gallery with WP Carousel Pro.
This video tutorial also helps you more design your photo gallery in a sophisticated way.
Step 4: Publish your WordPress photo gallery
If you have accomplished designing your WordPress photo gallery, it’s time to publish it. However, before you hit the Publish button, see your photo gallery preview to check if everything sounds fantastic. Looks awesome? Great! Now, click the Publish or Update button at the upper right side of the WP Carousel to get it ready to publish.
You can publish your WordPress photo gallery finally in three ways.
Use the WP Carousel Gutenberg block to publish
First, make sure you have published or updated the WordPress photo gallery from WP Carousel. After that, go to the page or post you want to display your WordPress slideshow. After that, click the plus icon on the right side of the block. However, if you don’t see any plus icon, press Enter. Once you click on the plus icon, It will come up with a search box. If it’s your first time with WP Carousel, type WP Carousel and click it. Next, click Select a shortcode and pick the WordPress photo gallery title. Wow! It plays. Finally, hit the Publish or Update button on the upper right corner of your page or post. Awesome! It has been published.

Click steps:
Publish/Update(slider) →(go to) the page/post→ Plus icon→ Search for WP Carousel→ WP Carousel block→ Select a shortcode→ Pick the gallery title→ Publish/Update
Most importantly, once you create a WordPress photo gallery with WP Carousel, you can use this photo gallery as many times and pages as you want.
Copy and paste the shortcode to publish
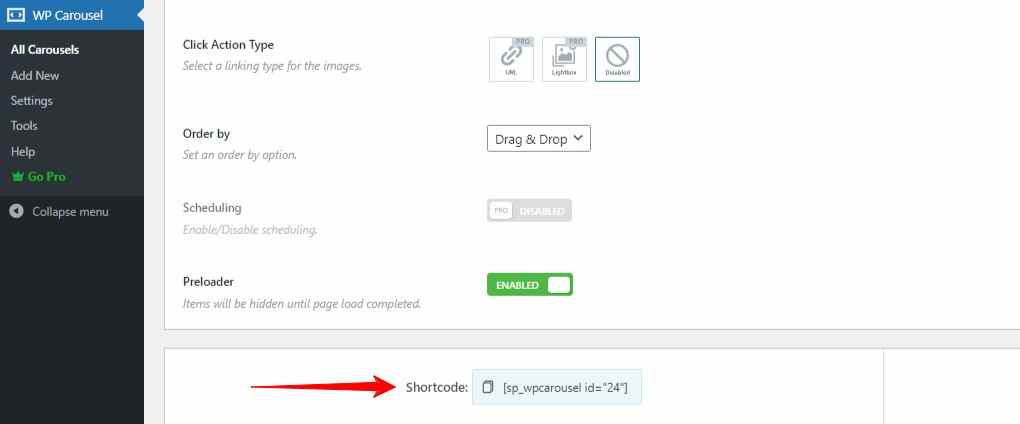
Alternatively, you can publish your WordPress photo gallery with the shortcode. First, copy the shortcode from the bottom left side. Next, go to the page or post where you want to show your WordPress photo gallery. Now, paste the shortcode in Gutenberg’s Code, Shortcode, and Text blocks and hit the Publish or Update button at the upper right side.

Copy and paste the PHP function
Similarly, you can also publish your WordPress photo gallery with the PHP function. First, copy the PHP function from the lower right side of the WP Carousel. After that, paste the function anywhere in your templates . It’s necessarily used only in terms of a hero section, product page, and somewhere, you can’t use blocks or edit visually.
Take away
A well-organized aesthetic WordPress photo gallery benefits you in many ways. Above all, it increases user engagement and your website’s conversion rate. In addition, regardless of the niche and industries, photos generally contribute significantly to your website’s SEO and help it rank higher on the SERP.
So, let’s create your WordPress photo gallery now and take your business experience to the next level.
Thanks for reading. Please feel free to leave your words in the comment box below. We’ll be happy to read and reply.

Leave a Reply