Do you want to create a beautiful thumbnail slider and display your key items in an attention-grabbing and engaging way?
A thumbnail slider attracts visitors, offers them a preview of all items at a glance, allows them to navigate to any item quickly, and grows user engagement.
In this blog, I’ll show you the step-by-step process to create phenomenal thumbnail sliders in minutes with no code.
Let’s dive in!
Table of contents
What is a thumbnail slider?
First, let’s see what a slider is. A slider is an animated showcase that displays multiple items one by one in a single place automatically or manually. When some of those multiple items appear in the thumbnails below the main slider, it’s called a thumbnail slider. However, the thumbnails could be at the large Image’s top, left, or right side. It allows users to see a preview of multiple items at a glance and quickly navigate to the items.

Basically, In a thumbnail slider, the main content area typically features a larger image or content item, while a row or grid of smaller thumbnail images or previews is displayed below, above, or beside it.
Why thumbnail slider?
A well-crafted thumbnail slider serves many purposes. Here are some of the significant benefits of using a thumbnail slider on your WordPress website:
Quick navigation
A thumbnail slider displays a preview (small versions) of all its images at the bottom. As a result, users can quickly navigate many content at a glance and easily browse to specific sections or items of interest, enhancing overall usability and satisfaction.
Visually appealing
Thumbnail sliders offer a visually appealing way to showcase multiple images or content pieces in a compact space, capturing visitors’ attention and encouraging interaction.
Highlight key content
Use sliders to prominently display your most important content, featured images, videos, posts, or special products, ensuring they don’t get buried amongst other content.
Space optimization
Sliders can display many items within a limited space on your webpage. This is particularly beneficial for showcasing multiple items within a little space. It keeps your website clean with enough white space and saves users from scrolling down and down.
More interaction & engagement
Thumbnail sliders contain the preview section, which includes hover effects, mouse dragging, and navigation icons that enhance user interaction and increase user engagement. Thumbnail sliders can also act as a visual call to action, enticing users to click through to individual product pages, blog posts, or other relevant content.
Overall, thumbnail sliders offer a range of benefits that can help enhance your website’s visual appeal, usability, and effectiveness. They ultimately contribute to a positive user experience and achieve your business goals.
4 easy steps to create a thumbnail slider
Follow the four simple steps below and create a spectacular thumbnail slider in minutes.
Step 1: Install WP Carousel plugin
WP Carousel is a highly feature-rich and easy-to-use slider and gallery plugin. It allows you to create mesmerizing galleries and sliders with images, videos, posts, products, and more. More than 70000+ WordPressians happily use this robust plugin to craft phenomenal galleries and sliders. Its powerful features and ease of use made it the user’s best choice.
Let’s install WP Carousel. It’s simple.
However, If you are new (future guru), you can see the documentation. You can also contact the expert support team for any help regarding the plugin.
Step 2: Add images
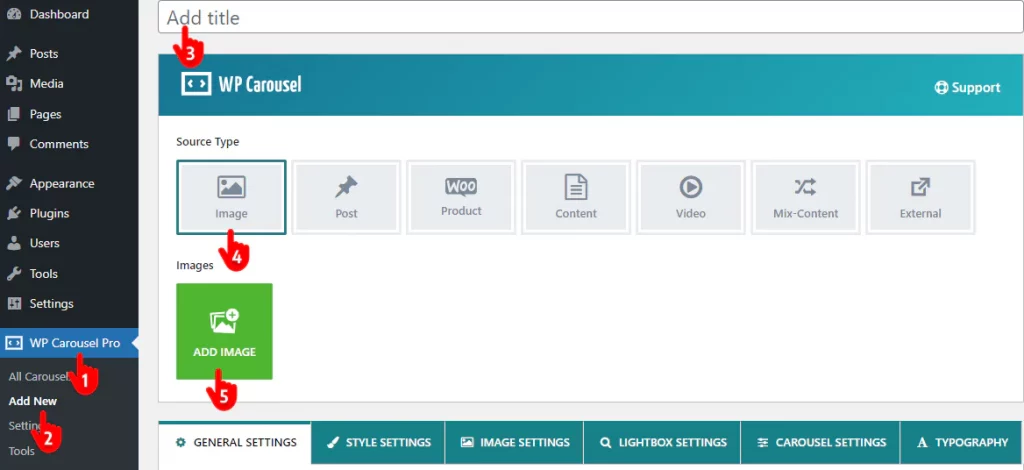
Once you install and activate WP Carousel, it must be on your WordPress dashboard admin sidebar, as seen below. Follow the simple steps to add images to create a thumbnail slider.

- First, click WP Carousel.
- Click Add New.
- Give your slider shortcode a title.
- Leave the Image selected. However, you can create sliders with videos, products, and more, as seen in the image above.
- Click ADD IMAGES. This will take you to your WordPress media library, where you can select the images you want to add to your thumbnail slider. Ensure you have optimized all your chosen images with proper alternative text before hitting the Insert Images button at the bottom right.
Step 3: Design a thumbnail slider
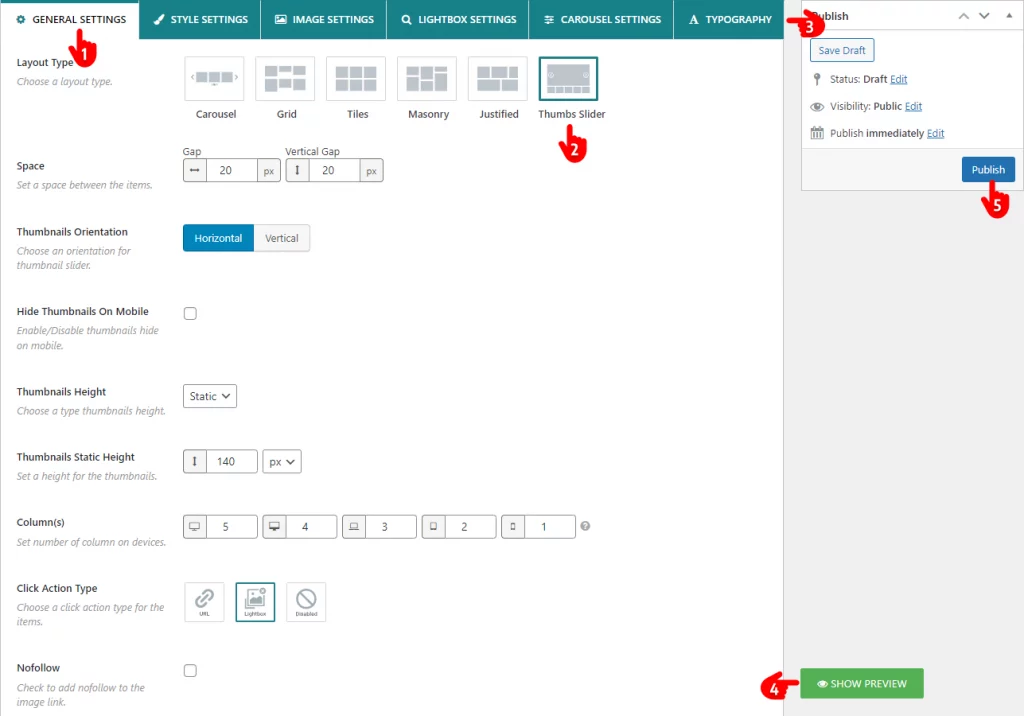
After adding images, dive into crafting your slider. WP Carousels offers you a wide range of powerful and easy-to-use customization features that allow you to utilize your creative power. Follow the simple steps below to create aesthetic and interactive sliders.

- Leave the GENERAL SETTINGS tab selected.
- Choose the Thumbnails Slider layout.
- Navigate through all 6 tabs to find all the features and apply them according to your requirements and user preferences.
- After trying some features, use the PREVIEW button at the bottom right to watch the slider’s appearance and interaction. If it still needs to be perfect, get back to revamping it. You don’t need to update the shortcode and refresh the page repeatedly.
- When your slider sounds perfect, hit the Publish or Update button at the top right.
Step 4: Publish the thumbnail slider
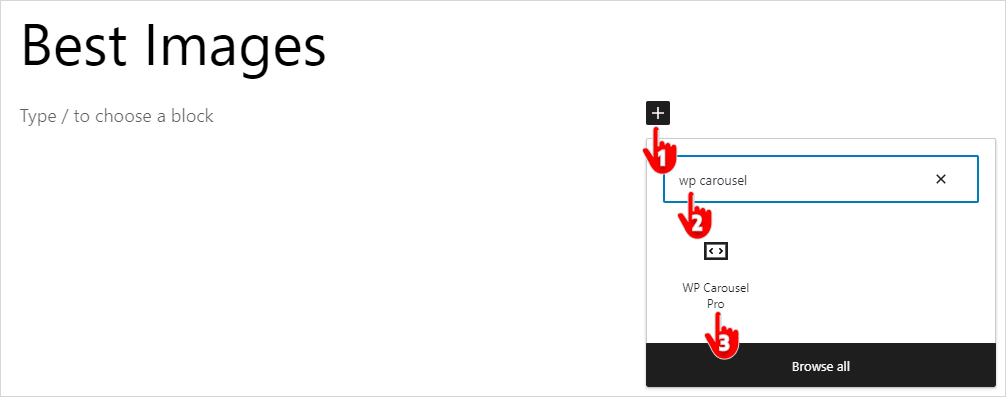
You have already published the slider shortcode you created. Now, copy the shortcode at the bottom and paste it anywhere you want to publish your carousel slider. Or, you can follow the steps below.


- First, click the plus icon.
- Type WP Carousel in the search bar.
- Click WP Carousel.
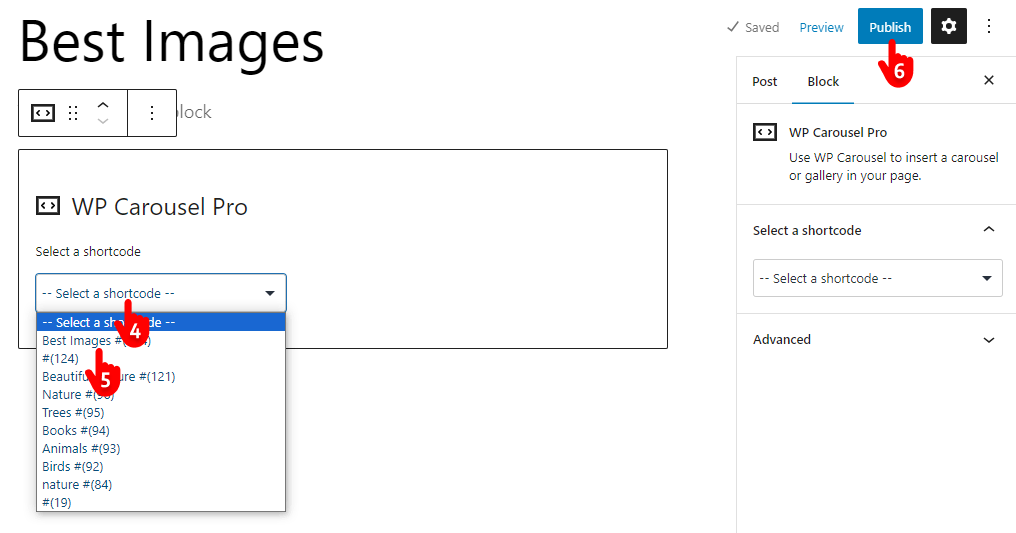
- Click the Select a shortcode.
- Select the shortcode.
- Hit the Publish or Update button at the top right corner.
Here is how a basic thumbnail slider looks.

Wrapping up
A thumbnail slider is a trendy and attention-grabbing way to showcase your key content. It’s highly aesthetic, interactive, and engaging.
WP carousel helps you create a thumbnail slider following only four simple steps above.
So, let’s create a thumbnail slider for your key content now.

Leave a Reply