In this blog, I’ll show you how to add a WordPress gallery lightbox in four simple steps.
World’s top image sites, including Freepik, Unsplash, and Pexels, have added powerful lightboxes to their galleries for a better visual experience.
Let’s get into it.
Table of contents
What is a WordPress gallery lightbox?
A WordPress gallery lightbox is a modal, popup, or overlay that appears over a WordPress gallery webpage dimming and disabling the rest of the background to show and slide single items for a better visual and interactive experience.
Besides it, the lightbox is also an excellent way for e-commerce sites to present products and boost sales.
Freepik’s lightbox

Unsplash’s lightbox

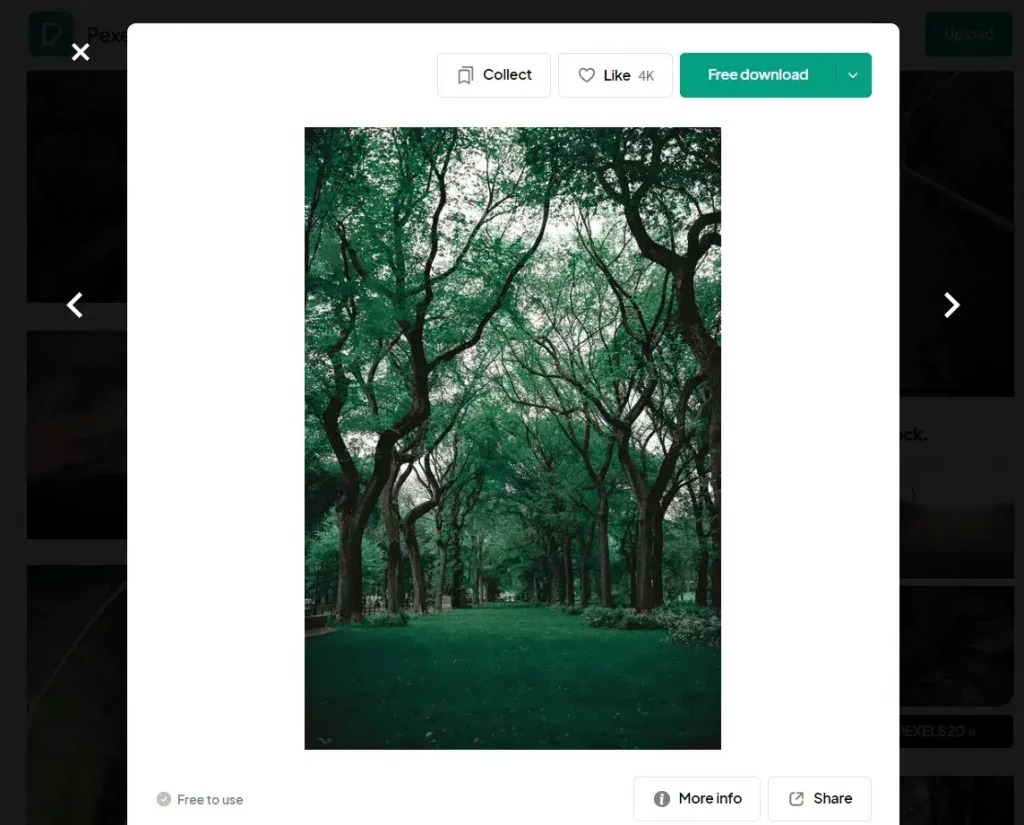
Pexels’s lightbox
4 Easy steps to add WordPress gallery lightbox
Follow these four simple steps to add a WordPress gallery lightbox seamlessly in minutes with no code.
Step 1: Install and activate WP Carousel Pro
It’s a powerful but easy-to-use slider and gallery plugin with a built-in full-featured lightbox.
Besides me, 60,000+ WordPress enthusiasts love this plugin to create mesmerizing sliders and galleries with lightbox effects.
Let’s install WP Carousel Pro.
However, if you need a guide on how to install and activate WP Carousel Pro, please read the documentation or watch this tutorial.
Feel free to reach out to the friendly support team for further assistance.
Step 2: Add images to your gallery
Once you install and activate WP Carousel Pro successfully, it must be at your WordPress admin sidebar, as seen in the following image.
Next, add images to your gallery with this powerful plugin with a built-in full-featured responsive lightbox.
Note: If you want to add a WordPress gallery lightbox to your existing gallery, revamp it with this plugin. It’s simple to create a WordPress photo gallery with WP Carousel.
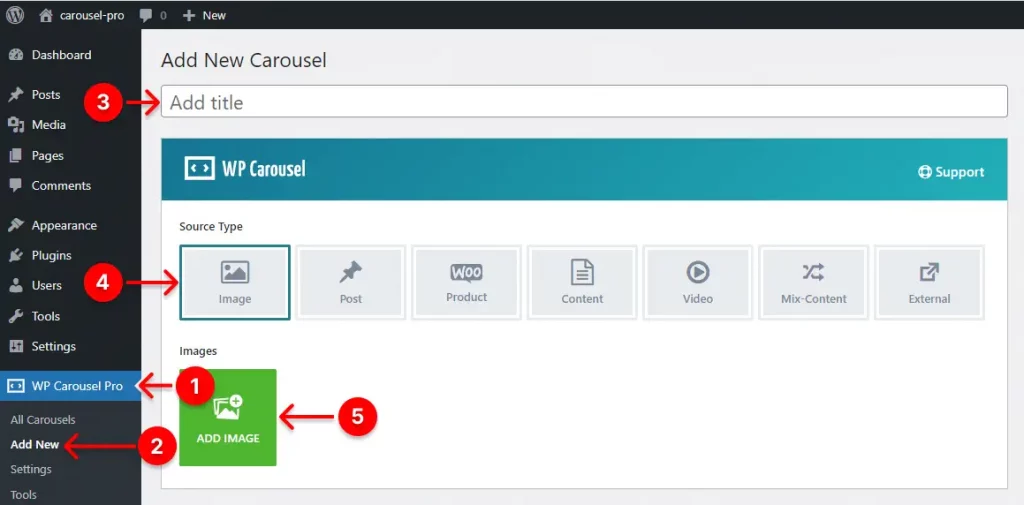
- First, click WP Carousel Pro.
- Next, Click Add New.
- Give your gallery a title.
- Leave the Image selected.
- Click ADD IMAGE. It will take you to your WordPress media library. There, select the images you want to create a gallery with.
However, if the images you want to add are unavailable, click Upload files (beside the Media Library) and follow the process to upload the images from your computer.
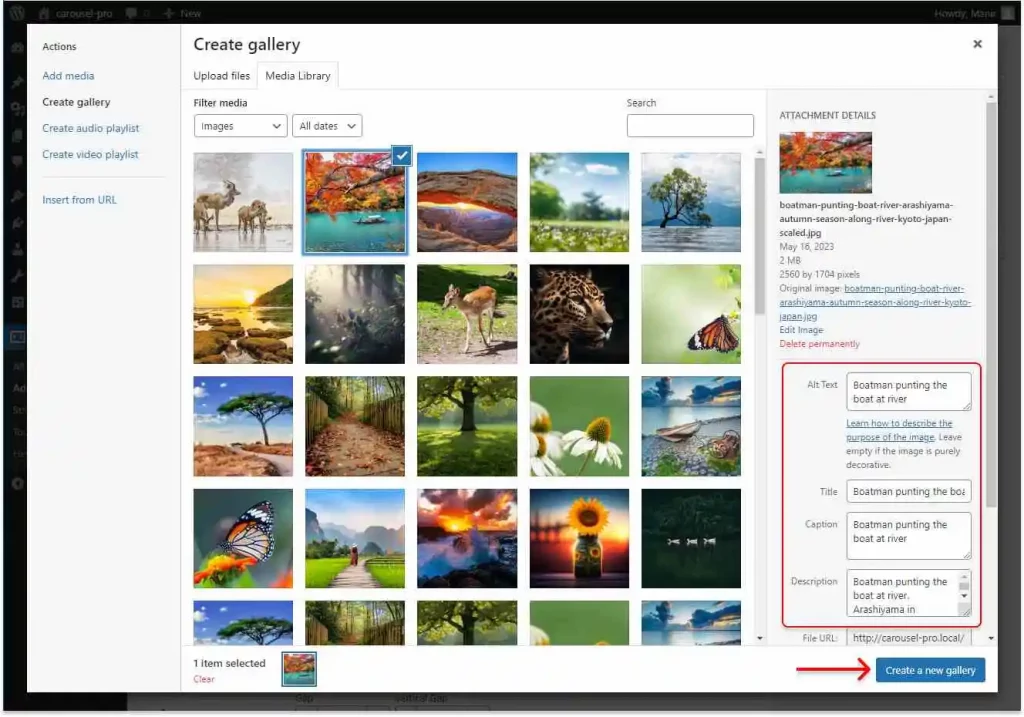
When you select an image in your WordPress media library, you will see a sidebar with text fields on the right. They allow you to add alternative texts, titles, captions, etc. Filling them out with phrases that refer to the image properly is always a good practice for SEO and accessibility. So, remember to fill them out.
After filling them out, click Create a new gallery. Then click Insert gallery.
The images have been added.
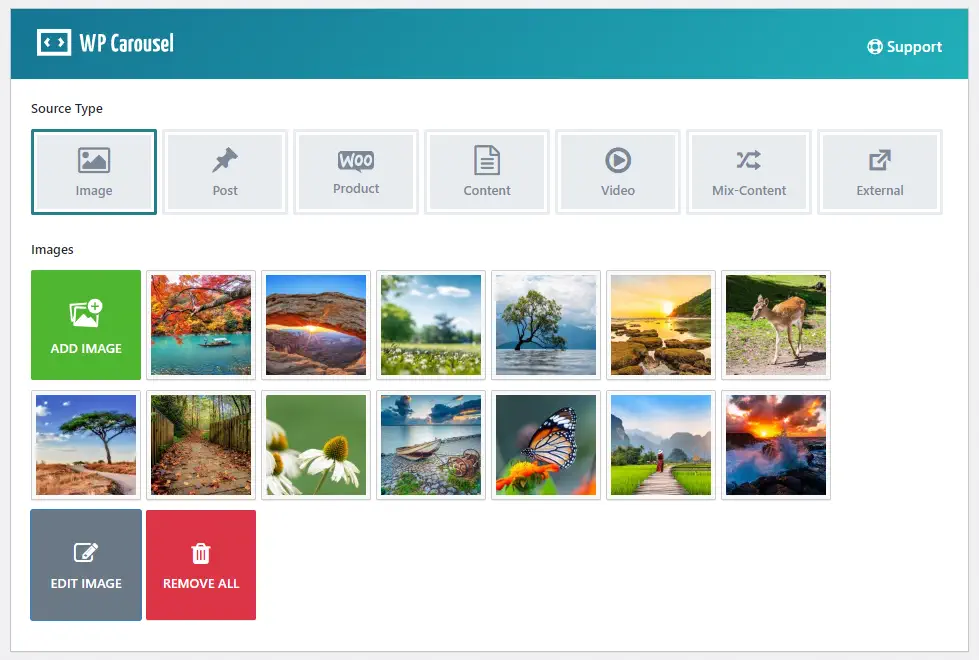
In addition, you can edit the images and remove all by clicking EDIT IMAGE and REMOVE ALL at the end of the images.
Step 3: Configure the lightbox
As mentioned above, WP Carousel Pro offers a built-in full-featured responsive WordPress gallery lightbox.
When configured right, it ensures an incredible visual and interactive experience.
Therefore, see the following screenshot and follow the easy steps to configure it.
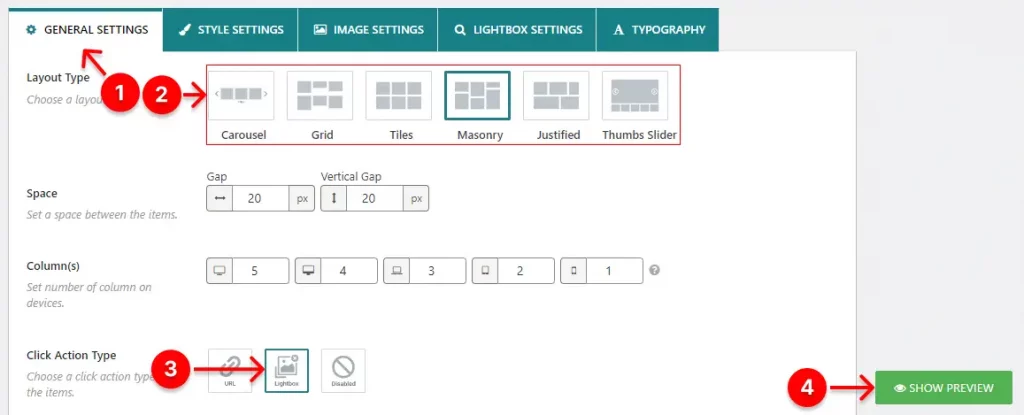
- Leave the GENERAL SETTINGS tab selected.
- Select Masonry or your favorite layout for your WordPress gallery lightbox.
- Keep Lightbox selected.
- You can see the preview by clicking the SHOW PREVIEW button on the bottom right side.
Great! The default lightbox has already been configured.
It shows:

Click an image here.
And see what the lightbox preview looks like.
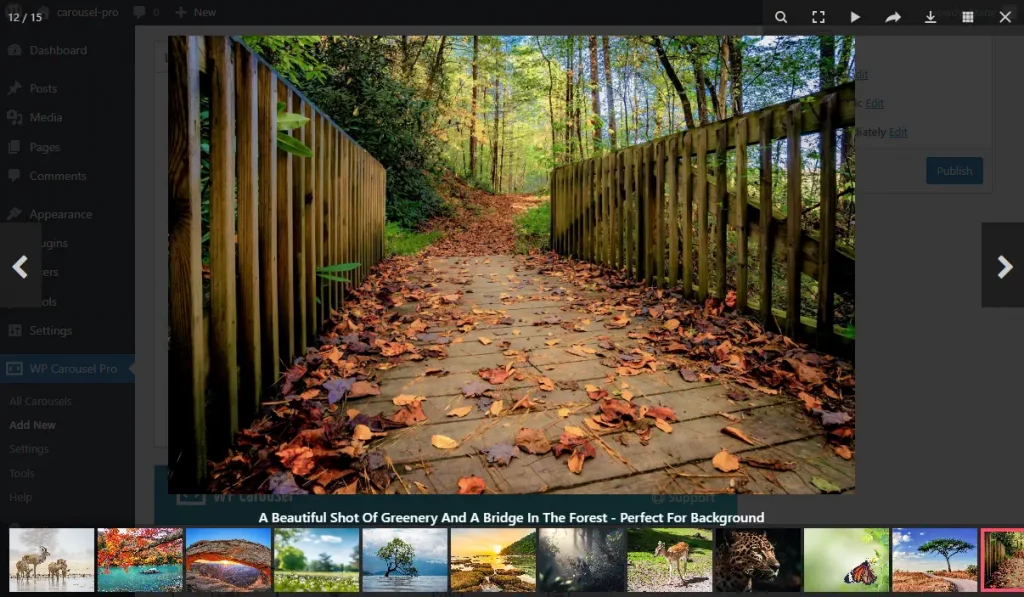
It looks appealing. Doesn’t it?
Let’s jump into the fourth tab, LIGHTBOX SETTINGS, to make your WordPress gallery lightbox more appealing and interactive.
That said:
Although we are now jumping over other tabs to keep the focus on adding a WordPress gallery lightbox, each has many robust features to make your WordPress image gallery more appealing and engaging.
So, I suggest you explore them and leave none of the necessary features untapped to make the best of your gallery.
Robust features of WP Carousel’s lightbox:
Now, let’s explore the powerful features of the WP Carousel Pro’s lightbox.
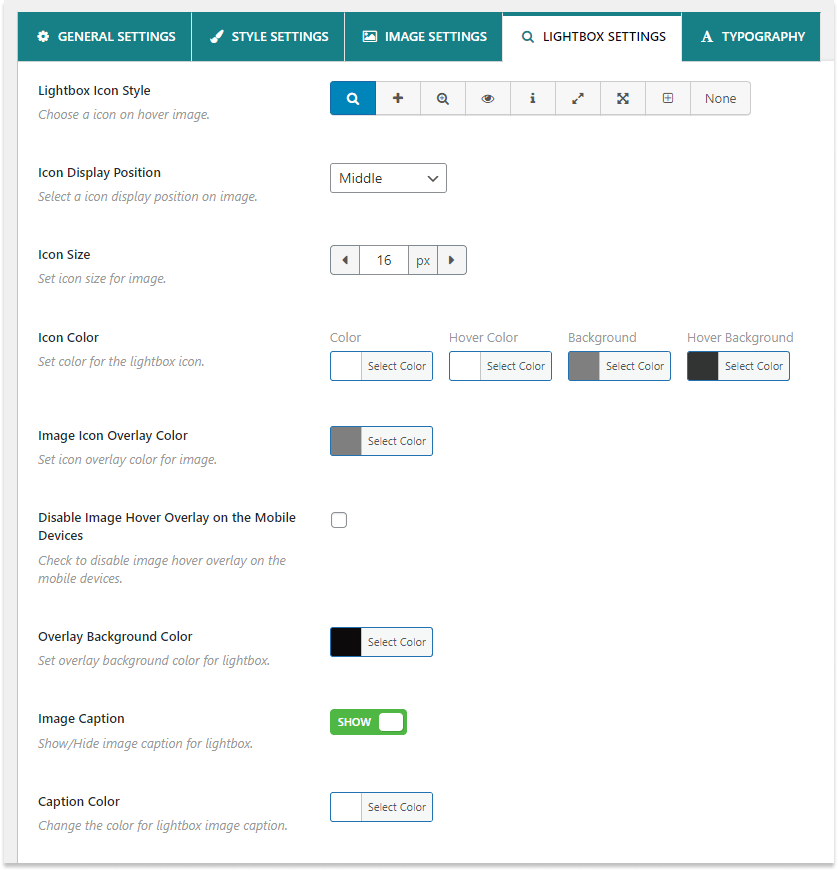
You can choose a lightbox icon and Customize its
- Position
- Size
- Color
- Hover color
- Background color
- Hover background color
- Overlay color
You can disable image hover overlay on the small devices.
It allows you to customize the overlay background color.
You can hide or show Image Caption and customize its color.
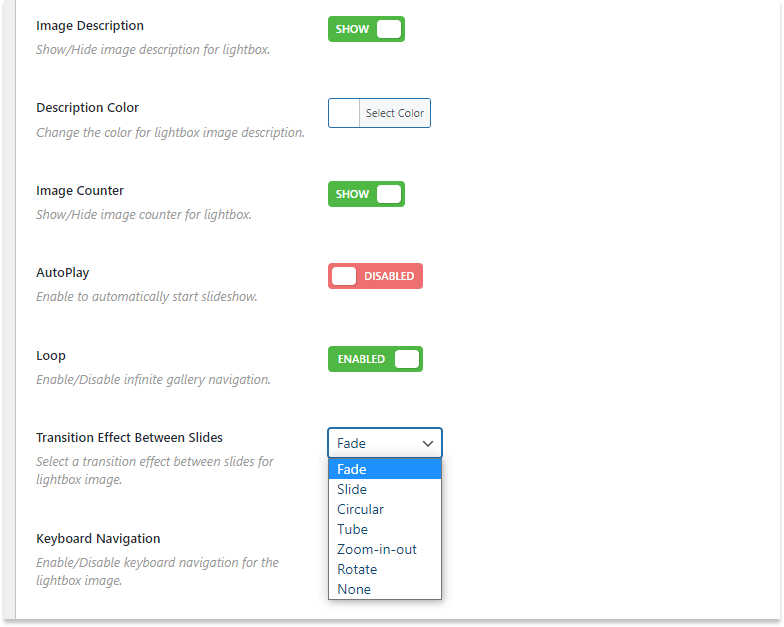
You can hide or show the Image Description and customize its color.
It allows you to hide or show the Image Counter.
Autoplay is a fantastic feature for your WordPress gallery lightbox. However, if you enable it, set the autoplay speed properly so the images won’t run away before your visitor see them thoroughly.
Infinite Loop, also called Endless Loop, is an important feature. It continually repeats your items when a visitor slides them. Consequently, you can put your item quantity limitation out of sight. Most importantly, select random ordering (available under the GENERAL SETTINGS tab) for your items when you enable the infinite loop.
You can choose any of 6 Transition Effects between slides:
- Fade
- Slide
- Circular
- Tube
- Zoom-in-out
- Rotate
Enable keyboard navigation.
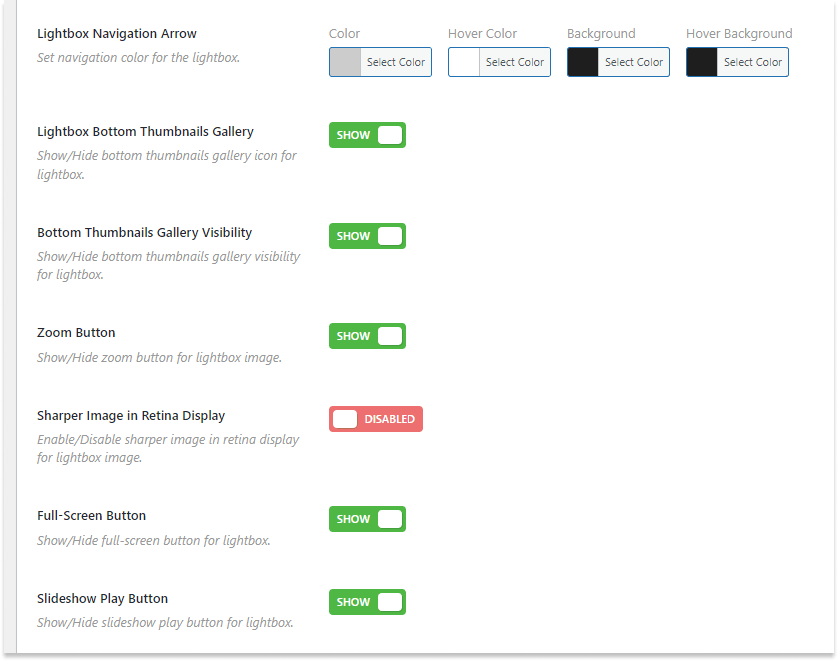
Customize the lightbox navigation arrow’s colors.
Show or hide the bottom thumbnails icon for the lightbox.
Display or hide the bottom thumbnails gallery for the lightbox.
Show the zoom button for a more extensive visual experience.
You can enable Retina Display for a sharper visual experience with higher pixel density.
Show the Full-Screen button on your WordPress gallery lightbox.
Display or hide the Autoplay button.
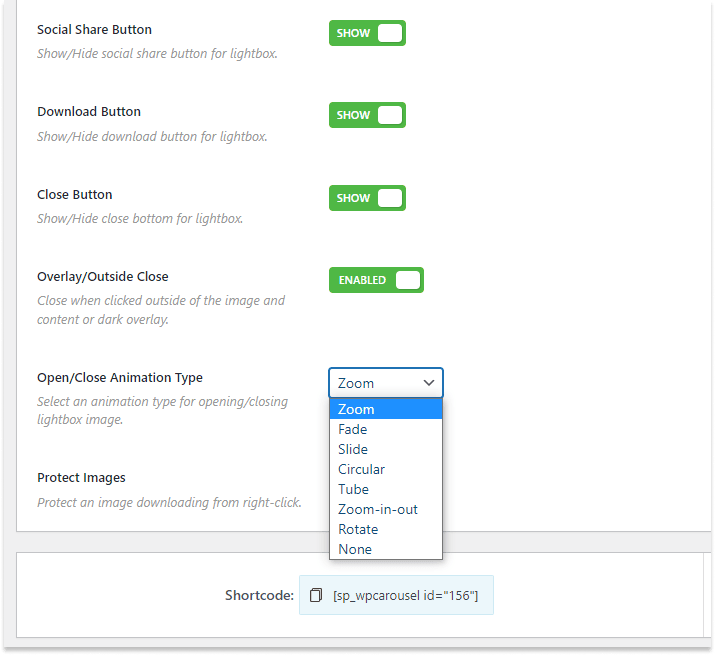
Show the Social Share button.
Display or hide the Download button.
Show the Close button.
Enable Overlay/Outside close with a click.
Choose an Open/Close Animation type:
- Fade
- Slide
- Circular
- Tube
- Zoom-in-out
- Rotate
You can enable or disable Protect Image. When you enable it, it prevents right-click downloading.
Step 4: Publish your WordPress gallery
After you design your gallery and configure the lightbox properly, find the Publish or Update button at the top right side.
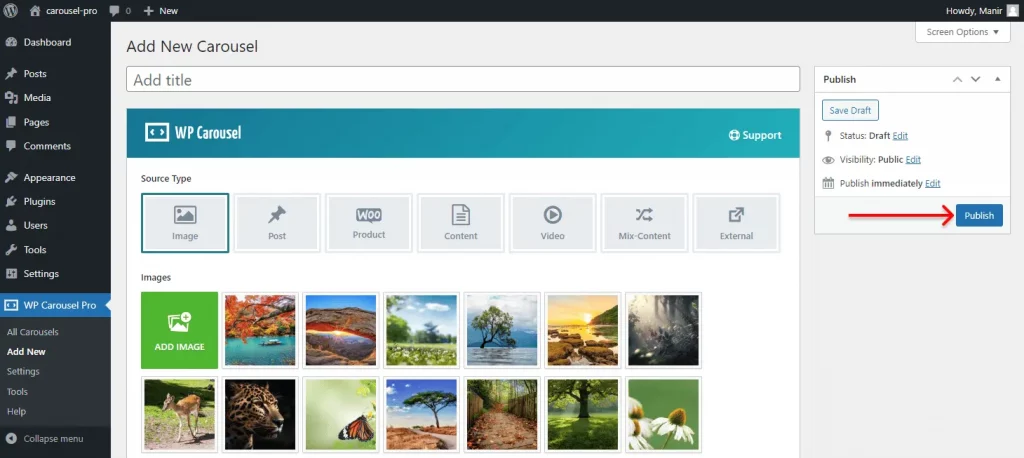
Click the Publish or Update button
After that, go to the page or post you want to display your WordPress gallery with the lightbox.
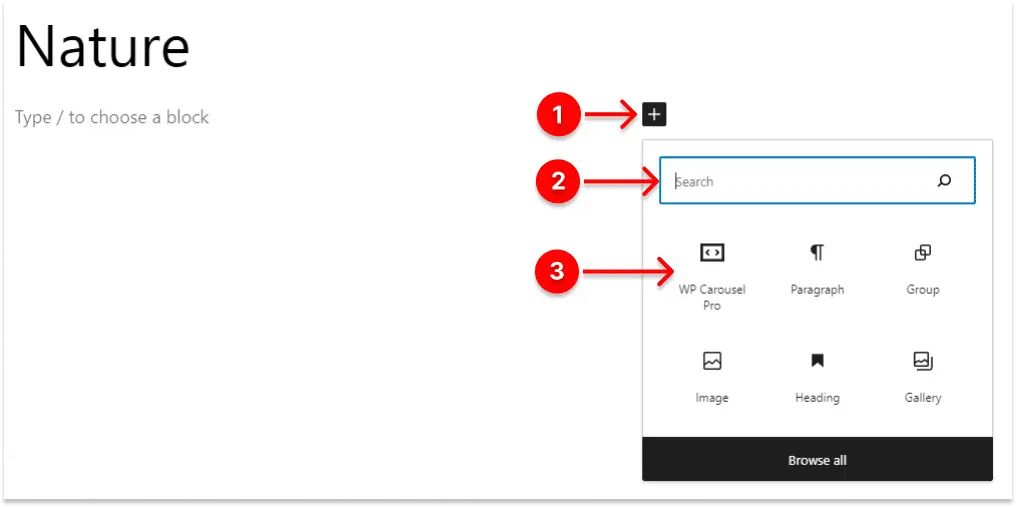
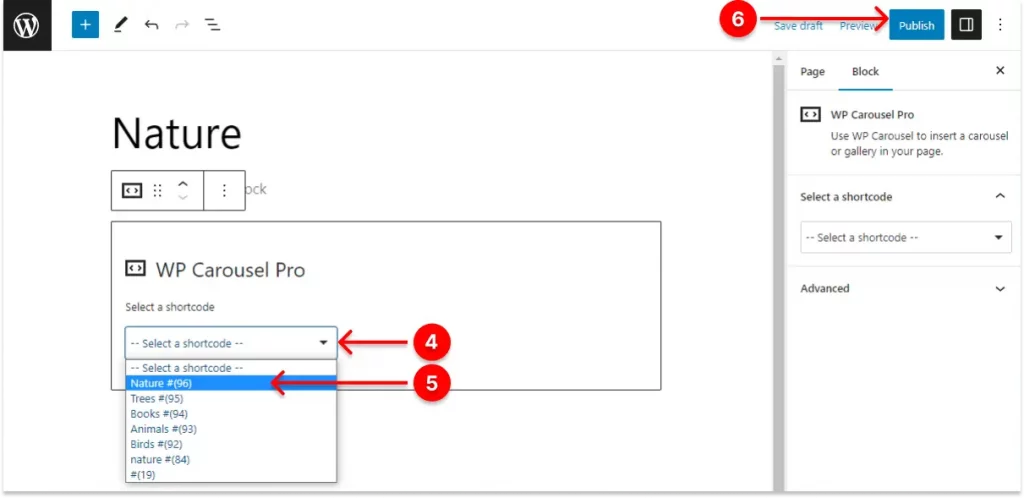
- First, click + (the plus icon).
- Next, type WP Carousel Pro in the search bar.
- Click WP Carousel Pro Gutenberg block.
- Click the dropdown. It will show the list of gallery titles (gallery shortcodes) you’ve created.
- Select the title or shortcode you want to publish.
- Finally, hit the Publish or Update button.
Congratulations! It’s done.
Let’s see how the WordPress gallery lightbox looks.
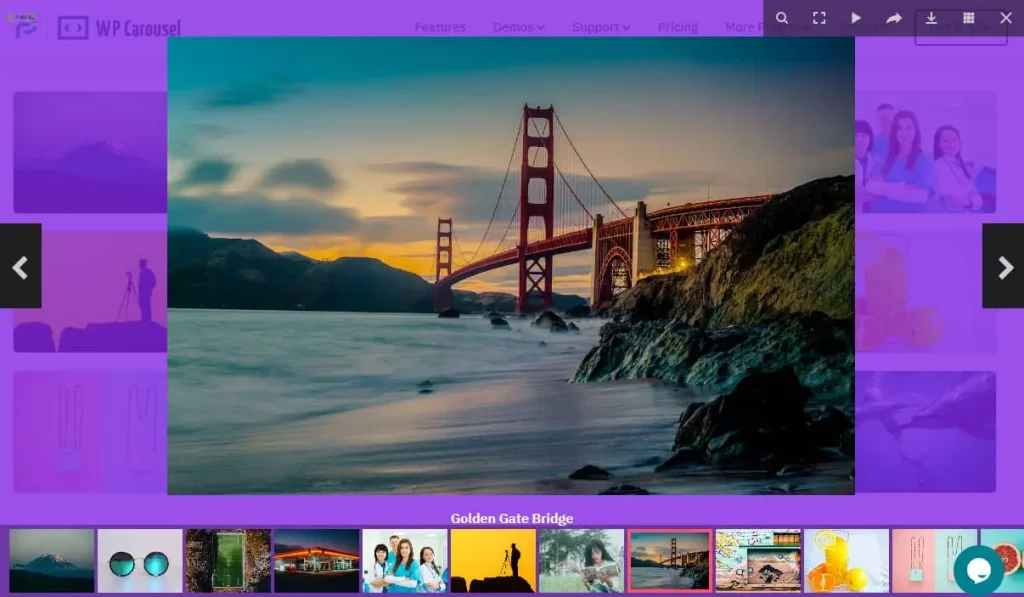
Some helpful icons are in the WordPress lightbox at the top right corner. These icons allow visitors to zoom in, view in full screen, play automatically, share, and download the image.
Plus, they can slide the images seamlessly with the right and left arrows.
In addition, they can watch multiple images at a glance and navigate them quickly.
Besides them, you can add many features as you need to make your WordPress gallery lightbox exactly how it should be.
Take away
A lightbox is a must if your website contains a small or big gallery. It ensures a better visual experience. Plus, it makes your gallery more interactive and engaging.
Moreover, by following only four easy steps, you can add your WordPress gallery lightbox in minutes with no code.
So, let’s do it now.
Thanks for reading. We love to read and reply to your comments. So, let’s talk more about it below.

Leave a Reply