Do you want to back up a WordPress site to protect it from data loss or unexpected design crash?
One wrong plugin update, a hacked login, server crash, or even a simple theme conflict can wipe out months—or years—of hard work in seconds.
It happens more often than you think: thousands of site owners face this nightmare every month, scrambling to recover posts, pages, products, media, and customer data.
You can prevent disaster completely with a proper backup strategy.
In this step-by-step guide, you’ll learn:
- The fastest, most reliable ways to back up your entire site (files + database)
- Free and premium tools that take just minutes to set up
- Automated daily/weekly backups so you never have to remember manually
- Where to store backups safely (not just on your server!)
- How to restore your site quickly if something goes wrong
Whether you run a blog, e-commerce store, portfolio, or membership site, protecting your WordPress data is non-negotiable– and it’s easier than you think.
Let’s get in.
What is Backing Up a Website?
Backing up a website means keeping a complete copy of your website so you can restore it if something goes wrong. The copy includes WordPress core files, your database, theme files, plugins, media, etc.
Why Backing Up Your Site is Important?
Backing up your WordPress site isn’t just a “nice-to-have” — it’s one of the smartest, most essential things you can do to protect your online business, reputation, and revenue.
Here’s why skipping regular backups can cost you dearly — and why having them in place is non-negotiable in 2026:
Human Errors Happen — Often
One accidental click — deleting the wrong page, overwriting files during a theme update, or installing a faulty plugin — can break your site or wipe out content. Without a backup, recovery means rebuilding from scratch, which takes hours, days, or even weeks.
Hacks & Malware Are Real Threats
WordPress powers ~43% of the web — making it a prime target. In 2025–2026, thousands of sites get compromised daily through vulnerable plugins, weak passwords, or outdated software. A clean backup lets you restore a secure version in minutes instead of paying thousands for emergency cleanup or losing your site forever.
Hosting & Server Failures Are Out of Your Control
Hard drive crashes, data center outages, hosting provider mistakes, or even accidental account deletions happen. If your host doesn’t keep reliable backups (or charges extra for restores), you’re left with nothing. Your own off-site backups give you independence and peace of mind.
Updates Can (and Do) Break Things
Core WordPress updates, plugin/theme updates, or PHP version changes frequently cause compatibility issues. A backup from before the update lets you roll back instantly — no downtime, no lost sales, no angry customers.
E-commerce & Membership Sites Have the Most to Lose
For WooCommerce stores or membership sites, backups protect:
- Orders & customer data
- Subscriptions & recurring revenue
- Reviews & testimonials
- Inventory & product settings Losing this data can mean lost revenue, compliance issues (GDPR/CCPA), and permanent damage to trust.
SEO & Traffic Recovery Is Brutal Without Backups
A hacked or broken site can get de-indexed, lose rankings, or trigger Google warnings. Restoring quickly from a backup preserves your SEO equity, backlinks, and organic traffic — minimizing long-term damage.
Migrations, Redesigns & Testing Become Risk-Free
Moving hosts, redesigning your site, or testing major changes? Backups let you experiment safely. If something goes wrong, you revert in minutes — no stress, no lost progress.
It Saves Time, Money & Stress
Professional recovery services charge $500–$5,000+ per incident. Automated backups cost pennies per month (or are free with good tools). The ROI is massive: one prevented disaster pays for years of protection.
Your WordPress site is more than a website — it’s your business, your portfolio, your voice, or your store.
One bad day without a backup can erase years of effort.
With reliable, recent backups, you turn potential disasters into minor inconveniences.
In the next sections, we’ll cover exactly how to set up bulletproof backups — automatically, securely, and affordably — so you never have to worry again.
How to Back Up Your Website with a Plugin (Easiest Way)
This is the easiest way to back up a WordPress website. We highly recommend it for beginners.
Top WordPress Backup Plugins
Here are the best Backup plugins for WordPress.
| Plugins | Users | Ratings | Reviews |
| UpdraftPlus | 3 million | 4.8 | 8,360 |
| Duplicator | 1 million | 4.9 | 4,853 |
| All-in-One WP Migration and Backup | 5 million | 4.5 | 7,615 |
| Jetpack | 3 million | 3.8 | 2,376 |
| Backuply | 600k | 4.5 | 127 |
How to Back Up a Website with UpdraftPlus
Step 1: Install UpdraftPlus
First, let’s install the plugin following the simple steps below.
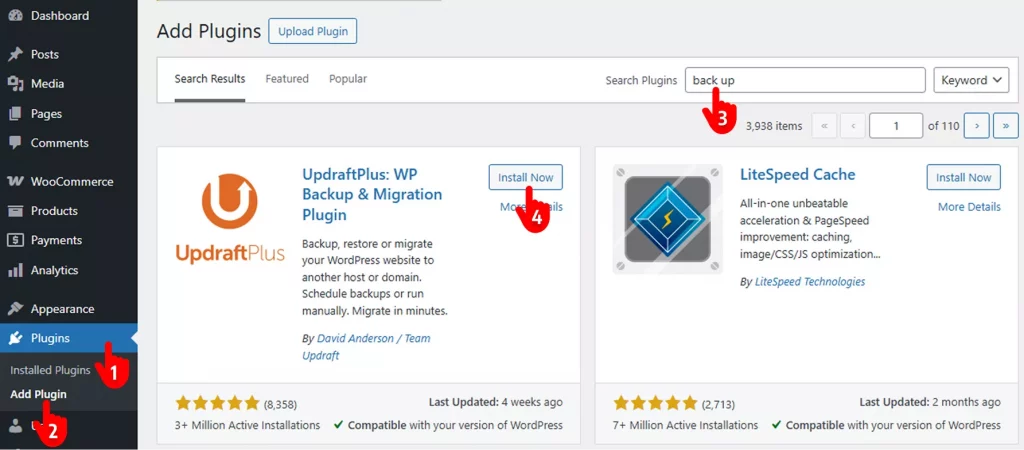
- Navigate to the Plugins on your WordPress admin sidebar.
- Click Add New
- Search back up or UpdraftPlus
- Click Install, then Activate
Step 2: Choose the Storage Options
Follow the simple steps below to choose the storage options.
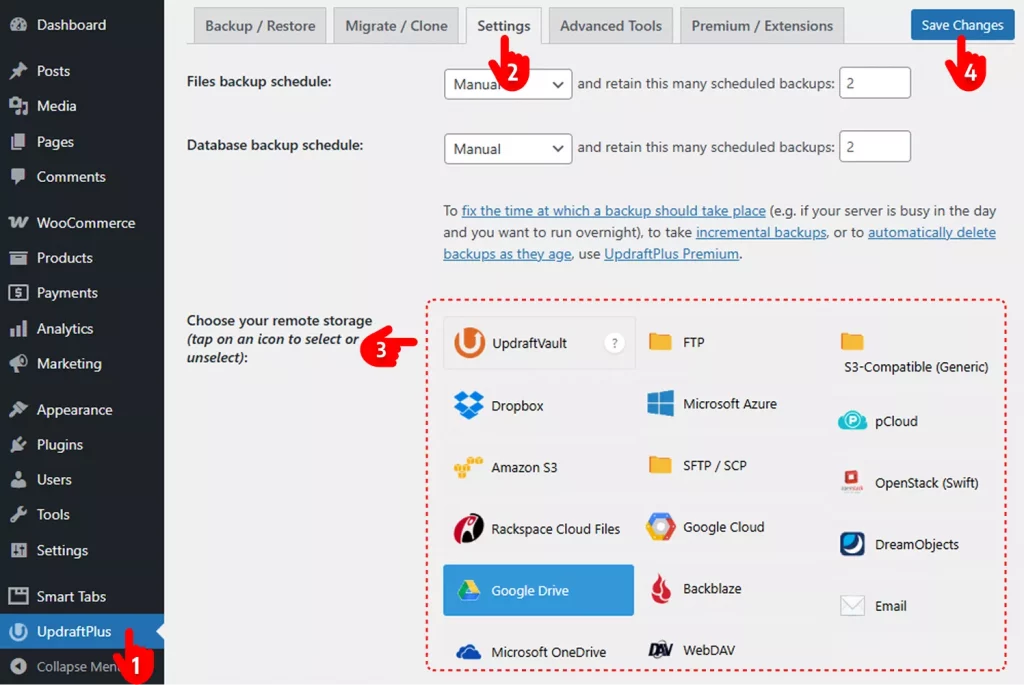
- Navigate to UpdraftPlus on your WP admin sidebar.
- Click the Settings tab.
- Choose Storage(s)
- Hit the Save Changes button.
Step 3: Back Up a Website Manually
Follow the easy steps below to back up your WordPress website manually.

- Navigate to the Backup/ Restore button.
- Click Backup Now. It may take a few minutes to be done. Scroll down to get your existing backup lists and restore any of them.
Back Up a Website Automatically
Follow the steps below to automatically back up your WordPress website.
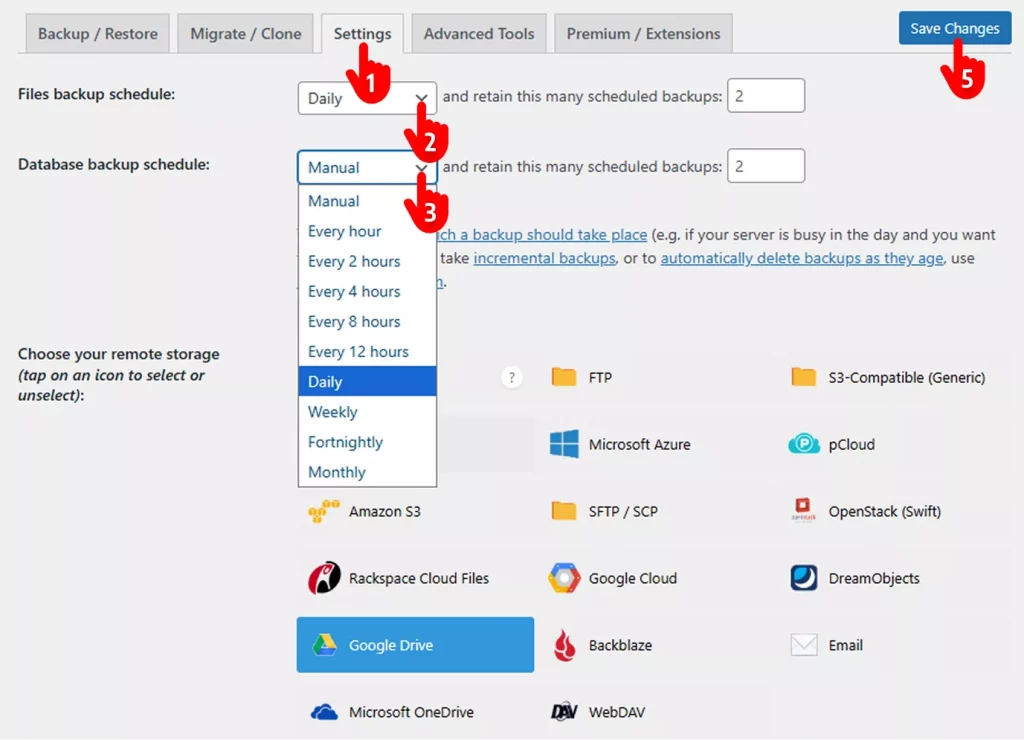
- Navigate to the Settings tab.
- Choose the Backup frequency
- You can set different backup frequencies for your files and database.
- Scroll down and configure as per your requirements.
- Finally, hit the Save Settings button.
How to Restore Your Backups?
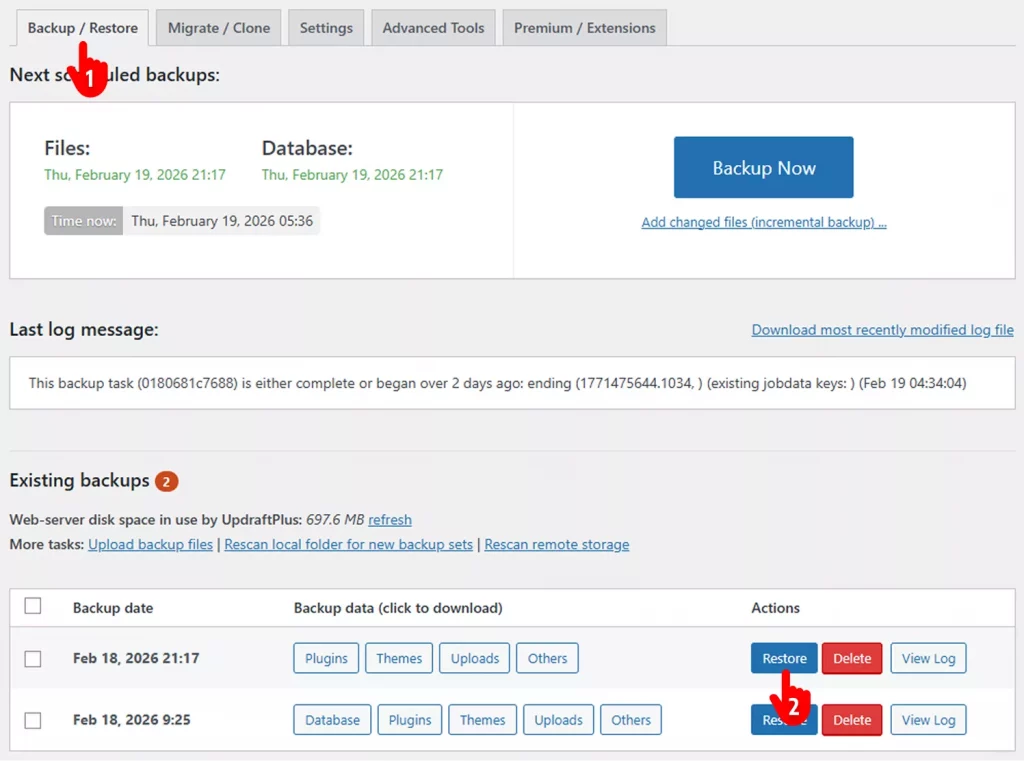
It’s simple. Navigate to the Back up/ Restore tab of UpdraftPlus. You will find a list of your existing backups at the bottom. You can restore anyone by clicking their Restore button and completing a very short, intuitive trip. It can take a few minutes.
How to Back Up a Website without a Plugin
You can back up your WordPress website without a plugin. Explore several methods below.
How to Back Up Your Website with Your Hosting Provider’s Backup Service
Most quality WordPress hosts (especially managed WordPress providers) include built-in backup services that are often easier, faster, and more reliable than manual methods like cPanel or FTP. These tools usually offer automated daily backups, one-click restores, and off-site storage — making them ideal for beginners and busy site owners.
The exact steps vary by host, but the process is similar across popular providers. Below are the common methods and examples from top hosts in 2026.
Step 1: Log In to Your Hosting Control Panel
- Access your hosting account dashboard (via email link or yourdomain.com/login).
- Look for sections like Dashboard, My Sites, Manage Hosting, or Control Panel.
Step 2: Locate the Backup Tool
Common locations and names by host (2026):
- SiteGround → Site Tools → Security → Backups
- WP Engine → Dashboard → Sites → Your Site → Backups
- Kinsta → MyKinsta Dashboard → Sites → Your Site → Backups
- Cloudways → Application Management → Backups
- Bluehost → My Sites → Manage → Backups (or Advanced → JetBackup)
- Hostinger → hPanel → Websites → Manage → Backups
- A2 Hosting → cPanel → JetBackup 5 or A2 Optimized WP → Backups
- Liquid Web / Nexcess → Manage Hosting → Backups
- Flywheel → Dashboard → Site → Backups
- DreamHost → DreamHost Panel → Manage Websites → Backups
If you don’t see a dedicated backups section, search your host’s knowledge base for “backups” or check the support chat.
Step 3: Create or Download a Backup
Most hosts offer these options:
- Automatic Daily Backups (enabled by default on managed hosts)
- These run every 24 hours (or more frequently on premium plans).
- You usually get 14–30 days of retention (older backups auto-delete).
- No action needed — they’re already saving your site.
- Manual Backup (On-Demand)
- Click Create Backup, Generate Backup, or Take Snapshot.
- Wait 2–15 minutes (depending on site size).
- You’ll get a notification when ready.
- Download the Backup
- Click Download or Export next to the latest backup.
- Files are usually .zip, .tar.gz, or proprietary format.
- Download to your computer/cloud storage.
- Off-Site Storage (Highly Recommended)
- Many hosts let you connect Google Drive, Dropbox, Amazon S3, or OneDrive.
- Set this up once — backups auto-upload off-site (follows 3-2-1 rule).
Step 4: Verify & Test Your Backup (Critical!)
- Download a recent backup.
- Restore it to a staging site (most managed hosts offer free staging).
- Check: Does the site load? Are posts, images, WooCommerce orders, and settings intact?
- Testing ensures the backup is usable — many users discover corrupted backups only during a crisis.
Step 5: Set Up Retention & Automation
- Adjust retention: Keep 30+ days if possible (premium plans often allow more).
- Enable real-time/incremental backups if available (e.g., Kinsta, WP Engine, BlogVault add-on).
- Turn on email notifications for backup success/failure.
How to Back Up Your Website via cPanel
Backing up your WordPress site through cPanel is straightforward, reliable, and completely free — perfect for a quick manual snapshot before updates, migrations, or major changes. You’ll create two essential files: one for all your site files (themes, plugins, images, etc.) and one for the database (posts, pages, settings, users, orders).
Follow these steps carefully.
Step 1: Log in to cPanel
- Open your browser and go to: yourdomain.com/cpanel (or the link provided by your host).
- Enter your hosting username and password to log in.
Step 2: Back Up Your Website Files
This includes WordPress core files, themes, plugins, uploads (images, videos, PDFs), and custom files.
- From the cPanel homepage, click File Manager (under the Files section).
- Navigate to the public_html folder (or the root folder of your site if it’s in a subdirectory).
- Select all files and folders:
- Click the checkbox at the top to select everything, or use Ctrl+A (Windows) / Cmd+A (Mac).
- Click Compress in the top toolbar.
- Choose Zip Archive as the compression type.
- Click Compress File(s).
- Once finished, right-click the newly created .zip file → Download it to your computer.
You now have a complete copy of every file on your site.
Step 3: Back Up Your WordPress Database
The database contains all your content (posts, pages, comments), user data, plugin settings, WooCommerce orders, and site configurations.
- Return to the cPanel dashboard.
- Click phpMyAdmin (under Databases section).
- On the left sidebar, select your WordPress database:
- Not sure which one? Open File Manager → find wp-config.php in your site root → open it → look for the line define(‘DB_NAME’, ‘your_database_name’);.
- With the database selected, click the Export tab at the top.
- Choose Quick export method (easiest).
- Set Format to SQL.
- Click Go.
- The .sql file will download automatically to your computer.
You now have a full export of your site’s content and settings.
What You Have Now
- Website Files → .zip archive (all themes, plugins, media, etc.)
- Database → .sql file (posts, pages, users, settings, orders)
Important: Store both files securely right away — upload them to Google Drive, Dropbox, OneDrive, or an external drive. Never leave backups only on your server.
Easier Alternative: Use the cPanel Backup Wizard
If you want everything in one file:
- In cPanel, go to Backup Wizard (under Files).
- Click Back Up.
- Select Full Backup.
- Choose Home Directory as destination and enter your email for notification.
- Click Generate Backup.
- Wait for the email → download the .tar.gz file when ready.
This single archive includes files + database + more — great for complete protection.
Quick Checklist
- Download both files immediately
- Store off-site (cloud or external drive)
- Test restoration on a staging site if possible
- Repeat before every major update or change
You’ve now created a solid, manual backup using only cPanel — no plugins required!
How to Back Up Your Website via FTP/SFTP
Backing up your WordPress site using FTP (File Transfer Protocol) or the more secure SFTP (Secure File Transfer Protocol) gives you direct, manual control over your files without relying on plugins or cPanel. This method is ideal for large sites, when plugins are unavailable, or for creating a quick snapshot before updates/migrations.
You’ll need:
- An FTP/SFTP client (recommended: FileZilla — free, reliable, supports both FTP and SFTP)
- Your FTP/SFTP credentials from your host (hostname/server address, username, password, port — usually 21 for FTP, 22 for SFTP)
Why Prefer SFTP Over FTP?
SFTP encrypts the connection — use it whenever available for security (most modern hosts support it).
1st Step : Install and Set Up FileZilla (or Another FTP Client)
- Download FileZilla from the official site: filezilla-project.org (free and open-source).
- Install it on your computer (Windows, Mac, Linux).
- Open FileZilla.
2nd Step: Connect to Your Server via FTP/SFTP
- In the top Quickconnect bar, enter:
- Host: Your server address (e.g., ftp.yourdomain.com, yourdomain.com, or IP address)
- Username: Your FTP/SFTP username (often the same as your hosting login)
- Password: Your FTP/SFTP password
- Port: Leave blank for auto-detect, or use 22 for SFTP (preferred) or 21 for plain FTP
- Click Quickconnect.
- If using SFTP: Select SFTP – SSH File Transfer Protocol from the Protocol dropdown in Site Manager (recommended for security).
- Accept the host key prompt if it appears (first time only).
- You should see a success message in the status area.
3rd Step: Download Your Website Files
- In the right pane (Remote site), navigate to your WordPress root folder:
- Usually public_html, www, yourdomain.com, or htdocs.
- Look for folders like wp-admin, wp-content, wp-includes to confirm you’re in the right place.
- Select all files and folders:
- Right-click in the remote pane → Select all (or Ctrl+A / Cmd+A).
- Download:
- Right-click the selection → Download.
- Choose a local folder on your computer (create a dated backup folder like “WP-Backup-2026-02-18”).
- FileZilla will transfer everything — this can take 5–60+ minutes depending on site size (images/uploads are usually the largest part).
- Monitor the transfer queue at the bottom — wait until it finishes (0 files queued).
You now have a complete copy of your site’s files (themes, plugins, media, wp-config.php, etc.).
Step 4: Back Up Your WordPress Database (Required for Full Backup)
FTP/SFTP only handles files — the database (content, posts, pages, users, settings, orders) must be exported separately via phpMyAdmin or a similar tool.
- Log in to your hosting control panel (cPanel, Plesk, etc.).
- Open phpMyAdmin (under Databases).
- Select your WordPress database:
- Check wp-config.php (via FTP) for the DB_NAME if unsure.
- Click the Export tab.
- Choose Quick method → Format: SQL.
- Click Go — the .sql file downloads automatically.
You now have the database backup (.sql file).
Step 5: Store & Secure Your Backups
- Move both the downloaded files folder (or zip it for compression) and the .sql file to secure off-site storage:
- Google Drive, Dropbox, OneDrive, external hard drive, or encrypted cloud.
- Follow the 3-2-1 rule: 3 copies, 2 different media types, 1 off-site.
- Encrypt sensitive backups if possible (most cloud services offer this).
- Label folders clearly (e.g., “Full WP Backup – Files & DB – Feb 18 2026”).
Best Practices for WordPress Backups
Backing up your WordPress site isn’t a one-time task– it’s an ongoing strategy to protect your content, revenue, and reputation. Following proven best practices ensures your backups are reliable, secure, and actually usable when disaster strikes (hacks, updates gone wrong, server failures, or accidental deletions).
Here are the essential best practices based on official WordPress guidance, expert recommendations, and real-world 2026 trends:
Back Up Both Files and Database – Every Time
A complete backup requires both:
- Files (themes, plugins, uploads/media, wp-config.php, .htaccess)
- Database (posts, pages, comments, users, settings, WooCommerce orders) Always create them together as a matched “set” (ideally at the same time) so restoration is consistent. Back up the database first, then files.
Automate Backups – Don’t Rely on Manual Effort
Schedule automatic backups using plugins or hosting tools. Frequency depends on your site:
- Daily (or real-time/incremental) for e-commerce, membership, or high-traffic sites
- Weekly for low-update blogs Automation eliminates forgetfulness—use plugins like UpdraftPlus, Duplicator, Solid Backups, or BlogVault.
Store Backups Off-Site (3-2-1 Rule)
Never keep backups only on your server—hackers or server crashes can wipe them out. Follow the modern 3-2-1 rule:
- 3 copies of your data (1 primary + 2 backups)
- 2 different storage types (e.g., server + cloud)
- 1 copy off-site (Google Drive, Dropbox, Amazon S3, Microsoft OneDrive, or private cloud) This protects against local failures and ransomware.
Keep Multiple Versions – Retain History
Store at least 3–5 recent backups (or more for high-change sites). Many plugins let you set retention (e.g., keep last 30 daily + 12 weekly + 6 monthly). Older versions help if a compromise went undetected for weeks.
Test Your Backups Regularly
A backup is useless if it won’t restore. Every 1–3 months:
- Download a backup
- Restore it to a staging/test site
- Verify everything works (content, images, plugins, WooCommerce data) Testing catches issues like corrupted files or incomplete databases early.
Choose Reliable, Secure Tools
- Plugins: UpdraftPlus (free/popular), Duplicator Pro (migration + backups), Solid Backups (formerly BackupBuddy), BlogVault (cloud-only, fast).
- Hosting backups: Many managed hosts (Kinsta, Liquid Web, WP Engine) offer daily/hourly automated backups + easy restores—use them as a baseline, but add off-site copies.
- Avoid free tools without encryption or off-site options.
Secure Your Backups
- Enable encryption (most good plugins support it)
- Use strong, unique passwords for backup storage accounts
- Store backups in read-only or tamper-evident locations if possible
- Never leave backups in public folders or unsecured emails
Backup Before Major Changes
Always create a fresh backup before:
- Updating core, themes, or plugins
- Installing new plugins
- Migrating hosts
- Major redesigns or content imports This lets you roll back instantly if something breaks.
Monitor & Integrate with Security
Combine backups with monitoring: Use security plugins (Wordfence, Sucuri) to alert on changes, then back up post-alert. Some tools (e.g., BlogVault) include malware scanning during backups.
Document Your Recovery Process
Write down (or screenshot) your exact restore steps. In a crisis, panic makes mistakes—having a clear checklist saves time and reduces errors.
Quick 2026 Summary Checklist
- Automate daily/weekly backups
- Store off-site (cloud) + keep 3–5 versions
- Test restores quarterly
- Encrypt backups
- Backup before any update/change
- Use trusted plugins/hosting tools
Following these practices turns backups from a chore into your site’s unbreakable safety net. One solid setup can save you thousands in recovery costs and lost revenue.
Leave a Reply