Are you looking for a way to showcase your testimonials attractively and engagingly?
If so, then you’ll want to check out this guide on how to create a testimonials grid or masonry in WordPress. With this tutorial, you will be able to create a grid or masonry layout of your testimonials quickly and easily!
So what are you waiting for?
Start learning Now!
How to create a testimonials grid or masonry in WordPress
When it comes to displaying testimonials on your WordPress website, you can use different layouts.
Grid and masonry layouts are great for displaying testimonials. However, WordPress default settings or most of the testimonials plugins don’t allow displaying testimonials in grid or masonry layout.
That’s why you must use dedicated testimonials plugin. Here, I will use a popular testimonials plugin; Real testimonials pro.
So, install and activate the Real testimonial pro plugin.
Step one: Create testimonials for displaying on your WordPress website.
I have already installed and activated the Real testimonial pro plugin. It is time for creating testimonials.
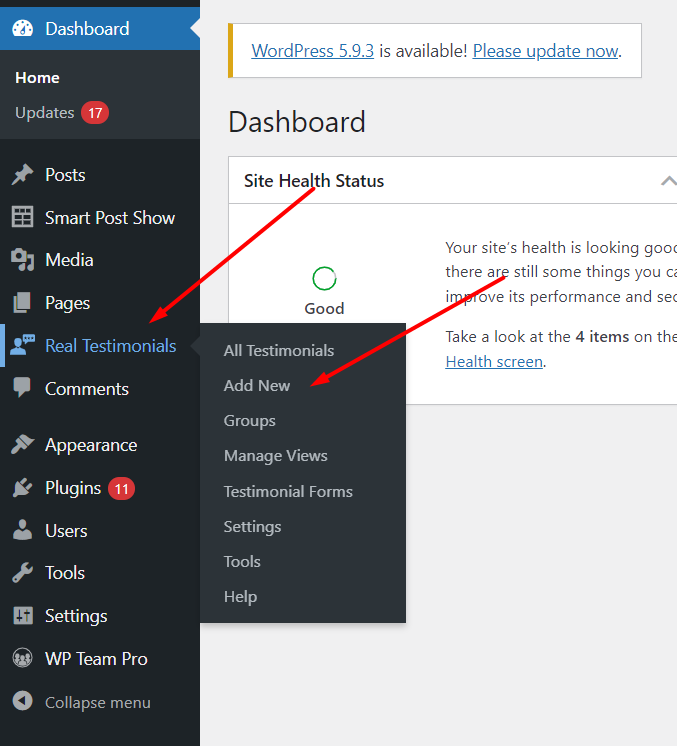
At first, go to WordPress dashboard, then navigate Real testimonial. After that, click on Add New.
Now, type the testimonial title in the title box. Next, write the testimonial in the text editor. After that, add reviewer information. You can add reviewer information such as full name, email address, identity, company name, phone number, location, rating, etc.
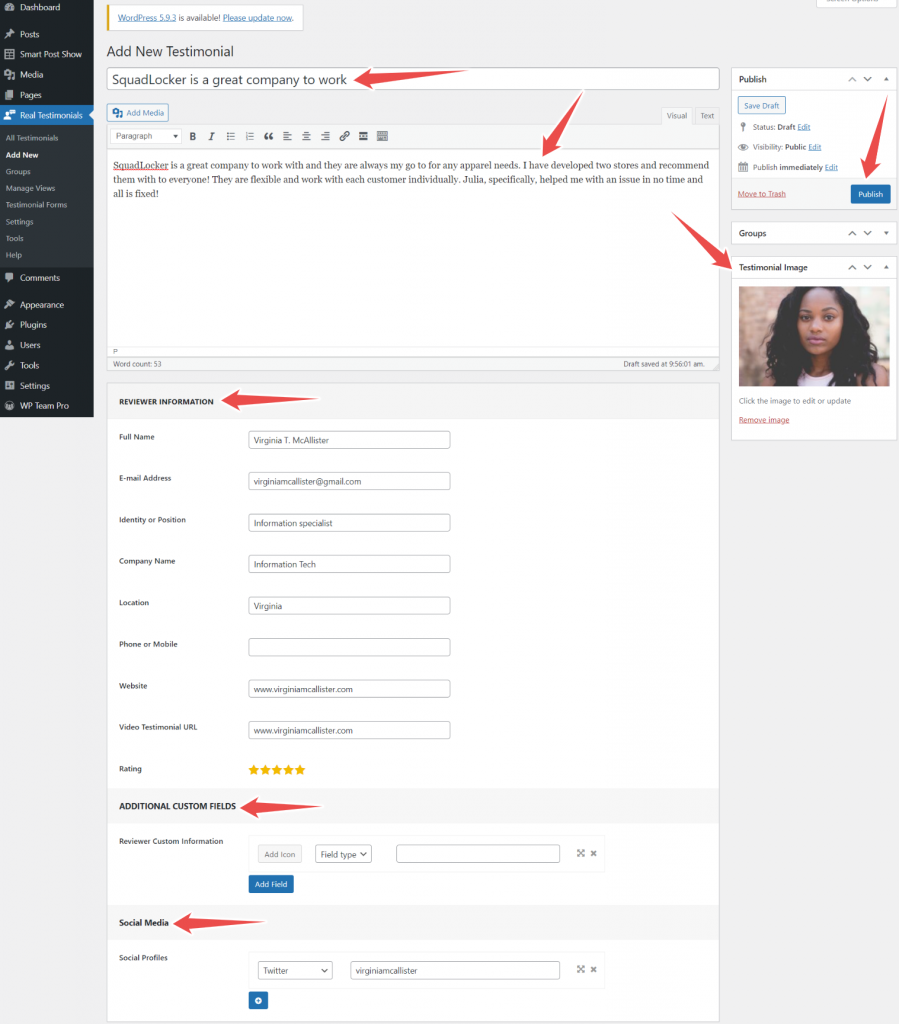
Moreover, you can add the video testimonial’s URL. You can also add social media profiles such as Facebook, Youtube, Twitter, Instagram, Linkedin, etc.
Furthermore, you can add any custom field you wish to, using Additional custom field options.
Finally, add the testimonial image and hit the publish button.
Repeat this process for adding as many testimonials as you want to create.
You have completed adding testimonials.
What’s next?
In the next step, I will show how to display testimonials in grid or masonry.
Step two: Creating a testimonials grid or masonry.
In the previous step, I created testimonials. In this step, I will display testimonials in grid or masonry.
So, let’s display testimonials in grid or masonry.
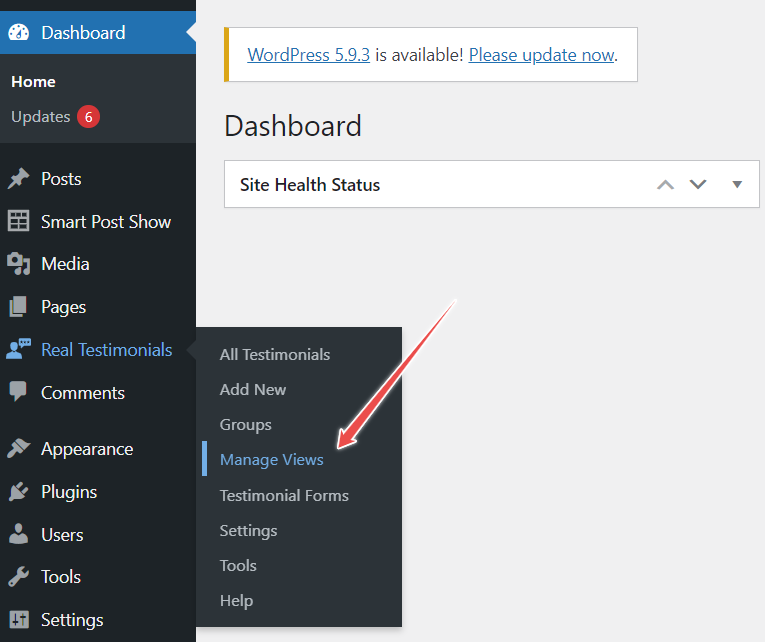
Again get back to WordPress Dashboard and navigate Real testimonials.
Now, click on Manage Views.
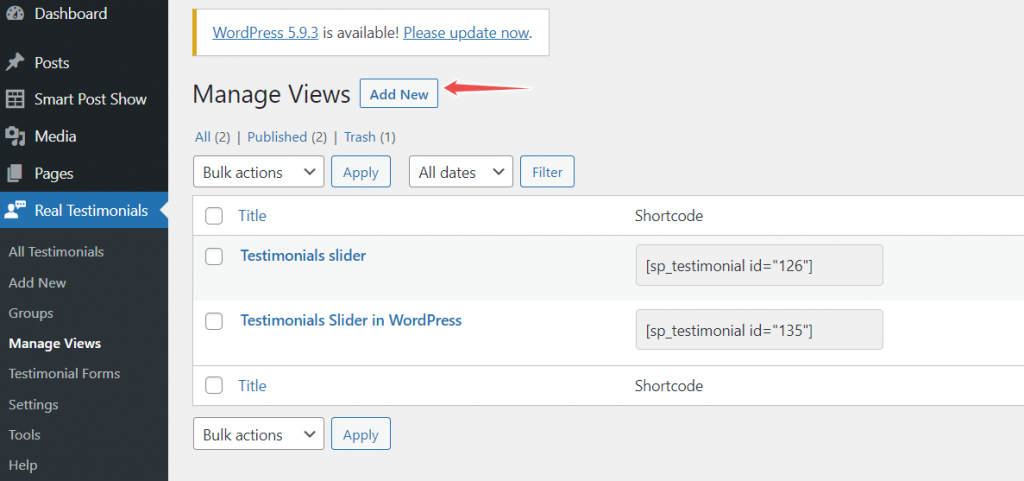
After that, click on Add new. Then, type the view’s title.
Navigate to General Settings and choose Grid or Masonry as layout preset.
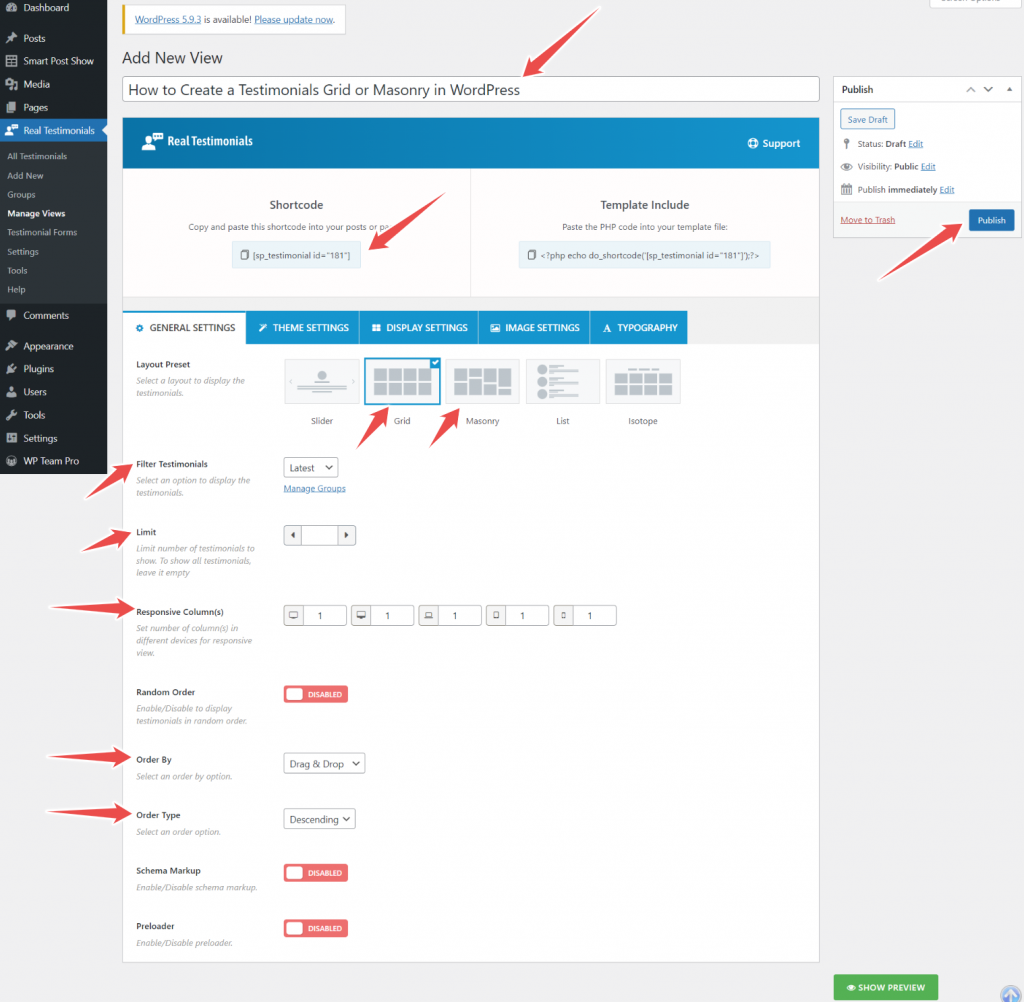
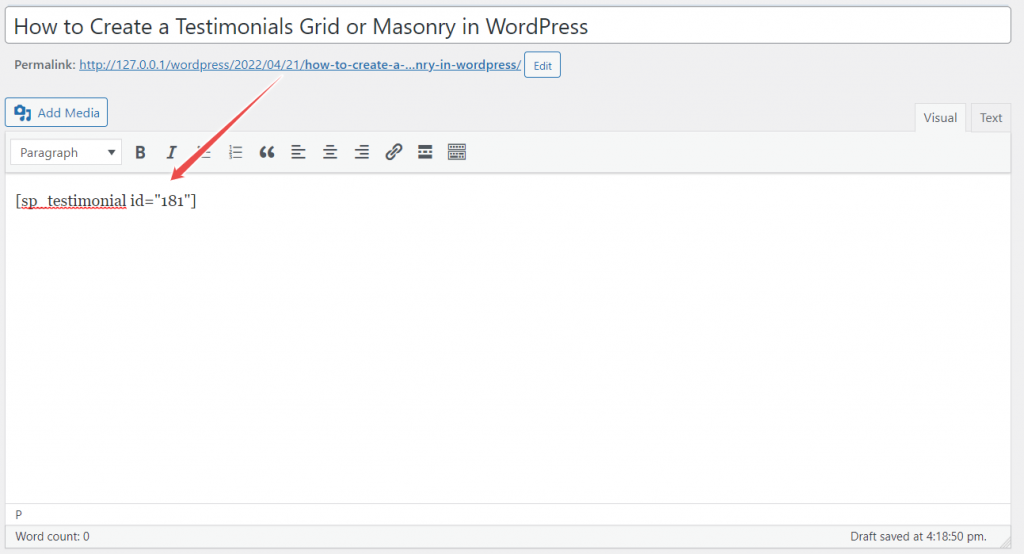
Hit the publish button, and you are done with creating testimonials in grid or masonry layout. Copy and paste the shortcode where you want to display testimonials in grid or masonry.
*Note: you can quit reading here if you don’t want to customize testimonials’ appearance.
Step three: Customizing testimonials appearance
The Real testimonials pro plugin offers wider customizations.
General Settings
For testimonials appearance customization, at first, navigate to the General Settings.
If you want to show specific testimonials or exclude any testimonials use Testimonial filters. If you want to show the latest testimonials, keep the testimonial filter settings unchanged. For this post, I will use the default setting.
Moreover, you can select the maximum number of testimonials you want to display using the Limit option. If you want to show all testimonials, keep the limit option blank.
You can also select maximum columns for specific devices. The default setting is the single column for all devices.
Furthermore, you can select Order by and Order type. Plus, enable/disable Random order, Schema markup, and Preloader.
Theme Settings
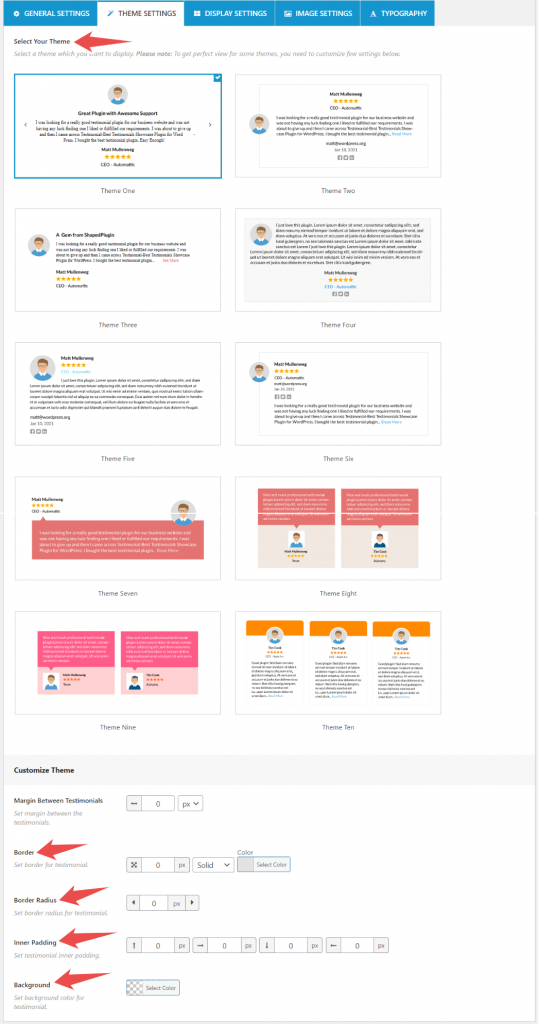
From the Theme Settings, you can choose from ten themes. Choose which theme you like most. Also, you can change the testimonial’s background color, set border radius, inner padding, and more.
Display Settings
The Display Settings allow you to make testimonials more appealing. You can show/hide the testimonial’s section title and average rating.

From the Display Settings’ Testimonial Content section, you can show/hide the testimonial’s title and content, and the read more button. Plus, you can set testimonials title’s character length and content length. Moreover, you can choose content display type and HTML tag for testimonials’ title.
Additionally, you can show/hide the reviewer’s full name, ratings, position, company name, location, phone, email, date, website, custom field, and social profile.
Image Settings
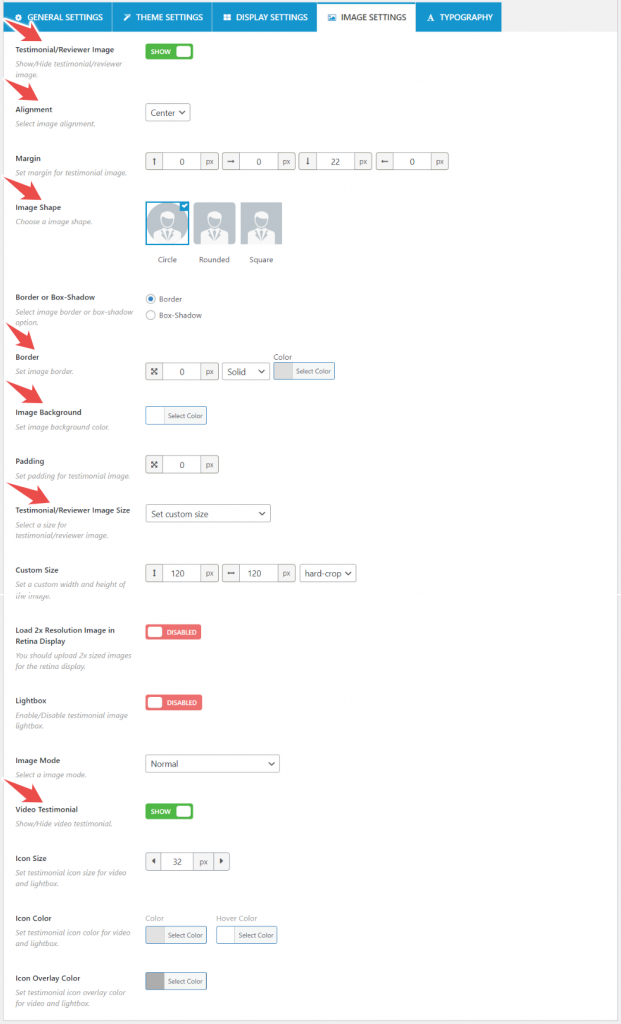
Using the Image Settings, you can show/hide the reviewer’s image, change the image size, and choose the image background. Also, show/hide video testimonials.
Typography
The Typography option allows you to choose the font’s family, size, color, background color, line height, margin, text alignment, letter spacing, etc.

This is how you can make your testimonials look great.
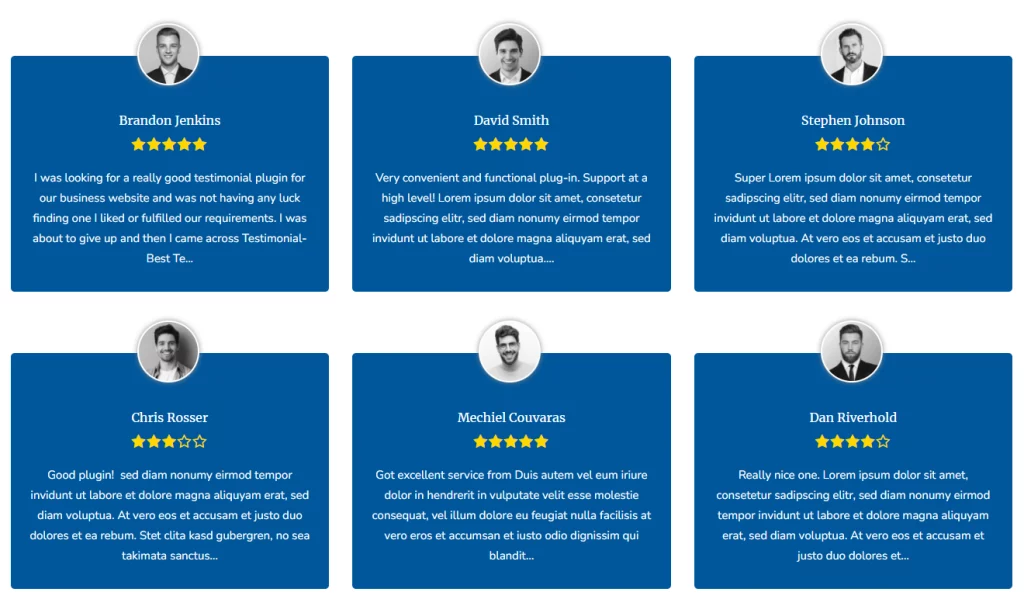
Here is the testimonials in grid look like.
Final words
If you want to try creating a testimonials grid or masonry in WordPress, the process is pretty simple. Just follow these steps: 1) Install and activate the plugin called Real Testimonial Pro; 2) Create testimonials ; 3) Create testimonials grid or masonry and 4) Customize testimonials appearance to match your needs. That’s it!
You should now see your testimonials grid or masonry on your website.
Have you tried creating a testimonials grid or masonry in WordPress? What tips do you have for others who want to give it a try?

Leave a Reply